This site is supported by our readers. We may earn a commission, at no cost to you, if you purchase through links.

A single clipper guard number separates a sharp high fade from a patchy mess. Most guys who attempt high fades at home end up with harsh lines or uneven transitions because they don’t understand how guard numbers work together.
The secret isn’t just knowing that a #1 guard leaves ⅛ inch of hair—it’s understanding which guards to combine, where to start the high fade, and how to blend between lengths without creating visible steps. High fade guard numbers follow a specific progression that barbers use to build clean, consistent results every time.
Once you know the system, you can communicate exactly what you want to your barber or replicate professional-looking fades yourself.
Table Of Contents
- Key Takeaways
- What Are High Fade Guard Numbers?
- Clipper Guard Number System Explained
- Choosing Guard Numbers for a High Fade
- High Fade Techniques Using Guard Numbers
- Best Guard Number Combinations for High Fades
- High Fade Guard Numbers for Different Hair Types
- Avoiding Common High Fade Mistakes
- Maintaining and Cleaning Clipper Guards
- Top 4 Clipper Guard Products for High Fades
- Tips for Communicating High Fade Guard Numbers
- Frequently Asked Questions (FAQs)
- Conclusion
Key Takeaways
- High fades rely on a tight guard progression—typically 0 through 3—where each number increases hair length by 1/8 inch, and the real skill lies in blending these transitions smoothly rather than just knowing individual guard sizes.
- Starting your fade with a zero guard at the base and moving to a one around the ear, then a two near the crown creates the sharp contrast that defines a high fade, while wider guard jumps like 0-2-4 soften the look by stretching the fade vertically.
- Hair texture dictates your guard choices more than most people realize—thick hair needs longer starting guards like a 3 to avoid a scalloped look, while fine hair shows more scalp and requires starting with a 1 or shorter for crisp definition.
- The clipper lever adjusts blade exposure mid-pass to create micro-length changes between guards, giving you smoother transitions than any guard swap alone, which is why professionals use it to eliminate harsh lines without switching attachments.
What Are High Fade Guard Numbers?
A high fade is one of the sharpest haircuts you can get, but the magic happens with the right clipper guard numbers.
For detailed guidance on guard sizes and when to switch to clipper-over-comb techniques for seamless blending, mastering both approaches creates the cleanest high fade results.
The guards you choose determine where the fade starts, how tight it cuts, and how smooth the blend looks from bottom to top.
Here’s what you need to know about high fade guard numbers and how they shape the final result.
Definition of High Fade
A high fade starts high on the head near the temples, creating a strong contrast between short sides and longer top hair. This bold haircut style emphasizes sharp edges and a dramatic silhouette.
- The fade transitions quickly from very short sides to your top length
- The high starting point sits in the temple region of the scalp
- It pairs well with short top haircut basics like buzz cuts and crew cuts
- The technique delivers a modern, attention-grabbing variation of classic fade styles
For more on specific high fade haircut types, see the full breakdown of this style.
Common Guard Numbers Used
Most high fades rely on a narrow range of clipper guard numbers to build that sharp shift. You’ll work primarily with guards 0 through 3, though some styles push to 4 for softer blends.
| Guard Number | Hair Length Left | Typical Fade Position |
|---|---|---|
| 0 | 1/16 inch (1.5 mm) | Fade base or skin line |
| 1 | 1/8 inch (3 mm) | Lower blend zone |
| 2 | 1/4 inch (6 mm) | Mid-transition area |
| 3 | 3/8 inch (9 mm) | Upper fade or crown approach |
| 4 | 1/2 inch (12 mm) | Top-side connection (optional) |
These guard size options form the foundation of nearly every fade technique.
How Guard Numbers Affect Fade Height
Guard number choices directly control where your fade stops climbing. A zero guard at the bottom paired with a two at the crown creates a compressed, tight fade height. Swap that two for a four, and the fade stretches higher, softening the contrast.
Guard numbers control fade height—lower progressions create tight, sharp contrast while higher numbers stretch the fade and soften the look
- Lower guard progressions (0-1-2) keep fade height compact and sharp
- Wider guard jumps (0-2-4) extend fade gradation zones vertically
- Hair texture impact determines how visible each guard step appears
- Clipper guard numbers set the boundary between skin and length
- Fade height control depends on where you switch each guard size
Clipper Guard Number System Explained
Understanding clipper guard numbers is the foundation of any successful high fade. Each guard corresponds to a specific hair length, and knowing these measurements lets you plan your fade with precision.
Here’s what you need to know about how the numbering system works across different brands and lengths.
Guard Number to Hair Length Chart

Understanding clipper guard numbers unlocks precise cutting lengths every time. A guard number to hair length chart shows that zero cuts to skin, one yields 1/8 inch, two gives 1/4 inch, and three provides 3/8 inch.
Each number increases by 1/8-inch increments up to guard eight at one full inch. This clipper guard size chart ensures you control fade techniques and hair length measurements with accuracy.
For more details on specific sizing, refer to this helpful hair clipper guard size chart.
Standardized Guard Sizes Across Brands

Most major brands align their guard numbers to universal sizing, but clipper guard sizes aren’t perfectly identical. A number two Wahl measures 1/4 inch, while Andis and Oster clipper guard sizes usually match that length within a millimeter. Guard size variance of ±0.5 mm to ±1 mm exists across brands, so always check each manufacturer’s guard size chart for precision fades.
- Brand compatibility matters when mixing guards from different manufacturers during detailed fade work
- Clipper standards guarantee fade clipper guard sizes fall within predictable 1/8-inch increments across most products
- Guard material affects durability—rigid ABS plastic maintains consistent cutting accuracy better than flexible alternatives
- Guard numbers use the same numbering convention industry-wide, making communication easier despite minor measurement differences
Visual Guide to Guard Numbers

When you’re lining up your guards before a cut, a quick reference chart prevents guesswork. Below you’ll find Clipper Guard Numbers mapped to precise hair length guides—essential for mastering fade techniques and guard selection tips.
Different taper fade haircut styles require specific guard combinations, so knowing which numbers create clean transitions makes all the difference.
| Guard Number | Hair Length |
|---|---|
| 0 | 1/16 inch (1.5 mm) |
| 1 | 1/8 inch (3 mm) |
| 2 | 1/4 inch (6 mm) |
Guard size charts like this one standardize fade clipper guard sizes across your toolkit, streamlining clipper maintenance and ensuring repeatable results every session.
Choosing Guard Numbers for a High Fade

Selecting the right guard numbers for a high fade determines whether your cut looks sharp or sloppy.
The process involves understanding how guards work together to create smooth transitions from skin to longer lengths.
Three key factors will guide your guard choices and help you achieve professional-looking results every time.
Typical Guard Progression (0 to 3)
Most high fades follow a simple blueprint: start with a zero guard at your base to expose skin, move to a one guard around the ear, then switch to a two guard as you climb toward the crown.
If you want extra length before shifting into the top, add a three guard near the parietal ridge. This progression ensures smooth blending and clean clipper settings across all guard sizes.
Matching Guard Numbers to Desired Style
Your style intent drives every guard decision you make. If you’re chasing a sharp, ultra-clean aesthetic with maximum contrast, you’ll pair a zero guard at the base with longer clipper guards on top. For a softer, more brushed look, start at a one and reduce the jump between haircut numbers.
Match your fade guard size chart to these cut objectives:
- Bold modern look – Zero to two progression for dramatic edges
- Classic professional fade – One to three sequence for balanced blending
- Subtle texture – Two to four range when personal preference leans understated
Factors Influencing Guard Selection
Your guard selection isn’t just about the fade technique variations you want—hair type considerations matter just as much. Thick, coarse hair often needs longer clipper guard sizes to avoid a scalped appearance, while fine hair looks fuller with shorter guards.
Check your guard size chart against your client’s texture, growth pattern, and density. Even perfect clipper maintenance tips won’t fix the wrong guard material comparison for the job.
High Fade Techniques Using Guard Numbers

Mastering a high fade means following a proven process from start to finish.
The right technique separates clean fades from choppy ones, and it comes down to how you sequence your guards and work the clipper.
Here’s how to execute a high fade with precision and control.
Step-by-Step Guide for High Fades
Start at the temples with a zero guard and map your high fade boundary—that’s where skin meets hair. Work upward in sections, switching to a one guard midway and a two near the crown. Use firm, vertical strokes against the growth pattern.
The Fade Haircut Techniques demand patience: each pass removes bulk, building smooth transitions. Guard Selection and Hair Texture Considerations directly impact your final High Fade result.
Blending and Transitioning Guards
Once you’ve moved through your Guard Sizes, smooth Blending Techniques become your priority. Eliminate harsh lines by overlapping each Guard Phasing zone with light, controlled strokes.
Here’s how to lock in Fade Consistency:
- Use short feather passes along Phasing Zones to soften guard boundaries
- Keep your clipper angle parallel to the scalp for uniform contact
- Alternate stroke directions to prevent directional beveling
- Limit pass counts to reduce heat buildup and irritation
- Inspect your blend from multiple angles under strong lighting
Master these steps and your Fade will look cohesive.
Using The Clipper Lever for Smooth Fades
Your blending work sets the stage—now Lever Manipulation refines it. The lever adjusts blade exposure mid-pass, creating micro-length changes between Clipper Guard Sizes.
Start with the lever fully closed at your baseline, then open it one or two detents as you move upward. These small Lever Mechanics shifts produce Smooth Transitions that no guard swap can match, giving you precise Fade control without switching attachments.
Best Guard Number Combinations for High Fades

Certain guard number combinations have become barbershop standards because they consistently deliver clean, well-proportioned high fades. These proven blends work across different hair types and face shapes, giving you a reliable starting point before you customize further.
Here are the most effective combinations you’ll use again and again.
Popular High Fade Blends (e.g., 0-1-2)
You’ll see the 0-1-2 blend everywhere because it delivers a pronounced High Fade with clean Guard Numbers. This Fade Haircut starts with a zero at the base—nearly skin—then moves to a one guard mid-section and finishes with a two near the crown.
The result is bold contrast and smooth Blend Patterns that highlight your Hair Texture without harsh lines, making it a staple across Clipper Guard Sizes and Fade Techniques.
High Fade With Longer Top Lengths
When you pair a high fade with four to six inches on top, you achieve Style Versatility that shorter lengths can’t match.
Guard Sizes zero through two handle the fade, while the Haircut Number System gives way to scissors for precision blending. This Length Ratio demands sharp Fade Techniques and regular Clipper Maintenance to keep Hair Texture looking crisp against those clean Clipper Guard Sizes.
Customizing Fades for Face Shape
Face Shape Analysis starts with your jawline and forehead. Round faces need a high fade with guard sizes zero through two to add vertical length.
Square faces look sharp with a low fade that softens angles while keeping definition. The Haircut Number System gives you control over Cheekbone Contouring—higher fades highlight bone structure, while Forehead Balance comes from adjusting fade height against your hair texture considerations.
High Fade Guard Numbers for Different Hair Types

Hair type changes everything when you’re working with high fade guard numbers. Straight hair shows transitions differently than curly hair, and thickness determines how aggressive you can be with your guard progression.
Here’s how to adjust your guard selection and technique based on what you’re working with.
Straight Vs. Curly Hair Approaches
Your hair texture dictates how you execute high fade techniques. Straight hair shows cleaner lines and blends easily between guard sizes, while curly hair hides transitions naturally.
Here’s what you need to know:
- Straight hair usually needs a 0-1-2 progression to maintain fade clarity without harsh lines
- Curl patterns soften guard transitions, so starting with a 0 or 1 prevents scalp overexposure
- Hair density in curls requires more blending passes between clipper guards for smooth results
Adjusting Guards for Thick or Fine Hair
Thickness changes everything about guard sizes and fade transitions in the haircut number system. Dense strands hold more bulk at the sides, so start with a longer guard—like a 3—and slowly drop down to control the shape without harsh lines. Fine hair texture shows more scalp, so begin with a 1 or shorter to establish a crisp base, then blend up using half-guards to smooth the fade.
| Hair Texture | Starting Guard | Blending Approach | Clipper Maintenance | Cutting Techniques |
|---|---|---|---|---|
| Thick hair | Guard 3 | Use successive guards (3-2-1) from top down | Sharp blades prevent tugging | Angle clipper guards outward to avoid boxy edges |
| Fine hair | Guard 1 or 0.5 | Small increments with half-guards (1.5, 2) | Clean blades reduce pulling | Light pressure; let clipper do the work |
Handling Cowlicks and Growth Patterns
Growth patterns turn a simple fade challenge into a challenge when whorls and cowlicks disrupt the blend. Scout the scalp before you pick guard sizes—cowlicks at the crown or nape dictate where you shift from a 0 to a 1.
Styling techniques and scalp health matter too:
- Part along natural growth lines to reduce visible disruption
- Use shorter layers near cowlicks to minimize bulk and flyaways
- Adjust clipper guards and fade height around stubborn whorls
- Train hair texture with blow-drying in your preferred direction
Haircut numbers work best when they respect what the follicle already wants to do.
Avoiding Common High Fade Mistakes

Even experienced hands make mistakes when cutting high fades, and most errors happen during the blending process or guard transitions.
Recognizing these pitfalls before they happen saves you time, frustration, and potentially a bad haircut.
Here’s what to watch for and how to fix common high fade problems.
Preventing Uneven Transitions
Uneven transitions start before you clip. Check your guard selection against hair texture—curly hair needs smaller guard steps than straight to prevent harsh lines.
Maintain steady clipper pressure and speed across every pass; inconsistent motion creates height shifts. Use blending techniques that include feathering sideways, not just up.
Work in horizontal sections. Brush against the grain to spot high areas early, then adjust with lever manipulation or crosschecking from both directions for fade line control.
Fixing Harsh Fade Lines
Spotting a harsh line mid-fade means you need immediate fade line correction before the cut progresses. Fixing harsh edges requires deliberate technique adjustments across guard sizes and clipper lever settings.
Use these proven methods for a smooth progression:
- Apply a 0.5 mm flick cut along the harsh edge fix zone to soften without excessive removal
- Blend with guards 0, 0.5, and 1 using multiple light passes for gradual fade haircuts
- Open the clipper lever to debulk above the line and reveal stray fibers
- Cross-check from multiple angles to identify remaining problem spots
- Finish with a detailing trimmer to pare down edges and complete the blend
When to Seek Professional Help
Even after you’ve corrected harsh lines, some fades remain beyond repair—that’s when professional help makes the difference. If you’ve spent 20 minutes blending without improvement, or if emotional support around self-care during grooming feels overwhelming, step back.
A skilled barber brings crisis intervention for botched fades, offering trauma response expertise and haircut maintenance that restores both your cut and confidence through proper barbering tips.
Maintaining and Cleaning Clipper Guards

Your guards are the backbone of every clean fade you produce. Without proper maintenance, even the best clippers deliver inconsistent cuts and frustrating results.
Here’s how to keep your guards performing like new through regular cleaning, smart storage, and timely replacement.
Proper Guard Cleaning Methods
Clipper guards demand consistent care to maintain clean, precise cuts. Rinse plastic guards with warm soapy water after each session, removing hair buildup and oils.
For metal guard care, dry immediately to prevent rust on joints. Disinfect with a 10 percent solution for five minutes when working with clients. These barbering tools last longer when you follow proper grooming tips for clipper maintenance and guard sanitizing routines.
Storing Guards to Prevent Damage
Once guard storage tips are applied, and guards are clean and dry, proper care protects your investment. Store barbering tools in a dry, cool area using vented containers that prevent moisture buildup—a key damage prevention measure.
Keep clipper guard sizes separated and labeled for quick guard organization. Metal and plastic clipper guards belong in different bins to avoid surface wear. These storage solutions and clipper maintenance routines preserve your clipper guard collection for years.
Replacing Worn or Broken Guards
Inspect your clipper guards every few weeks for cracks, warping, or a loose latch. Replace guards immediately when damage appears—waiting risks blade contact with skin.
Standard replacement frequency runs six to twelve months with regular use. Choose compatible guard sizes that match your clipper model and guard numbers. Keep spare clipper guard sizes on hand so guard damage doesn’t halt your work mid-fade.
Top 4 Clipper Guard Products for High Fades
The right clipper guard set can make or break your high fade results. Quality guards deliver consistent cuts and survive the wear of daily use, while cheap ones create uneven lengths and need constant replacement.
Here are four proven products that professionals and home barbers rely on for clean, precise fades.
1. Wahl Hair Clipper Guards Set
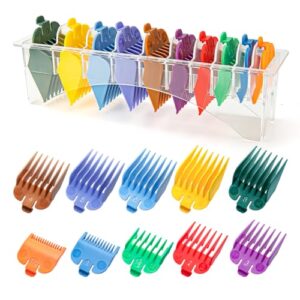
When you need precision and organization in one package, Wahl’s guard set delivers. It includes guards labeled 1 through 8 plus fractional sizes, covering everything from tight tapers to longer cuts.
Each guard snaps onto the blade with an audible click—no slipping mid-fade. The color-coded system lets you grab the right length without measuring every time.
Built from durable plastic with rounded teeth, these guards protect the scalp while maintaining stable performance. They fit most standard Wahl clippers, though some professional models may require fitment checks.
| Best For | Home users and barbers who want a complete range of cutting lengths with easy-to-identify guards that stay secure during use. |
|---|---|
| Material | Nylon |
| Brand | LAVEST |
| Weight | 0.25 kg |
| Compatibility | Wahl & select models |
| Use Case | Hair cutting/trimming |
| Price Range | Budget-friendly |
| Additional Features |
|
- Ten guards covering 1/16″ to 1″ give you plenty of options for different styles and lengths
- Color-coded system makes it quick to find the right guard without checking measurements
- Solid nylon construction feels sturdy and includes a storage holder to keep everything organized
- Tighter fit means you might need to push harder to snap guards on
- Colors are assigned randomly, so you can’t choose your preferred scheme
- Compatibility is limited mainly to Wahl and a few specific clipper models
2. Wahl Hair Clipper Guard Attachments

Looking for long cuts without switching to scissors? These oversized guards attach to full-size Wahl clippers and stretch from 1.25 inches all the way to 2.5 inches—far beyond standard sets.
The six-piece collection uses reinforced ABS plastic with secure clip-on points that won’t budge during a pass. Rounded edges prevent snagging while precision teeth guide hair smoothly.
Check your blade width first. They fit models between 1-5/8″ and 1-3/4″ wide, but won’t work on mini clippers or trimmers.
| Best For | Home barbers and anyone cutting longer styles who want consistent length without grabbing scissors every few minutes. |
|---|---|
| Material | ABS Plastic |
| Brand | Generic/Universal |
| Weight | Not specified |
| Compatibility | Wahl full-size clippers |
| Use Case | Professional haircuts |
| Price Range | Mid-range |
| Additional Features |
|
- Six guards reach up to 2.5 inches—way longer than typical sets that max out under an inch
- Reinforced plastic with solid clips means they stay locked during cuts instead of popping off mid-pass
- Rounded edges and precision teeth prevent hair from catching or pulling
- Only work with full-size Wahl clippers that have blades between 1-5/8″ and 1-3/4″ wide
- Won’t fit smaller tools like beard trimmers or mini clippers
- Need to double-check compatibility photos before buying to avoid fit issues
3. Wahl Color Pro Cordless Hair Clipper
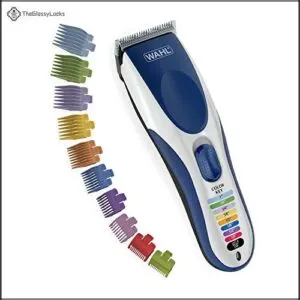
Cordless freedom has a significant impact when you’re working around a client’s head. This battery-powered clipper runs for 60 minutes on a full charge and uses a rotary motor that copes with medium-thick hair without bogging down.
Twelve color-coded guards snap on tight—from 1/16 inch to 1 inch—so you won’t mix up lengths mid-fade. The blades detach for rinsing under the tap, and precision grinding keeps edges sharp through repeated sessions. Worldwide voltage means it charges anywhere from 110 to 240V.
| Best For | People who want cordless flexibility for home haircuts or quick touch-ups without dealing with tangled cords. |
|---|---|
| Material | Plastic/Metal |
| Brand | Wahl |
| Weight | 1.4 lbs |
| Compatibility | Universal |
| Use Case | Home grooming |
| Price Range | Mid-range |
| Additional Features |
|
- 60 minutes of wireless runtime gives you plenty of time to finish cuts without scrambling for an outlet
- Twelve color-coded guards make it simple to grab the right length without second-guessing
- Detachable blades rinse clean in seconds and stay sharp through regular use
- Needs charging every few months even when not in use to keep the battery healthy
- Rotary motor handles medium-thick hair but might struggle with very coarse or dense textures
- Dropping it can damage the cutting head, so you’ll need to handle it carefully
4. Wahl Hair Clipper Lubricating Oil
A blade running hot or catching on hair tells you friction is winning. Wahl’s mineral-based lubricating oil fixes that by coating teeth with a slippery film that cuts heat and wear.
Apply a few drops to running blades after every few haircuts, shift the lever to spread it through the teeth, then wipe the excess. Regular use keeps edges sharp longer, prevents blade seizure during long sessions, and delays sharpening.
The 4-ounce bottle works with Wahl and most other brands.
| Best For | Anyone using electric clippers regularly who wants to keep blades running cool and sharp without constant sharpening or replacement. |
|---|---|
| Material | Synthetic Oil |
| Brand | Wahl |
| Weight | 0.1 lbs |
| Compatibility | Wahl & other brands |
| Use Case | Blade maintenance |
| Price Range | Accessory |
| Additional Features |
|
- Reduces friction and heat during use, preventing blades from getting dull too quickly
- Works with Wahl clippers and most other brands, so you’re not locked into one system
- Small bottle lasts a long time since you only need a few drops every few haircuts
- Needs regular reapplication to stay effective, which means remembering to do it
- No clear info on whether it might cause skin reactions or allergies for some people
- Won’t fix blades that are already damaged or completely worn out
Tips for Communicating High Fade Guard Numbers

Getting the high fade you want starts with clear communication. If your barber doesn’t understand your vision, you’ll walk out disappointed—no matter how skilled they’re.
Here’s how to make sure you’re both on the same page before the first clipper pass.
How to Explain Your Desired Fade
When you sit in the chair, start with the lowest guard you want at the skin—zero for a true high fade. Then specify your mid-transition guard, usually a 1 or 2, and mention where the fade should start near your crown.
Describe your top length in inches or haircut numbers to help your barber set proper client expectations. Clear fade communication prevents mismatched guard sizes and ensures your style description matches the final clipper guards result.
Bringing Reference Photos for Clarity
Words won’t always capture what you want—a reference image will. Choose photos with proper lighting essentials and visual accuracy: clear front and side angles that show fade height, guard sizes at each stage, and haircut techniques your barber can replicate.
Camera settings matter less than photo clarity tips like sharp focus and neutral backgrounds. Multiple reference images beat vague descriptions every time.
Frequently Asked Questions (FAQs)
Can you use half guard sizes for high fades?
Yes, half guard sizes excel at erasing those stubborn lines you swear weren’t there a second ago.
Half guards like 5 and 5 create smoother transitions between standard clipper guard sizes, refining high fade styles with precision clipper maintenance demands.
How often should clipper blades be replaced?
Most professionals replace clipper blades every six to twelve months with heavy daily use.
Lighter use extends this to twelve to twenty-four months. Watch for dull cutting, uneven results, or increased heat signaling replacement time.
Whats the difference between taper and high fade?
A taper gradually shortens hair from top to neckline, preserving length.
A high fade starts the shift near the crown, blending quickly to skin-close sides for bold contrast and sharper definition.
Do guard numbers work the same when wet?
Guard numbers shift slightly when cutting wet hair due to water weight impact and moisture effects.
Wet hair compresses more easily under clipper guards, and guard slip prevention becomes critical since dampness can loosen attachment security during passes.
Should you fade against or with hair growth?
Blending with hair growth patterns softens transitions and makes regrowth less obvious.
While cutting angles against texture considerations create sharper fade haircut lines—clipper guard sizes and haircut numbers matter less than how your natural flow guides each pass.
Conclusion
Knowledge is power, but only when you apply it. Mastering high fade guard numbers transforms guesswork into precision—whether you’re cutting your own hair or directing your barber.
The difference between a clean fade and a botched attempt comes down to understanding guard progression, blending technique, and knowing when each number belongs. Start with the basics, practice the transitions, and trust the system.
Your next high fade won’t just look professional—it’ll prove you’ve cracked the code.