This site is supported by our readers. We may earn a commission, at no cost to you, if you purchase through links.

A fresh fade hits different when it’s tight. But by day ten, that clean taper starts looking like it graduated without you—fuzzy, uneven, somewhere between intentional and neglected.
Most guys either book another appointment or let it go completely, not realizing a touch up fade at home is well within reach. You don’t need barbering school or a professional setup to keep your cut looking sharp between visits. The right tools, a decent mirror setup, and a little patience go a long way—and once you get the hang of it, you’ll wonder why you ever waited so long.
Table Of Contents
Key Takeaways
- The right setup — good clippers, a T-blade trimmer, and a proper mirror-and-lighting arrangement — is what separates a clean home touch-up from a disaster you’ll regret.
- Washing your hair 12–24 hours before touching up and working only on dry hair keeps your lines honest and your blades moving the way they should.
- Slow, controlled passes with gradual guard transitions (3 to 2 to 1) are the difference between a seamless blend and choppy, uneven lines that no quick fix can save.
- Between cuts, light daily brushing, edge clean-ups every 3–4 days, and washing 2–3 times a week are what keep a fade looking intentional instead of grown-out.
Essential Tools for Touching Up a Fade
Before you touch a single hair, you need the right gear in your hands. Using the wrong tools is how a quick touch up turns into a disaster real fast.
If you’re unsure where to even begin, brushing up on how to style a fade the right way can save you from a lot of preventable mistakes.
Here’s what you actually need to get it done right.
Choosing The Right Clippers and Guards
Your clippers are the backbone of a clean fade — so don’t cheap out here. A Wahl hair clipper with a solid rotary motor (think 5,000–7,200 RPM) cuts through dense hair without snagging.
Cordless clippers with 90-plus minutes of runtime give you freedom to move. Look for adjustable levers, quality blade construction, and a full guard size set so you control every step of the blend.
It’s essential to take into account essential clipper features when choosing the right tool.
Importance of Detail Trimmers and Combs
Good clippers handle the heavy lifting, but trimmers own the details. A T-blade trimmer — usually 30 to 40 millimeters wide — gives you the hairline precision your main clippers simply can’t deliver around ears and temples.
Pair it with a fade comb for sharper edge control and cleaner fade techniques. That combo keeps your fade maintenance tight without raising the line or wrecking your edge work.
To learn more about the different types of fade haircuts, explore various style and maintenance tips.
Setting Up Mirrors and Lighting
Once your trimmer’s doing its job, your mirror and lighting setup can make or break the whole fade haircut.
- Mount your primary mirror at eye level for clean reflection control
- Use a secondary mirror at 45 degrees for neckline shadow reduction
- Choose 5000–6500K neutral white bulbs for glare minimization
- Position lights in front — never behind — for proper lighting angles
- A three-way mirror system covers every blind spot in one shot
Nail these grooming tips and your barbering techniques actually work.
Preparing Hair for a Clean Touch Up
Your mirror setup’s locked in — now your hair needs to match that true energy. Wash it 12 to 24 hours before the touch up, not right before.
Day-old hair sits naturally, shows your true hair texture, and lets the blades move clean. Dry hair is non-negotiable for solid fade maintenance — damp strands clump, hide lines, and mess with clipper safety.
Step-by-Step Guide to Touching Up Your Fade
Knowing what tools to grab is half the battle — now it’s time to actually use them.
The steps below break down the process in the same order a barber would follow, so nothing gets missed. Work through each one at your own pace and you’ll have a clean, tight fade before you know it.
If you want that fade to stay crisp after you’re done, check out these fade haircut styling products for long-lasting hold and definition to finish the look right.
Defining Your Fade Line and Guidelines

Your fade line is the blueprint — get it wrong and nothing else saves you.
Pick a head reference point first: the top of the ear for a low fade, the temple for mid, near the parietal ridge for high fade.
Set your first guideline with a 0.5 or 1 guard, then add secondary guidelines above it to map the gradient zones cleanly.
Blending Sides and Back for a Seamless Look

Blending the sides and back is where your fade haircut actually comes alive. Nail these three things and you’re golden:
- Step your guard transitions down gradually — 3 to 2 to 1 — using slow clipper angles and a flicking wrist motion for smooth blend control.
- Match your hair texture by adjusting your lever for half-steps between guards.
- Tilt your head forward to tighten the back skin for cleaner fade techniques around the occipital.
Shaping The Hairline and Perimeter

Your hairline design is where the whole fade haircut either ties together or falls apart. Start center-front, then work outward toward the temples — this keeps your facial framing balanced.
Use trimmers for edge work around the temple shaping and perimeter blending; clippers are too aggressive here. Follow your natural curve, stretch the skin taut, and move in short, controlled strokes for clean edge maintenance.
Techniques for Even Fading and Blending

Even blending isn’t magic — it’s method. Nail these fade techniques and your clippers become a precision tool, not a gamble.
- Guard Transitions: Step from a 3 down to a 1, overlapping each band slightly
- Lever Control: Open to closed while dropping lower erases harsh lines without switching guards
- Flicking Motion: Tilt and flick out at the top of each pass to avoid digging new lines
- Clip Over: Use comb-guided strokes above weight lines for flawless sectioning techniques
Common Mistakes to Avoid During a Fade Touch Up

Even the cleanest fade can go sideways fast if you’re not careful — and most of the time, it comes down to the same handful of mistakes.
A little self-awareness goes a long way when you’re running clippers on your own head. Here’s what to watch out for before you pick up those clippers.
Rushing The Process and Uneven Blending
Speed kills a fade haircut—literally. The moment you rush clipper control, you’re creating blending errors that turn smooth gradients into choppy, uneven textures. Move too fast and your haircut maintenance falls apart in real time.
Rush your fade and you’ll trade smooth gradients for choppy, uneven mistakes that no quick fix can save
| Rushing Consequence | What Actually Happens |
|---|---|
| Fast passes | Uneven textures, missed strands |
| Skipping guards | Patchy fade techniques fail |
Slow down. Your fade haircut deserves it.
Raising The Fade Line Too High
Every time you chase a stubborn line higher, you’re slowly killing your fade haircut’s shape.
Fade Height Control is everything — a low fade sits about an inch above the ear, so poor Guideline Placement can accidentally push it into high-fade territory.
That Style Mismatch is tough to fix without a barber. Protect your Hair Density Impact by staying within your original zone.
Pressing Clippers Too Hard on The Skin
Controlling your fade line matters — but so does how you actually hold the tool.
Pressing clippers hard into the skin is a real rookie move.
It causes Clipper Burn, Skin Irritation, Razor Bumps, even Folliculitis Risk around the neckline.
Let the blades do the work.
Light, gliding passes keep your fade haircut clean without your scalp paying the price.
Fixing Visible Lines or Blending Errors
Visible lines happen — even to solid barbers. When you spot one, don’t panic and start chopping everything down. Instead, open your clipper lever slightly and do soft, flicking passes just above and below that line.
That fade correction move scatters the contrast without pushing your fade higher. Small blend techniques beat big swipes every time. When in doubt, stop and let a pro finish it.
Maintaining a Fresh Fade at Home

Getting the cut is only half the battle — keeping it sharp is where most people drop the ball.
A fresh fade doesn’t maintain itself, but with the right habits, it stays clean way longer than you’d think. Here’s what actually moves the needle in maintaining your fade at home.
Proper Washing and Conditioning Routines
Two or three shampoo days a week is your sweet spot for fade maintenance — enough to clear sweat and buildup without stripping your scalp dry.
Stick to a gentle, moisturizing shampoo for solid scalp care, and always follow up with conditioner. A quick fingertip scalp massage while washing boosts circulation and keeps your haircare routine working for you, not against you.
Brushing and Moisturizing for Healthy Hair
Good washing habits set the foundation, but brushing and moisturizing are what keep your fade looking intentional between cuts.
Here’s what actually works for healthy hair maintenance:
- Brush 1–2 times daily using a soft boar bristle brush — short, controlled strokes following your fade pattern
- Apply a water-based leave-in conditioner before sealing with a light oil like coconut or argan
- Moisturize in the evening so your hair absorbs hydration overnight
- Brush right after moisturizing to train short hair into shape while it’s flexible
These simple haircare routine habits build real fade maintenance momentum.
Edge Maintenance and Controlling Stray Hairs
Even the cleanest fade haircut starts looking rough the moment stray hairs creep past the edges.
That’s where daily grooming habits earn their keep. A precision trimmer takes care of hairline shaping and edge control without disturbing your fade blending.
Clean up neck strays every 3–4 days, follow your natural hairline, and use an edge brush with lightweight gel for lasting hair maintenance.
Frequency of Touch Ups for Best Results
Most fades start showing their age within 7 to 10 days — that’s just hair growth rates doing their thing, roughly 2 to 3 millimeters a week.
For skin or high fades, weekly touch up schedules keep the blend line sharp. Mid and low fades? You can stretch to two or three weeks. Smart fade haircut maintenance tips beat reactive fixes every time.
Top Products for At-Home Fade Touch Ups
Having the right products on hand makes the difference between a fade that holds and one that falls apart by noon.
Whether you’re locking in edges, training your waves, or decorating your space like someone who takes the craft seriously, what you keep in your kit matters.
Here’s what’s worth having.
1. SoftSheen Carson Sportin Waves Pomade
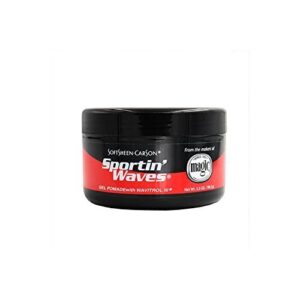
Sportin Waves by SoftSheen-Carson is a classic for a reason — it’s been laying down waves and keeping fades sharp for decades. The petrolatum-based formula goes on smooth, holds without getting crunchy, and gives your hair that clean, glossy sheen without looking greasy.
It’s dye-free and rinses out easily, which your scalp will thank you for. Apply a small amount on damp hair, brush in your wave direction, and throw on a durag. Simple, effective, proven.
| Best For | Anyone rocking short styles, waves, or natural hair who wants a lightweight hold with moisture and shine — no crunch, no grease. |
|---|---|
| Product Type | Collectible Poster |
| Condition | Brand New |
| Target Audience | Collectors/Fans |
| Use Case | Display/Decoration |
| Size/Weight | 27×40 in, 13 oz |
| Key Limitation | Possible Shipping Creases |
| Additional Features |
|
- Promotes and maintains waves while keeping hair moisturized and looking clean
- Dye-free formula that rinses out easily without leaving buildup
- Goes on smooth and works well for all hair types, including curly and natural
- Hold strength is regular, so it won’t cut it if you need something stronger
- Some users have noticed formula or packaging changes that affected performance
- Hair is flammable when treated with this product, so you’ll want to stay away from open flames
2. WavEnforcer Boar Bristle Wave Brush
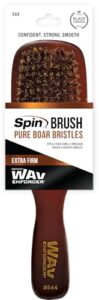
At $4.99, the WavEnforcer Boar Bristle Wave Brush punches way above its price tag.
The 100% boar bristles pull natural oils from your scalp down through the hair shaft, adding shine without loading up on extra product. They’re firm enough to reach into low-to-medium fades and short waves, but gentle enough that they won’t tear up your scalp.
Use it after applying your Sportin Waves to distribute everything evenly — no crusty buildup, no puffed-out sides.
| Best For | Anyone rocking short to medium length cuts, waves, or fades who wants deeper wave patterns without spending much. |
|---|---|
| Product Type | Hair Pomade |
| Condition | Ready to Use |
| Target Audience | All Hair Types |
| Use Case | Styling and Moisture |
| Size/Weight | 3.5 oz |
| Key Limitation | Flammable When Applied |
| Additional Features |
|
- At $4.99, it’s hard to beat the value — boar bristles at this price point is a steal
- Longer bristles dig deeper into the hair to pull out natural oils and boost shine without extra product
- Comfortable wooden handle makes daily brushing sessions easy on the hand
- Bristles may start shedding after extended use, which gets old fast
- Skip it if you have very fine hair — it’s built for thicker, coarser textures
- Won’t do much for beard grooming or working product through facial hair
3. 50 50 Movie Poster

Okay, this one’s a little different — but hear me out. The 50/50 movie poster isn’t a styling product, but if you’re serious about your fade game, it belongs on your wall.
The image shows Joseph Gordon-Levitt getting his head shaved, and that single shot captures everything a clean, precise cut means emotionally. It’s a daily reminder of why the craft matters. Collector’s condition, 27×40 inches, double-sided. Frame it, hang it, and let it set the tone.
| Best For | Movie fans and barber shop owners who want a meaningful piece of art that doubles as a conversation starter. |
|---|---|
| Product Type | Hair Brush |
| Condition | Ready to Use |
| Target Audience | Short to Long Hair |
| Use Case | Wave Enhancement |
| Size/Weight | Rectangular, Handheld |
| Key Limitation | May Shed Bristles |
| Additional Features |
|
- Studio-issued original in near-mint condition — this is the real deal, not a reprint
- Double-sided 27×40 print looks sharp framed on any wall
- A genuinely cool collector’s piece that holds sentimental value for fans of the film
- Rolled shipping can leave creases, so inspect it carefully when it arrives
- You’ll need a frame to display it properly, which adds to the overall cost
- Pretty niche — if you’re not a fan of the movie, it won’t mean much to you
Frequently Asked Questions (FAQs)
How to touch up your fade?
Start with clean, dry hair. Set your lowest guideline around the sides and neckline, then work upward with longer guards, using a flicking motion to blend each pass smoothly.
What is the 3:2:1 buzz cut rule?
The 3-2-1 rule means guard 3 on top, guard 2 on the sides, and guard 1 at the bottom edges — a simple, clean gradient that works for almost any head shape.
What to get instead of a skin fade?
A classic taper, low fade, crew cut, or textured crop all give you a clean, sharp look without bare skin. Less maintenance, softer contrast, and still seriously sharp.
Can any hair type pull off a fade?
Yes — every hair type can pull off a fade. Straight, wavy, curly, coily — it all works.
Your barber just adjusts the height and guard lengths to match your texture and face shape.
How do I fade around my ears safely?
Fold the ear down gently with your free hand, then use a guarded clipper — a 2 works well — and follow the curve with short upward strokes. Slow and steady wins here.
What should I do after a bad touch up?
Stop the clippers immediately. Assess the damage in good lighting, then blend gently with a lower guard.
If it’s too uneven, buzz it short and even — reset beats a patchwork fix every time.
Does hair length affect how fades look?
Hair length absolutely changes how a fade looks. Longer tops make the contrast pop harder, while shorter tops let the fade itself steal the show. Your length, your call.
Can I touch up a fade on curly hair?
Absolutely — curly hair takes a fade just as well as straight hair, sometimes even better.
The texture actually helps hide blending imperfections, giving you a little more room to work with.
Conclusion
Every barber started by practicing on themselves—clippers shaking, hairline slightly crooked, learning what not to do. That trial and error is exactly how skill gets built.
Now you’ve got the roadmap. Knowing how to touch up a fade at home means you’re never stuck waiting on an appointment to look your best. Your cut, your schedule, your standards. Keep the blade sharp, stay patient with the process, and the results will speak for themselves.
- https://kingdombarberstudio.com/the-ultimate-guide-to-keeping-your-fade-haircut-sharp-between-barber-visits/
- https://www.youtube.com/watch?v=pSFyrrhKj1Q
- https://getsquire.com/booking/book/kingdom-barber-studio-bryan
- https://www.nytimes.com/wirecutter/reviews/best-hair-clippers-for-home-use/
- https://bestbomg.com/blogs/news/corded-vs-cordless-hair-clippers