This site is supported by our readers. We may earn a commission, at no cost to you, if you purchase through links.

Most people don’t fail at skincare because they’re lazy—they fail because someone handed them a 12-step routine when they needed three.
The beauty industry runs on complexity, but your skin doesn’t. It runs on consistency, the right ingredients, and products that match what your skin actually needs.
A solid facial skincare routine doesn’t require a shelf full of serums or a spreadsheet to manage. Once you know your skin type and understand a handful of proven ingredients, the whole thing clicks into place faster than you’d expect.
Table Of Contents
- Key Takeaways
- How to Identify Your Skin Type at Home
- How to Start a Simple Skincare Routine (3–4 Steps)
- Top 5 Cleansers for Every Skin Type
- How to Layer Your Skincare Routine (No Guesswork)
- Best Skincare Ingredients for Beginners to Know
- How to Customize Your Routine to Your Skin Type
- Why Daily Sunscreen is Non-Negotiable
- What About Exfoliation, Masks, and The 4-2-4 Rule
- Common Skincare Routine Mistakes to Avoid
- Lifestyle Habits That Support a Healthy Skincare Routine
- Frequently Asked Questions (FAQs)
- How do I create a skin care routine?
- How do I choose a skincare routine?
- Do you really need a skin care routine?
- How do you maintain a smooth skin?
- How do I build my own skincare routine?
- What are the 7 steps of skincare?
- Can you use retinol and vitamin C together?
- Is toner a necessary step for everyone?
- How does makeup affect your skincare routine?
- Can skincare products expire or go bad?
- Conclusion
Key Takeaways
- Your skin type is the foundation of everything — get that wrong, and even the best products will work against you, so do the bare-faced test before spending a single dollar.
- A solid routine doesn’t need more than four steps: a gentle cleanser, a targeted serum, a moisturizer that matches your skin, and broad-spectrum SPF 30 every single morning.
- Layering products from lightest to heaviest — and giving each one a minute or two to absorb — is what actually lets your skincare do its job instead of pilling up or canceling itself out.
- Consistency beats complexity every time: results take weeks to show up, so picking a simple routine you’ll actually stick to matters far more than chasing the trendiest ingredients.
How to Identify Your Skin Type at Home
Before you spend a single dollar on skincare, you need to know what you’re actually working with. Your skin type shapes every cleanser, serum, and moisturizer you’ll ever choose.
Getting this right is the foundation of everything—your evening skincare routine steps will only work as hard as your skin type allows them to.
Here’s how to figure it out at home — no guesswork needed.
The Bare-Faced Test Method

Before buying a single product, the barefaced test gives you real data on determining skin type. Cleanse, then wait 30 minutes — no touching, no products.
Watch for these observation cues:
- T-zone shine signals oiliness
- Tightness or flaking points to dryness
- Redness after cleansing suggests sensitivity
Use blotting paper across zones, keep environmental consistency day-to-day, and log results. Record keeping across a few days beats one-off guesses every time.
Signs of Oily, Dry, Combination, and Sensitive Skin

Now that your 30 minutes are up, here’s what those results actually mean.
| Skin Type | What You’ll Notice | Key Concern |
|---|---|---|
| Oily | Midday shine, pore congestion | Excess sebum |
| Dry | Flaky patches, tightness | Barrier weakness |
| Combination | T-zone oiliness, normal cheeks | Uneven hydration |
Sensitive skin is trickier — stinging reactions after cleansing are your biggest clue. Your skin type assessment starts with honest observation.
Why Skin Type Affects Every Product You Choose

Your skin type isn’t just a label — it directly shapes which ingredients, textures, and formulas will actually work for you. Barrier strength determines how well your skin tolerates actives.
Texture preference matters because oily skin stays clear with lightweight gels, while dry skin craves richer emollients. Formulation compatibility and ingredient sensitivity are why one person’s holy grail product is another person’s breakout trigger.
How to Start a Simple Skincare Routine (3–4 Steps)
")
Starting a skincare routine doesn’t have to mean a 10-step production — four steps are genuinely all you need to see real results. The goal here is to keep things simple enough that you’ll actually stick with it.
Here’s what your daily routine should look like.
Step 1 – Cleanse Gently Twice Daily
Think of cleansing as your routine’s reset button. In the morning, it clears overnight oil and pillow residue; at night, it lifts sunscreen and daily buildup — that’s where a gentle double cleanse really earns its place.
Use lukewarm water and a pea-sized amount of cleanser, spending about 30–60 seconds working it in. Then pat dry, never rub, to avoid irritation.
Step 2 – Apply a Targeted Serum or Treatment
Once your face is clean, serums are where the real work happens. A pea-sized dose covers your whole face — press it in gently; don’t rub.
Start with one serum: vitamin C makes a great morning antioxidant, while retinoids shine at night.
Niacinamide plays well with most actives, making active compatibility easier to manage.
Always do a serum patch test first.
Step 3 – Moisturize to Support Your Skin Barrier
After your serum sinks in, moisturizer is what locks everything in place — this is your lipid barrier repair step.
Choose your formula with Moisturizer Texture Matching in mind:
- Oily skin: lightweight gel-cream with niacinamide
- Dry skin: rich cream packed with ceramides and fatty acids
- Combination skin: lotion or fluid — light but effective
- Sensitive skin: fragrance-free barrier cream with ceramides
Apply while your skin’s still slightly damp — that’s your Post-Cleanse Application Timing window. The humectant emollient balance draws water in while occlusives seal it there. Think of it as the Occlusive Seal Technique: humectants attract, emollients smooth, occlusives protect. Your skin barrier will thank you.
Step 4 – Apply Broad-Spectrum Sunscreen Every Morning
Sunscreen isn’t optional — it’s the whole point of everything you just applied. Without broad-spectrum SPF 30, UV damage quietly undoes your serums and moisturizers daily.
| Sunscreen Quick Guide | Details |
|---|---|
| Sunscreen Texture Choice | Gel for oily, cream for dry skin |
| Sunscreen and Makeup | Apply SPF last, before foundation |
| Sunscreen Storage Tips | Keep away from heat and direct light |
| Travel Sunscreen Essentials | Stick or solid formats pass TSA easily |
| Kids Sunscreen Guidance | Use mineral SPF 50 for sensitive skin |
Make UV protection your morning skincare routine’s non-negotiable final step.
Top 5 Cleansers for Every Skin Type
Finding a cleanser that actually works for your skin doesn’t have to be a guessing game. five options below cover every skin type, from oily and acne‑prone to dry and sensitive.
what each one does and who it’s really meant for.
1. CeraVe Foaming Facial Cleanser
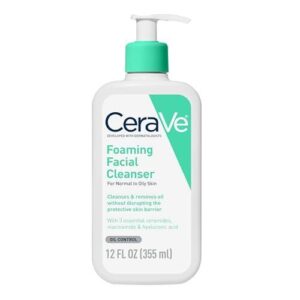
If you’ve got oily or combination skin, this one’s a classic for good reason. The CeraVe Foaming Facial Cleanser starts as a clear gel and transforms into a light, airy foam — removing excess oil and dirt without that tight, stripped feeling afterward.
It’s packed with three essential ceramides, hyaluronic acid, and niacinamide to cleanse and support your barrier at the same time.
Fragrance-free, non-comedogenic, and dermatologist-developed.
Just note: it’s not built for heavy or waterproof makeup.
| Best For | People with oily, combination, or acne-prone skin who want a gentle daily cleanser that cleans without wrecking their skin barrier. |
|---|---|
| Skin Type | Normal to Oily |
| Fragrance-Free | Yes |
| Non-Comedogenic | Yes |
| Paraben-Free | Yes |
| Formula Type | Gel-to-Foam |
| Net Volume | 12 fl oz |
| Additional Features |
|
- Gel-to-foam formula removes oil and dirt without that tight, stripped feeling
- Packed with ceramides, hyaluronic acid, and niacinamide — so it’s actually doing good while it cleans
- Fragrance-free, non-comedogenic, and dermatologist-developed — hard to argue with that lineup
- Won’t cut through heavy or waterproof makeup on its own
- Lather can be weak if you’re dealing with hard water
- Doesn’t moisturize, so drier skin types will definitely need a solid follow-up
2. CeraVe Hydrating Facial Cleanser
Dry or sensitive skin? This one was basically made for you.
CeraVe Hydrating Facial Cleanser skips the foam entirely — it’s a creamy, lotion-like formula that cleanses without stripping a single drop of natural moisture. You get ceramides, hyaluronic acid, and glycerin working together, plus MVE technology that keeps delivering hydration long after you’ve rinsed.
It’s fragrance-free, non-comedogenic, and gentle enough for eczema-prone skin. Tight, uncomfortable post-wash feeling? Gone.
At around $16, it’s hard to argue with.
| Best For | Anyone with dry, sensitive, or eczema-prone skin who wants a gentle daily cleanser that hydrates while it cleans. |
|---|---|
| Skin Type | Normal to Dry |
| Fragrance-Free | Yes |
| Non-Comedogenic | Yes |
| Paraben-Free | Yes |
| Formula Type | Cream/Lotion |
| Net Volume | ~16 fl oz |
| Additional Features |
|
- Ceramides, hyaluronic acid, and glycerin keep skin feeling soft and moisturized — no post-wash tightness
- Fragrance-free and non-comedogenic, so it plays nice with even the most reactive skin
- At ~$16, it punches well above its price point for the ingredients you’re getting
- The creamy, low-foam texture can feel heavy or greasy if you have oily or combination skin
- Not great at taking off heavy makeup — you’ll likely need a separate remover for mascara
- A few buyers have reported packaging issues or receiving non-original products
La Roche-Posay Toleriane Hydrating Gentle Cleanser
Combination skin is notoriously tricky to shop for — but La Roche-Posay Toleriane Hydrating Gentle Cleanser genuinely gets it right. This fragrance-free formula pairs Ceramide NP Boost with Prebiotic Thermal Water to deliver real skin barrier protection without heaviness.
It’s a pH balanced cleanser with a non-comedogenic texture that fits your morning skincare routine perfectly, leaving skin ready for smooth product layering order.
Its efficacy is boosted by prebiotic thermal water, which supplies antioxidant minerals.
3. Neutrogena Ultra Gentle Facial Cleanser
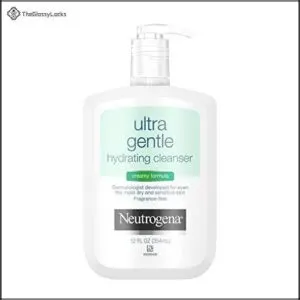
If your skin throws a fit at almost everything, the Neutrogena Ultra Gentle Facial Cleanser might be your new best friend. It’s fragrance-free, soap-free, dye-free, and non-comedogenic — basically stripped down to just what your skin actually needs.
The creamy, non-foaming texture feels soft on sensitive, reactive, or rosacea-prone skin without leaving that tight, stripped feeling afterward. A little goes a long way, and it plays nicely with whatever moisturizer or serum you layer on next.
| Best For | People with sensitive, dry, or reactive skin who need a no-fuss daily cleanser that won’t trigger breakouts, redness, or irritation. |
|---|---|
| Skin Type | Normal to Dry |
| Fragrance-Free | Yes |
| Non-Comedogenic | Yes |
| Paraben-Free | Yes |
| Formula Type | Creamy Low-Foam |
| Net Volume | 15.4 fl oz |
| Additional Features |
|
- Free from fragrance, dyes, soap, oils, and parabens — a solid pick if your skin reacts to almost everything
- Creamy, non-stripping formula leaves skin feeling soft and moisturized after washing
- Works well for acne, eczema, and rosacea-prone skin without causing extra flare-ups
- Non-foaming texture can feel heavy or greasy, especially if you have oily skin
- Doesn’t do much for makeup removal — you’ll likely need a separate product for that
- The pump dispenser can be finicky and sometimes doesn’t pop up or dispense consistently
4. Aveeno Clear Complexion Foaming Cleanser
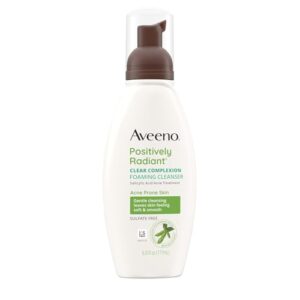
Now, if your skin leans more oily or breakout-prone, the Aveeno Clear Complexion Foaming Cleanser is worth a look.
It’s built around 0.5% salicylic acid — enough to gently exfoliate inside pores without feeling harsh — plus soy extract to help even out your tone over time. It’s oil-free, non-comedogenic, and fragrance-free.
The foam is light and rinses clean, leaving your skin fresh without that tight, over-dried feeling.
Consistent use is key though — give it at least six to eight weeks.
| Best For | People with oily, acne-prone, or combination skin who want a gentle daily cleanser that targets blemishes without stripping moisture. |
|---|---|
| Skin Type | Sensitive/Dry |
| Fragrance-Free | Yes |
| Non-Comedogenic | Yes |
| Paraben-Free | Yes |
| Formula Type | Non-Foaming Cream |
| Net Volume | 12 fl oz |
| Additional Features |
|
- Salicylic acid and soy extract work together to fight breakouts and even out skin tone over time
- Light, rinse-clean foam that leaves skin feeling fresh — not tight or dried out
- Oil-free, non-comedogenic, and hypoallergenic, so it’s safe for sensitive skin too
- Twice-daily use can cause dryness or tightness for some people
- Won’t cut through heavy makeup or deeply congested pores
- A 6 oz bottle goes fast — about three weeks with regular use — and it’s not the cheapest option on the shelf
How to Layer Your Skincare Routine (No Guesswork)
")
Layering your skincare products in the right order makes a bigger difference than most people expect — get it wrong and you’re basically blocking your products from doing their job. The good news is there’s a simple logic to it, and once you know it, you’ll never second-guess yourself again.
Here’s exactly how to layer your routine, from morning to night.
The Lightest-to-Heaviest Application Rule
Think of your skincare routine like getting dressed — you wouldn’t pull a sweater over a coat. The same logic applies here: always layer from thin to thick. This Viscosity Hierarchy keeps every product working as intended.
Why it matters when you layer them:
- Start with Damp Skin Application — serums spread more evenly and absorb faster
- Follow the thin to thick rule to prevent Pilling Prevention issues
- Watch for Silicone Interaction — applying thick creams too fast causes balling
- Save Occlusive Layer Placement for last to seal everything in
- Layering skincare products correctly means ideal product layering and application order every time
Morning Routine Order: Cleanser to SPF
Once your layers are ordered thin to thick, the sequence locks in fast. Start with your pH balanced cleanser, pat dry — yes, the Patting Dry Technique matters for Sunscreen Pilling Prevention later.
Then serum, moisturizer, SPF. Build in a short Absorption Waiting Time between steps, and do a quick Texture Compatibility Check before adding each layer.
Evening Routine Order: Cleanser to Night Cream
Your evening routine has five clear moves.
After cleansing, Pat Dry Technique leaves skin slightly damp — that’s your cue for Damp Skin Application of toner, then serum.
Active Treatment Timing matters here: retinol goes on before moisturizer, never after.
Eye Cream Placement follows your serum step, using just a tiny amount.
Seal everything with Night Cream Texture that locks in all that product layering order.
How Long to Wait Between Product Layers
Waiting isn’t wasted time — it’s doing real work. Rushing your product layering order is the fastest way to end up with pilling, streaky sunscreen, or diluted actives.
Here’s your simple guide to Drying Time Checks and Active Absorption Timing:
- Water-based serums: 1–2 minutes for Texture Viscosity Timing
- Retinoids/acids: fully dry skin only — Pilling Prevention starts here
- Moisturizer: 2–3 minutes before Sunscreen Layer Readiness
- Sunscreen: wait until skin feels smooth, not tacky
Master ingredient layering, master your results.
Best Skincare Ingredients for Beginners to Know

You don’t need a shelf full of products to see real results — you just need the right ingredients. As a beginner, knowing what’s actually in your skincare and why it matters makes all the difference.
Here are five ingredients worth getting familiar with first.
Hyaluronic Acid for Deep Hydration
Hyaluronic acid is basically your skin’s best drinking buddy — it pulls water in and holds onto it. Molecular weight variants matter here: high-weight forms sit on the surface and smooth things out, while low-weight versions go deeper.
Always do damp skin application before your moisturizer seals everything in.
Serum vs gel? Either works — crosspolymer technology in both keeps things lightweight and non-tacky.
Niacinamide for Barrier Support and Pore Minimizing
Niacinamide is a quiet overachiever — one ingredient doing four jobs at once.
It boosts lipid production for real skin barrier protection and barrier‑strengthening support, manages sebum control, so you’re not shiny by noon, and delivers inflammation soothing that calms redness and irritation fast. The pore minimizing and pore refinement benefits come naturally from less oil buildup.
Consistent use keeps skin barrier maintenance on autopilot.
Vitamin C for Brightening and Antioxidant Defense
Vitamin C is your morning routine’s secret weapon. Through free radical scavenging, it neutralizes the oxidative damage that sunlight and pollution throw at your skin daily.
Tyrosinase inhibition means it’s actively working on hyperpigmentation reduction — fading dark spots over time. It even delivers a collagen synthesis boost for firmer-looking skin.
Just check for good formulation stability or encapsulation techniques — vitamin C serums oxidize fast when exposed to air and light.
Retinol for Cell Turnover and Anti-Aging
Retinol is the top choice of anti-aging skincare — and for good reason. It works by accelerating cell renewal, pushing fresh skin to the surface while supporting collagen synthesis underneath.
Retinol concentration levels matter: start low (0.025–0.05%) a few nights per week. Retinol application timing is always in the evening. Manage retinol irritation by buffering it with moisturizer.
Consistent use = real results.
Ceramides for Restoring The Skin Barrier
If retinol is your skin’s personal trainer, ceramides are the recovery team. These lipid molecules live naturally in your skin barrier, locking in hydration and keeping irritants out.
When that barrier gets depleted, dryness and redness follow fast.
Look for ceramide types like NP, AP, and EOP — ideally paired with cholesterol and fatty acids for real lipid mix synergy. Apply your ceramide moisturizer right after cleansing for the best barrier repair benefits.
How to Customize Your Routine to Your Skin Type

No two skin types play by the same rules, so a routine that works for your oily-skinned friend might leave your dry skin feeling like parchment. The good news is that once you know your skin type, tweaking your routine is pretty straightforward.
Here’s exactly what to focus on for each one.
Best Routine Steps for Oily and Acne-Prone Skin
Oily, acne-prone skin needs a targeted game plan. Start with an oil-free foaming cleanser — double cleansing at night removes sunscreen and buildup without overdoing it.
Follow with salicylic acid for pore-clearing action, then a light gel moisturizer with niacinamide for oil control.
Add a targeted spot treatment where needed, and save evening retinoid use for after your skin adjusts.
Noncomedogenic moisturizers for oily skin only — always.
Best Routine Steps for Dry and Dehydrated Skin
Dry and dehydrated skin craves a hydration strategy that starts at the sink. Use a gentle cleanser with a Low-Temperature Rinse — hot water steals moisture fast.
Pat Dry Technique matters too; no rubbing. Apply hyaluronic acid HA on damp skin, then Double-Apply Moisturizer packed with ceramides and fatty acids.
Finish with a Facial Oil Seal or Nighttime Occlusive Seal to lock everything in overnight.
Best Routine Steps for Combination Skin
Combination skin is basically two skin types sharing one face — and that’s exactly how you treat it.
Use a lightweight gel cleanser to handle T-zone oil control without stripping your cheeks.
Layering products strategically matters here: a niacinamide serum across the whole face, then a richer moisturizer on dry cheeks only.
For cheek dryness management, spot care timing is everything — save oil-absorbing clay strictly for the T-zone.
Best Routine Steps for Sensitive and Rosacea-Prone Skin
Sensitive and rosacea-prone skin needs a routine built around one rule: if it causes stinging, it’s not for you.
Start with a Fragrance-Free Cleanser and follow with a Redness-Reducing Serum like azelaic acid or niacinamide — both are anti-inflammatory ingredients; your skin will thank you for.
Keep your Barrier-Boosting Moisturizer simple, and always finish mornings with Mineral Sunscreen.
- Use a gentle cleanser with lukewarm water only.
- Introduce products gradually — a few times per week first.
- Reserve Nighttime Prescription options like metronidazole for evenings.
Fragrance-free formulas aren’t optional here — they’re essential for rosacea management.
Adjusting Your Routine for Hyperpigmentation Concerns
Dark spots don’t fade overnight — but the right routine stacks the odds in your favor.
| Step | Morning | Evening |
|---|---|---|
| Cleanse | Gentle, non-stripping formula | Full double-cleanse |
| Treat | Vitamin C + niacinamide | Nighttime Brightening Routine with retinoids |
| Protect | Tinted Sunscreen (SPF 50+) for Visible Light Protection | Barrier moisturizer |
Your Ingredient Layering Strategy and Spot Treatment Timing matter more than you think — hyperpigmentation requires daily, consistent sunscreen above everything.
Why Daily Sunscreen is Non-Negotiable

Sunscreen isn’t just a nice-to-have — it’s the one step that protects everything else you’re doing for your skin. Skip it, and UV damage quietly undoes all the progress your serums and treatments are making.
Here’s what you actually need to know to use it right.
UVA Vs. UVB Rays and What Broad-Spectrum Means
Think of UV rays as two uninvited guests — UVB burns the surface while UVA quietly sinks deeper, breaking down collagen and triggering dark spots over time.
That’s why broad-spectrum SPF 30 matters: it covers both. A product labeled just "SPF" without a broad-spectrum definition may leave your skin wide open to UVA photoaging effects, even on cloudy days.
Physical Vs. Chemical Sunscreen Formulas Explained
There are two ways sunscreen gets the job done — and they work very differently.
Chemical sunscreen uses organic UV filters that absorb UV radiation and convert it to heat. Physical (mineral) sunscreen relies on mineral UV blockers like zinc oxide and titanium dioxide, which scatter and reflect rays off your skin.
Here’s what matters most:
- Absorption vs reflection: Chemical filters work from within the skin layers; mineral filters sit on top.
- Photostability differences: Mineral sunscreens are more photostable — chemical filters like avobenzone can break down without stabilizers.
- Particle size impact: Micronized mineral particles reduce that dreaded white cast without sacrificing UV protection.
Neither is better — just different fits for different skin.
How Much Sunscreen to Apply and When to Reapply
Most people apply way too little — and that’s where SPF quietly fails you. Use two finger lengths of sunscreen to cover your face and neck fully, including your hairline and ears — those missed areas burn fast.
Wait 15 minutes before sun exposure, then reapply every two hours.
After swimming or sweating, water resistance limits mean it’s coming off regardless. Reapply.
Sunscreen as Your Most Effective Anti-Aging Step
Sunscreen isn’t just a summer thing — it’s your single most powerful antiaging move. UV rays break down collagen daily, triggering DNA damage, hyperpigmentation, and lost elasticity before you ever notice.
Sunscreen is your most powerful anti-aging weapon — UV rays silently break down collagen every single day
Broad-spectrum SPF 30 gives you real collagen preservation and antioxidant defense against both UVA and UVB.
Make sun protection a non-negotiable habit, and you’re genuinely preventing premature aging where it starts.
What About Exfoliation, Masks, and The 4-2-4 Rule

Once you’ve nailed the basics, exfoliation and deep-cleansing steps are where your routine gets a real upgrade. There’s more than one way to slough off dead skin, and timing matters more than most people realize.
Here’s what you need to know before adding these steps in.
Chemical Vs. Physical Exfoliation Methods
Regarding exfoliation methods, chemical vs. physical options work very differently. Physical exfoliants use particle size and friction to manually buff away dead cells — think scrubs or washcloths.
Chemical exfoliants like AHAs and BHAs shift pH impact at the surface to dissolve those bonds instead.
Enzyme benefits offer a gentler third path.
Managing acid strengths carefully prevents irritation and keeps your barrier intact.
How Often to Exfoliate by Skin Type
Now that you know the difference between chemical and physical exfoliation methods, the next step is timing it right for your skin type.
- Oily/acne-prone – BHA timing matters here; salicylic acid 1–3x weekly controls clogged pores without barrier damage.
- Dry skin – AHA frequency stays low — once weekly max, paired with a rich moisturizer.
- Combination – Split your approach: BHA on the T-zone 1–2x weekly, skip dry cheeks.
- Sensitive – Exfoliate every 1–2 weeks; barrier recovery is the priority.
- Normal – 1–2x weekly keeps things balanced.
Watch for peel timing red flags — tightness or persistent redness means you’ve gone too far. Seasonal adjustments help too; scale back in winter when skin’s already stressed.
When and How to Use a Face Mask
Face masks are the bonus boost — not the foundation. After cleansing, apply your clay mask in a thin, even layer and rinse within 5–15 minutes before it fully cracks.
Hydrating mask benefits are real, but mask frequency matters: 1–3 times weekly max. Always patch test first, follow with moisturizer, and skip strong actives the same session.
What is The 4-2-4 Cleansing Method and How It Works
Think of the 4-2-4 cleansing method as the double cleansing method’s more intentional sibling. Here’s how it breaks down:
- 4 minutes – Massage the cleanser gently across dry skin
- 2 minutes – Contact phase benefits kick in as the formula dissolves residue
- 4 minutes – Rinse thoroughly with lukewarm water
- Pat dry – Barrier preservation starts immediately with moisturizer
Time allocation matters. Fingertip massage technique only – no cloths.
Common Skincare Routine Mistakes to Avoid

Even a solid routine can quietly work against you if a few key habits are off. Most skin frustrations — breakouts, dryness, irritation — trace back to mistakes that are surprisingly easy to fix once you know what to look for.
Here are the ones that show up most often.
Introducing Too Many Actives at Once
Launching five new actives at once is a fast track to a damaged skin barrier — redness, stinging, and flaking show up fast. Instead, lean into gradual ingredient introduction: add one active every two weeks, patch testing it on your inner arm first.
That way, irritation monitoring actually tells you something. Smart active scheduling strategy and ideal product layering protect your skin sensitivity long-term.
Over-Cleansing and Stripping Your Skin Barrier
Washing your face three times a day isn’t dedication—it’s damage. Frequency limits exist for a reason: cleansing too often strips ceramides and disrupts skin barrier function, leaving you with tightness, flaking, and real skin sensitivity and irritation.
Watch your water temperature too—hot water weakens barrier lipids fast. Stick to twice daily, choose a gentle cleanser with low surfactant strength, and always prioritize post-cleanse hydration immediately after.
Skipping Sunscreen on Cloudy or Indoor Days
Clouds don’t block UVA rays — and neither does your window glass. UVA penetration happens whether you’re driving, sitting by a window, or stepping out on an overcast afternoon.
Cloudy day UV exposure is real, and so is invisible UV damage that quietly breaks down collagen.
Make broad-spectrum SPF 30 a daily sun protection habit, indoors or out.
Mixing Incompatible Ingredients Like Retinol and Strong Acids
Retinol and strong acids — like alpha hydroxy acids, beta hydroxy acids, or a chemical peel — can absolutely coexist in your routine, just not on the same night. Effective product layering and application order matter here.
Alternate day scheduling keeps retinoids and exfoliating acids from stacking irritation. Try buffering with moisturizers using the sandwich method, and watch for irritation signs: redness, flaking, or tightness are your cues to back off.
Lifestyle Habits That Support a Healthy Skincare Routine

Your skincare products can only do so much if the rest of your life is working against them. What you eat, how you sleep, and how you handle stress all show up on your face eventually.
Here’s what actually moves the needle beyond your morning routine.
How Diet and Hydration Affect Skin Condition
Your skin is basically a mirror of what you’re eating. Here’s what moves the needle most:
- Hydration — Water-rich foods like cucumbers, berries, and leafy greens support skin hydration from the inside out.
- Omega-3 fats — Fatty fish reduce inflammation behind breakouts and redness.
- Low glycemic meals — Swapping sugary snacks for whole grains helps calm oil production.
A healthy diet for skin — including vitamin C intake and an antioxidant-rich diet — genuinely matters.
The Role of Sleep and Stress in Breakouts and Aging
Poor sleep and stress aren’t just draining your energy — they’re actively working against your skin. A cortisol surge raises inflammatory hormones that overstimulate oil glands, making breakouts worse.
Sleep deprivation slows barrier repair and disrupts your skin’s circadian disruption cycle, dulling your complexion over time. Real beauty sleep matters: your skin does its heaviest rebuilding at night, making stress impact on skin far deeper than it looks.
How Long Before You See Real Skincare Results
Just like sleep impacts your results, so does patience. Your skin cell turnover timeline runs on its own clock — and rushing it gets you nowhere.
Here’s what the timeline actually looks like:
- Visible Hydration Timeline: 1–3 days for less tightness; 2–4 weeks for real barrier repair time
- Acne Improvement Period: 4–6 weeks for early changes; 8–12 weeks for significant clearing
- Brightening Onset: 2–4 weeks with vitamin C; dark spots take 8–12 weeks
- Anti-Aging Results: Smoother texture in 4–8 weeks; fine lines shift after 3–6 months
- Barrier Repair Time: Irritation often calms within 3–7 days with gentler products
Consistency over complexity in skincare wins every time. Daily routine consistency — not product-hopping — is what drives long-term skin maintenance.
When to See a Dermatologist for Skin Concerns
good routine gets you far — but it has limits.
If you’re dealing with persistent acne that won’t budge after 12 weeks of consistent acne treatment, sudden rash or hive outbreaks, mole changes, unexplained itching lasting weeks, or any infection signs like spreading redness and swelling, that’s your cue.
Skin sensitivity and irritation that keep worsening, or hyperpigmentation that deepens despite SPF — a dermatologist recommendation isn’t overkill. It’s just smart.
Frequently Asked Questions (FAQs)
How do I create a skin care routine?
Building a skin care routine is a lot like setting up a new habit — start simple.
Cleanse, moisturize, and apply sunscreen every morning. Determine your skin type first, then layer products lightest to heaviest.
How do I choose a skincare routine?
Start with your skin type, pick one goal, and keep it simple. Three steps beat ten every time. Know your skin, choose accordingly, and adjust as seasons shift.
Do you really need a skin care routine?
Yes — but it doesn’t have to be complicated. A simple 3-step routine covering cleanse, moisturize, and SPF covers most of what your skin actually needs, every single day.
How do you maintain a smooth skin?
Smooth skin is less about magic products and more about consistency.
A gentle exfoliant, a solid moisturizer packed with hyaluronic acid, niacinamide, and peptides, plus microbiome balance, hydrating mists, nightly oil treatment, facial massage, and a cold water rinse keep things glowing.
How do I build my own skincare routine?
Your skin type identification is step one. Then build around three essentials: a gentle cleanser, moisturizer, and SPF. Simple, budget-friendly options work beautifully — no ten-step chaos required.
What are the 7 steps of skincare?
Cleanse, treat, moisturize, protect — that’s the core. The 7 steps are: cleanser, toner, serum, eye cream, moisturizer, face oil, and sunscreen (morning only).
Can you use retinol and vitamin C together?
You can — but timing matters. Vitamin C works best in the morning, retinol at night.
Using both at once increases irritation risk, so separate them by routine if your skin runs sensitive.
Is toner a necessary step for everyone?
Toner isn’t a must-have for everyone. If your cleanser leaves skin comfortable and your moisturizer covers hydration needs, you can skip it. It’s a helpful extra — not a rule.
How does makeup affect your skincare routine?
Makeup changes everything. Residue, comedogenic ingredients, and skipped double cleansing can clog pores and cause breakouts. Always remove makeup fully — your routine works better on a clean slate.
Can skincare products expire or go bad?
Yes, they absolutely can.
Most products have a shelf life—once opened, preservative efficacy drops over time, and signs like odd smells, texture shifts, or vitamin C turning brown mean it’s time to toss them.
Conclusion
The secret to great skin is surprisingly simple: less really is more. You don’t need a 12-step routine or a shelf full of serums to get glowing results.
By focusing on a handful of proven ingredients, understanding your skin type, and sticking to a straightforward regimen, you’ll be on your way. Mastering how to build a facial skincare routine that actually works starts with simplicity—and that’s where your journey to radiant, healthy skin begins today.