This site is supported by our readers. We may earn a commission, at no cost to you, if you purchase through links.

Most shower heads don’t need a single tool to install—just your hands and about five minutes. The secret lies in modern designs that use built-in rubber gaskets to create watertight seals, eliminating the need for wrenches or plumber’s tape in many cases.
This simple reality transforms what many homeowners assume requires professional help into a straightforward weekend upgrade. Whether you’re swapping out a water-wasting relic for an eco-friendly model or simply updating your bathroom’s look, the process boils down to unscrewing the old fixture and threading on the new one.
The real challenge isn’t the installation itself—it’s knowing which preparation steps prevent leaks and guarantee your new shower head performs flawlessly from day one.
Table Of Contents
- Key Takeaways
- Benefits of Tool-Free Shower Head Installation
- Choosing The Right Shower Head for No-Tool Installation
- Preparing for a Wrench-Free Shower Head Install
- Step-by-Step Guide to Installing Without Tools
- Troubleshooting Common Installation Issues
- Maintenance Tips for Your Tool-Free Shower Head
- Top Tool-Free Shower Head Accessories
- Frequently Asked Questions (FAQs)
- Conclusion
Key Takeaways
- Modern shower heads install in about five minutes using hand-tightening alone, eliminating the need for wrenches or professional help thanks to built-in rubber gaskets that create watertight seals.
- Proper preparation—applying three clockwise wraps of Teflon tape, cleaning threads thoroughly, and using a rubber glove for extra grip—prevents leaks and ensures your new fixture performs flawlessly from day one.
- Tool-free installation saves money immediately since you’ll reuse existing connections and skip plumber fees, while modern low-flow designs cut water usage to 1.5 gallons per minute without sacrificing spray quality.
- Regular maintenance like weekly visual checks, monthly pressure tests, and natural vinegar soaks to remove mineral buildup keeps your hand-installed shower head working reliably for years without requiring any special tools.
Benefits of Tool-Free Shower Head Installation
Installing a shower head without tools isn’t just convenient—it puts you in control of a quick bathroom upgrade without scheduling a plumber or digging through your toolbox.
If you have kids, choosing a shower head designed for children can make installation even more rewarding since you’ll tailor the bathroom to your family’s needs.
You’ll save time, skip the hassle of wrenches and adjustable fittings, and still get professional-looking results. Here’s what makes tool-free installation worth your effort.
Quick and Easy Bathroom Upgrades
Swapping your shower head is just the start of a bathroom refresh you can tackle without calling anyone. Tool-free installation makes this upgrade feel like the beginning of a whole new routine—proof that small changes add up fast.
Here’s what else you can transform in minutes:
- Update bathroom lighting with energy-efficient fixtures that brighten every corner
- Install peel-and-stick tile designs behind the shower for instant visual impact
- Swap vanity updates like mirrors or faucets in matching finishes
- Add bathroom storage using floating shelves or adhesive organizers
- Replace shower enclosures’ curtain rods with no-drill aluminum options
To further personalize your space, consider a simple DIY bathroom upgrade like creating a faux frame for your mirror using painted wood strips. These wrench-free solutions put you in control.
Water-Saving and Modern Features
Modern shower head technology brings water efficiency right into your hands. Low flow systems cut usage to 1.5 gallons per minute while mixing air with water—you won’t sacrifice spray quality.
Smart faucets with eco friendly designs track consumption per session, and some WaterSense labeled models reduce daily use by 30 percent. Tool-free installation means you’ll start saving immediately without leak prevention hassles.
Cost-Effective DIY Solutions
You’ll slash costs on this DIY home improvement project by reusing old fixtures whenever threads remain clean.
Budget material choices matter—discount retailers stock quality chrome shower heads under twenty dollars, and tool-free installation means you won’t buy wrenches.
This wrench-free approach to DIY plumbing lets you follow a shower head installation guide using hand tension alone, keeping your wallet happy.
Choosing The Right Shower Head for No-Tool Installation

Not every shower head is built for wrench-free installation, so you’ll want to shop with intention. The packaging or product description should mention “hand-tightening” or “tool-free” to confirm you won’t need hardware down the line.
Let’s walk through the design types, styles, and must-have features that make a no-tool swap both possible and leak-free.
Tool-Free and Hand-Tightening Designs
You’ll find tool-free installation shower heads use larger knurled grip designs with rubberized or satin finishes that won’t slip when your hands are wet.
These wrench-free solutions feature built-in elastomeric washers and sealing mechanisms that create watertight connections with just hand-tightening. Most fit standard 1/2 inch NPT threads, though some include adapters for different sizes, ensuring universal thread compatibility without risking damage from over-torquing.
Types: Handheld, Rainfall, and Fixed
Each shower head style brings a different feel to your daily rinse. Handheld showers give you the freedom to direct water exactly where you need it, rainfall models deliver that spa-like downpour, and fixed heads keep things simple with reliable, full-body coverage—all compatible with tool-free installation.
- Handheld shower heads attach via flexible hose with quick-detach triggers for controlling water pressure on the fly
- Rainfall shower heads use broad, flat faces with numerous nozzles to recreate a gentle, natural spray pattern
- Fixed shower heads mount directly to the shower arm with hand-tightening threads for straightforward shower head replacement
- Standard 1/2 inch threads make most shower head types compatible with your existing shower system without special adapters
Key Features to Look For
A solid shower head replacement starts with the right features. Look for hand-tightening designs with built-in gaskets that eliminate the need for Teflon tape and deliver leak prevention through self-sealing technology.
These quick-install options are perfect if you’re exploring shower heads for relaxation that prioritize both convenience and calming water flow.
Prioritize shower head materials like brass or stainless steel for durability, plus flow control settings that boost water efficiency while maintaining pressure—all supporting true wrench-free, tool-free installation.
Preparing for a Wrench-Free Shower Head Install

Before you start unscrewing anything, a little prep work goes a long way toward a smooth, leak-free installation.
You don’t need a toolbox full of equipment, but you do need to handle a few quick tasks first.
Here’s what to take care of before you touch that old shower head.
Turning Off The Water Supply
Before you touch anything, you’ll want to locate the shut-off valves that control water supply to your shower. For most tool-free installations, you won’t need the main shut-off—just turn the shower control to “off.”
However, knowing your valve location matters for emergency protocol and leak prevention during any plumbing DIY project. This wrench-free approach keeps things simple and stress-free.
Gathering Essential Materials
You’ll need just a handful of plumbing essentials for this wrench-free installation. Your new shower head kit should include the unit itself, washers, and sometimes pre-installed gaskets.
Grab Teflon tape (also called plumbers tape) to seal the threads—three clockwise wraps does the trick. For material selection, consider a rubber glove or silicone grip pad to boost hand-tightening power without needing tool alternatives.
Protecting Your Tub and Fixtures
Before you start your tool-free installation, a little prep work saves a lot of headaches. Here’s how to keep your bathroom looking sharp:
- Lay a thick towel or cardboard over the tub—dropped shower heads won’t scratch your finish.
- Use painter’s tape on chrome fixtures to prevent scuff marks.
- Place a damp cloth along the tub rim for leak prevention.
- Turn off the water supply completely.
- Keep plumbers tape and surface shielding materials within arm’s reach.
Step-by-Step Guide to Installing Without Tools
Ready to swap out your shower head without hunting for a wrench? Here’s exactly how you can get it done using just your hands and a little prep.
Let’s walk through each step so you know what to expect.
Removing The Old Shower Head by Hand

Removing your old shower head by hand is easier than you’d think. First, confirm you’ve shut down the water supply to prevent unexpected drips.
Grip the shower head firmly with one hand while steadying the shower arm with the other—this keeps the pipe from spinning during hand removal.
Turn counterclockwise using steady pressure, not force, to avoid thread damage and guarantee smooth wrench-free shower head replacement. For tips on selecting the best fixture for your bathroom, see this guide on universal shower head connections.
Cleaning The Shower Arm Threads

Once you’ve unscrewed the old fixture, leak prevention becomes your next priority. Grab a stiff brush or old toothbrush and scrub clockwise along the shower arm threads to tackle mineral buildup and debris elimination.
Wipe everything dry with a cloth, checking for rough spots that could compromise your tool-free installation. Surface smoothing now means a proper seal when you apply Teflon tape next.
Applying Teflon Tape for a Watertight Seal

With clean threads, you’re ready to apply Teflon tape for thread sealing and leak prevention. Wrap three full turns clockwise—matching the tightening direction—starting one thread back from the end.
Keep it tight and flush with no gaps. This watertight seal is your insurance against drips in your tool-free installation, so take your time getting it smooth and even.
Hand-Tightening The New Shower Head

Now comes the satisfying part: thread the new shower head onto the arm, turning clockwise with steady hand pressure. Your hand-tightening technique should feel snug without forcing—plastic fittings especially can crack if you muscle them too hard.
That towel-grip trick works wonders if things get slippery. Stop when resistance builds naturally; you’ll feel the seal engage, signaling your wrench-free installation is complete.
Troubleshooting Common Installation Issues

Even with careful preparation, a few hiccups can pop up during your tool-free installation.
The good news is that most problems have quick fixes that won’t send you running for a wrench.
Let’s walk through the most common snags and how to handle them using just your hands and a few household items.
Fixing Leaks Without Tools
Caught a drip after your tool-free installation? Don’t panic—most leaks can be fixed without reaching for a wrench. Start by wrapping three tight rounds of plumber’s tape clockwise around the threads for leak detection and prevention. Hand-tightening a quarter turn past resistance usually seals the deal.
For emergency repairs, apply silicone sealant sparingly around the base, or try rubber self-adhesive tape for temporary fixes until you’re ready for a permanent wrench-free solution.
Enhancing Grip With Rubber Gloves
Struggling to get enough torque for hand-tightening? Rubber gloves transform slippery shower head replacement into a secure grip experience.
The textured coating on dishwashing gloves creates slip resistance against chrome fixtures, letting you apply firm pressure without your hands sliding off. Look for nitrile or latex options with raised palm patterns—they channel water away while maintaining friction for tool-free installation success.
Addressing Low Water Pressure
Low water pressure after tool-free installation often signals issues beyond the shower head itself. Before assuming your new fixture is faulty, investigate these common culprits that affect flow rates:
- Check your home’s water pressure with a gauge—it should read between 40 and 60 psi for ideal performance
- Inspect the main shutoff valve to confirm it’s fully open, as partial closure reduces pressure throughout your home
- Remove and clean mineral buildup from the shower head nozzles using a mild vinegar solution
- Examine pipes for scaling or corrosion that restricts flow and consider leak detection to rule out hidden drips
- Verify your pressure reducing valve is set correctly, or explore pressure boosters if municipal supply runs low
These water conservation checks restore satisfying spray without compromising your leak prevention efforts.
Maintenance Tips for Your Tool-Free Shower Head

Getting your new shower head installed is just the first step—keeping it running smoothly takes a little ongoing attention.
The good news is that maintenance doesn’t require any special tools or plumbing expertise. Here’s what you need to do to keep your shower head working like new for years to come.
Regular Leak Checks and Tightening
You’ve installed your shower head without a wrench—now let’s keep it that way. Weekly visual inspections catch moisture or corrosion early, while a full pressure test every six months ensures your hand-tightening and seal maintenance are holding strong. Within 24 hours of your tool-free installation, recheck for leaks—it’s your best shot at leak prevention before small drips become bigger headaches.
| Check Type | Frequency | What to Look For |
|---|---|---|
| Visual Inspection | Weekly | Moisture, corrosion around shower arm |
| Pressure Test | Every 6 months | Seal integrity, water pressure consistency |
| Post-Install Check | Within 24 hours | Any leaks after hand-tightening |
| Seasonal Faucet Inspection | Twice yearly | Overall connection stability, wrench-free tightening tips |
If water pressure drops suddenly, inspect within 48 hours—hidden leaks don’t announce themselves. Tightening tips for leak detection: a gentle clockwise turn by hand usually does the trick without tools.
Cleaning Mineral Buildup Naturally
Hard water leaves mineral deposits that can choke your shower head over time, but you don’t need harsh chemicals to fix it. Natural descalers work wonders for bathroom maintenance—even on your tool-free installation.
- Vinegar remedies: Soak parts in white vinegar for several hours to dissolve calcium buildup, then scrub and rinse thoroughly
- Lemon juice cleaning: Rub fresh lemon halves directly on stains, let sit 5-10 minutes before rinsing
- Baking soda scrub: Make a paste with water for gentle abrasion that won’t scratch finishes
- Steam removal: Direct steam onto fixtures to soften scale without chemicals
- Prevention: Dry your shower head after use to minimize future mineral buildup
Ensuring Long-Lasting Performance
Your tool-free installation won’t last if you ignore the small stuff. Every month, run water for 30 seconds and inspect for drips—early leak prevention saves headaches.
Replace worn washers at the first sign of trouble, and swap out Teflon tape during maintenance schedules to keep water pressure steady. Quality sealant materials and proper thread durability mean fewer shower head replacement projects down the road.
Top Tool-Free Shower Head Accessories
While most modern shower heads install by hand, having a few quality shower heads accessories on standby can make the job even easier when you hit a stubborn connection.
The right wrench gives you leverage without damaging your new fixture’s finish, and honestly, it’s nice to have options when hand-tightening just isn’t cutting it. Here are three reliable wrench sets that work perfectly for those rare moments when you need a little extra grip.
1. Grenpro Ratcheting Wrench Set
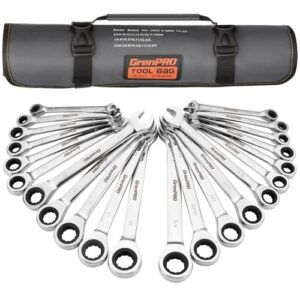
You might wonder why a wrench set appears in a tool-free guide—sometimes stubborn connections need backup. The Grenpro 22-piece ratcheting set offers both SAE and metric sizes, covering 1/4″ to 3/4″ and 6-18mm ranges.
Its 72-tooth mechanism works smoothly in tight spaces, while the chrome vanadium steel construction resists corrosion from bathroom moisture. The 12-point box end grips securely without rounding fasteners.
You’ll appreciate the durable storage bag keeping everything organized, and at 8.77 inches long, these wrenches provide solid leverage when hand-tightening just won’t cut it.
| Best For | DIYers and professionals who need reliable backup for stubborn plumbing connections that won’t budge with standard tools. |
|---|---|
| Material | Chrome Vanadium Steel |
| Finish | Chrome |
| Box End Design | 12-Point |
| Size Range | SAE and Metric |
| Storage Included | Durable Bag |
| Use Case | Automotive and Household |
| Additional Features |
|
- 22-piece set covers both SAE and metric sizes, so you’ll have the right fit for most plumbing fixtures
- 72-tooth ratchet mechanism lets you work in tight bathroom spaces without needing much swing room
- Chrome vanadium steel holds up well against bathroom moisture and corrosion
- Carrying case design could use improvement for better organization
- Long-term durability of the ratcheting mechanism depends heavily on how often you use it
- Some users haven’t tested it enough to confirm how it performs over time
2. Workpro Combination Wrench Set
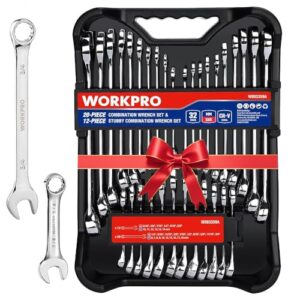
When one ratcheting set isn’t enough, you’ll want the Workpro 32-piece combination offering both standard and stubby lengths. Its forged chrome vanadium steel tackles auto repairs, home maintenance, and bicycle upkeep with mirror-polished durability.
The 12-point box end increases your access angle while preventing fastener damage. You’ll get 20 standard wrenches plus 12 compact stubbies, all organized in a premium tray weighing just 5.48 pounds.
This set excels at DIY projects without tolerating cheater pipes or industrial abuse.
| Best For | DIY enthusiasts and new homeowners who need a versatile wrench set for auto repairs, home maintenance, and general garage projects without heavy-duty industrial demands. |
|---|---|
| Material | Chrome Vanadium Steel |
| Finish | Mirror Polished Chrome |
| Box End Design | 12-Point |
| Size Range | SAE and Metric |
| Storage Included | Premium Tray |
| Use Case | Auto and Home Maintenance |
| Additional Features |
|
- Includes both standard and stubby wrenches in SAE and metric sizes for maximum versatility
- Forged chrome vanadium steel with mirror-polished finish offers durability and corrosion resistance
- Premium organization tray keeps 32 pieces organized and portable at just 5.48 pounds
- Not built for heavy-duty applications or excessive torque like industrial settings
- Cannot handle extreme force such as using cheater pipes or breaker bars
- Quality may fall short compared to premium professional-grade tool brands
3. Max Torque Combination Wrench Set
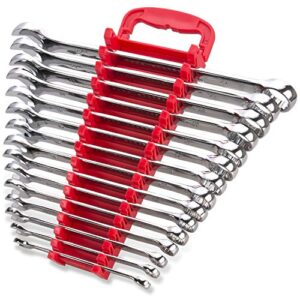
Beyond sheer piece count, you need real bite when plumbing fixtures refuse to budge. The Max Torque set grips nuts 25 percent tighter than standard wrenches thanks to aggressive jaw geometry that prevents rounding even on corroded threads.
Its I-beam handle spreads load across your palm, reducing fatigue when you’re wrestling stubborn shower arms. Ink-filled labels stay legible through oil and water exposure, while the chrome finish wipes clean after messy work.
Available in 7-piece or 15-piece configurations with lifetime guarantees.
| Best For | DIYers and homeowners tackling plumbing repairs, auto work, and general maintenance who need strong grip on stubborn fasteners without paying premium tool prices. |
|---|---|
| Material | Chrome Vanadium Steel |
| Finish | Mirror Chrome |
| Box End Design | 12-Point |
| Size Range | Metric Only |
| Storage Included | Organizing Rack |
| Use Case | Auto Repairs and Construction |
| Additional Features |
|
- V-cut open ends and 12-point box design deliver 25% better grip than standard wrenches, preventing rounded corners on corroded nuts
- Chrome vanadium steel with rust-resistant finish holds up to messy conditions and wipes clean easily
- 15-piece metric set with storage rack covers common sizes from 8mm to 22mm for versatile home and garage use
- Open ends may flex under heavy torque compared to high-end brands like Snap-On
- Can slip on severely rusted or damaged fasteners despite improved grip design
- Not built for precision or professional-grade heavy-duty applications
Frequently Asked Questions (FAQs)
How to loosen a tight shower head without tools?
Stuck shower heads can feel like wrestling a mule. Wrap a damp cloth around the connection for better grip, then turn counterclockwise using steady pressure.
Rubber gloves work wonders too.
Can I install a shower head in apartments?
Yes, you can install a shower head in most apartments. Check your lease for fixture policies first, and keep the original head to reinstall before moving out if required.
How often should I replace shower heads?
You should inspect your shower head annually and replace it every six to twelve months in hard water areas, or every twelve to twenty-four months in soft water conditions with minimal buildup.
What if my shower arm is damaged?
A damaged arm needs replacing before you attach any new head.
Like a frayed rope, a cracked or bent arm can leak behind walls, causing hidden water damage that’s costly to repair later.
Do all shower heads come with Teflon tape?
Not every shower head includes Teflon tape in the package. Some manufacturers include it, while others assume you’ll grab your own roll.
Check your kit before starting, or pick up a roll just in case.
Conclusion
Last month, a homeowner in Portland replaced three outdated fixtures in under twenty minutes—no toolbox required. That’s the beauty of learning how to install a shower head without tools: you’re not just upgrading hardware, you’re reclaiming weekend hours usually lost to complicated projects.
Hand-tighten with confidence, check for drips within 24 hours, and enjoy immediate water savings. Your bathroom transformation doesn’t need professional intervention—just clean threads, steady hands, and five focused minutes.
- https://www.pinterest.com/anorganizedseason/
- https://www.facebook.com/anorganizedseason/
- https://www.instagram.com/anorganizedseason/
- https://umaine.edu/news/blog/2022/12/14/macrae-speaks-to-bdn-about-pfas-in-plumbing-tape/
- https://www.reddit.com/r/Advice/comments/1j0axdh/how_do_i_put_on_a_new_shower_head_the_current_one/