
This site is supported by our readers. We may earn a commission, at no cost to you, if you purchase through links. This content is for general informational and educational purposes only and is not a substitute for professional medical, dermatological, or nutritional advice.
That sharp tug in your nostril isn’t bad luck. It’s a trimmer yanking hair out by the root instead of cutting it, and your skin pays for it.
Pulling happens for plain reasons. Dull blades snag. Heavy pressure bends hairs away from the cutter. Pushing too deep reaches thick follicles that resist the blade. Each mistake turns a two-minute task into a watering-eyed wince.
Learning how to avoid pulling when using a nose hair trimmer gives you control over the result. You’ll pick a model with a rounded guard, prep your nostrils, and keep your blades sharp, so every pass cuts clean.
Table Of Contents
- Key Takeaways
- How Do You Stop Nose Hair Trimmer Pulling?
- Choose a Nose Trimmer That Cuts Cleanly
- Prepare Your Nose and Trimmer Before Use
- Use Light Pressure and Controlled Trimming Motions
- Clean and Maintain Blades to Prevent Pulling
- Avoid Overtrimming and Leave Protective Hairs Intact
- Frequently Asked Questions (FAQs)
- Conclusion
Key Takeaways
- Pulling comes from dull or dirty blades, heavy pressure, and pushing too deep, so keep the blade clean and sharp, press lightly, and use short upward strokes at the nostril entrance.
- Pick a trimmer with a rounded-tip guard, a motor that holds speed, and sharp stainless steel or titanium-coated blades, since cheap models with blunt cutters grab hair before they slice it.
- Prep your nose before you start by clearing mucus, patting the area dry so hairs stand up to be cut, and checking that the trimmer is charged and undamaged.
- Trim only the hairs you can see and leave about 5 to 10mm, because the coarse front hairs and the tiny cilia deeper inside filter dust and germs and move mucus toward your throat.
How Do You Stop Nose Hair Trimmer Pulling?

Why does a nose hair trimmer yank instead of cut? The blade grabs the hair before it can slice through. That tug stings, and it can leave the skin red and irritated.
Trimming too often only adds to that irritation, so knowing how often to use a nose hair trimmer helps your skin recover.
Pulling usually comes down to a few causes you can control. A dull or dirty blade snags. Too much pressure bends the hair away from the cutter. Pushing the head too deep reaches thick, resistant follicles. Damp, sticky hairs cling instead of standing up to be cut.
Dull blades pull hair instead of cutting it cleanly, so it helps to replace worn blades or the whole trimmer every 12 to 18 months.
The fix is simple and fast. Keep the blade clean, let a protective guard shield your skin, and work only at the nostril entrance with short upward strokes. Go slowly, and you’ll trim cleanly, with every single pass under your control.
Choose a Nose Trimmer That Cuts Cleanly
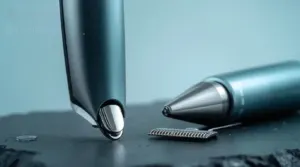
Your trimmer decides how this goes before you ever switch it on. A good electric nose hair trimmer cuts hair. A poor one plucks it. Cutting vs plucking is the whole difference between a clean pass and a sting that brings tears to your eyes.
If you’re still weighing speed against silence, this beginner’s guide to nose and ear trimmers helps you pick a model that cuts cleanly.
Look for these features, and you’ll protect yourself from the pain:
- Rounded tips on the guard, so nothing sharp nears your skin.
- A sturdy protective guard that feeds hair toward the blade without exposing your skin.
- A motor that holds speed, so it never stalls and yanks.
- Sharp stainless steel or titanium-coated blades that stay smooth, never burred.
Skip cheap models with blunt tips on the cutter. They always grab first and only slice later.
Prepare Your Nose and Trimmer Before Use

A good trimmer still pulls if you use it on a messy nose. Start by clearing the nostril opening. Blow your nose gently, or use a saline spray to loosen dried mucus. Debris blocks the hairs and gives the blades something to snag.
Once the area is clear, it helps to understand how nose and ear trimmers actually work, since knowing how the blades move makes gentle, snag-free passes easier.
Next, dry the area. Water makes hairs clump, so you can’t see which ones are exposed. Pat the nostril entrance dry with a tissue.
Check your trimmer before you switch it on. Look for a bent or damaged head, and make sure it’s firmly attached. Charge the battery, because weak power makes blades stall and tug. Wipe the clean blade and follow your manual on oil. Some models need a drop, others don’t.
Sit near a well-lit mirror. If your nostrils feel sore or irritated, wait.
Use Light Pressure and Controlled Trimming Motions
Once your nose is clean, dry, and your trimmer is charged, you’re ready to cut. Technique matters now, because most pulling comes from how you hold and move the tool.
Use light pressure. Let the trimmer glide. If you press it against the skin, the hairs bend and the blades yank them at the root.
Keep the tip just inside the nostril, near the inside edge. Don’t push deeper. Make short strokes of 3 to 5mm at a steady speed. Rush, and the blades snag longer hairs.
Add a gentle circular motion, or a back-and-forth, so you catch hairs that grow in different directions. Favor light strokes over long stray hairs, not one hard pass. Stop if you feel tugging.
Clean and Maintain Blades to Prevent Pulling

Hair trapped between the blades is the most common reason a trimmer starts tugging. Tool maintenance takes two minutes, and it keeps your cutting edge sharp enough to slice instead of yank.
Follow this routine:
- Remove trapped hairs after every use with the included brush, or rinse the head under warm water if your model is waterproof.
- Disinfect the blades with an alcohol pad or clipper spray. Good blade sanitation protects performance and your skin.
- Dry every part completely. Moisture causes rust, and rust creates dull blades.
- Add 1 to 3 drops of blade oil every few uses.
Store the trimmer somewhere dry with the protective tip covered. That keeps moisture and accidental knocks away from the delicate cutting surface.
Avoid Overtrimming and Leave Protective Hairs Intact

You don’t need a bare nose to get a clean look. Trim only the hairs you can see poking past the nostril entrance, and stop there.
Leave about 5 to 10mm of length. Those coarse hairs at the front trap dust, pollen and germs before they reach your lungs. Cut them too short and your nose loses its first line of defense.
Trim your nose hair, but keep a little length, because those coarse front strands quietly guard your lungs against dust, pollen, and germs
Never trim the tiny cilia deeper inside. They move mucus toward your throat, and damaging them raises your infection risk.
Work in small passes. Never push the blade deep. Check how your nose feels before you cut more. Dryness, irritation or frequent sneezing means you’ve gone too far, so let the hair grow back before the next session.
Frequently Asked Questions (FAQs)
Why does my nose hurt after using a nose hair trimmer?
Your nose can feel like it got hit by a freight train after trimming. The cause is usually dull blades yanking hairs, too much pressure, or pushing too deep, which irritates the nasal vestibule and sensitive tissue.
Can nose hair trimmers cause infections or ingrown hairs?
Say you trim daily, pressing the blade deep into your nostril. Within days, you’ve got a red, sore bump.
Yes, trimmers can cause infections and ingrown hairs, but trimming technique and clean blades prevent both.
Is it better to trim or pluck nose hair?
Trim it. Trimming removes only the hairs you can see and leaves the rest to filter dust and allergens. Plucking pulls out the follicle, which invites infection, ingrown hairs, and painful irritation.
How often should I replace my trimmers blade?
Your blade won’t send a reminder, so watch for signs yourself. No fixed schedule exists. Replace it when it tugs despite cleaning, or when it’s damaged. Check your manual, since models differ.
Is it safe to trim nose hair when wet?
Water and electronics are a recipe for disaster. Trim wet only if your trimmer is rated for it, like wet/dry models. Otherwise, you risk damage and safety hazards.
Even then, wet hair pulls, so dry first.
Conclusion
Why endure the wince when the fix takes seconds? Knowing how to avoid pulling when using a nose hair trimmer comes down to five habits. Pick a rounded-guard model. Dry your nostrils first. Press lightly and move slowly. Wipe the blades after every use. Stop while protective hairs remain.
Do these and the trimmer cuts cleanly instead of yanking. Your nostrils stay comfortable, your natural filter stays intact, and the two-minute job stays exactly that.