
This site is supported by our readers. We may earn a commission, at no cost to you, if you purchase through links. This content is for general informational and educational purposes only and is not a substitute for professional medical, dermatological, or nutritional advice.

Ear hair doesn’t announce itself. One day you’re fine, and the next a barber, a spouse, or a bathroom mirror under bright light points out the wiry tufts you’ve carried around for months.
Most guys grab the first trimmer they find and push it in deep, which is exactly how nicks, soreness, and bleeding happen. The eardrum sits about 2.5 cm inward, and the hair you’re after grows only in the outer third of the canal.
Learning how to use an ear trimmer takes minutes, not years. Pick the right tool, respect the depth limit, and use light, short passes for clean results.
Table Of Contents
- Key Takeaways
- Choose Your Trimmer and Prepare Your Ears
- How Deep Can an Ear Trimmer Safely Go?
- How Do You Use an Ear Trimmer?
- Avoid Common Ear Trimming Mistakes
- Clean and Maintain Your Ear Trimmer
- Frequently Asked Questions (FAQs)
- How to use an ear trimmer?
- Is it good to trim ear hair?
- What is the best way to trim ear hair?
- How to use a trimmer correctly?
- How often should you trim your ear hair?
- Can you share an ear trimmer with someone?
- Should you trim nose hair with the same trimmer?
- Does ear hair grow back thicker after trimming?
- When should you replace an ear trimmer blade?
- Conclusion
Key Takeaways
- Stay in the outer third of the canal and never push the trimmer inward, since the eardrum sits about 2.5 cm in and the hair you’re after only grows near the opening.
- Pick a guarded rotary or oscillating trimmer made for ears and noses, then trim on clean, dry ears under bright light with two mirrors so you can see every hair.
- Use short, light passes with zero pressure, and stop the moment you feel resistance, since pressing hard or going over one spot again and again is what causes soreness and bleeding.
- Brush, rinse, oil, and dry the blades after every use, don’t share your trimmer, and swap the blades when they start tugging.
Choose Your Trimmer and Prepare Your Ears

Pick a trimmer made for ears and noses, with a shielded rotary or oscillating head. The guard keeps blades off your skin, which matters for ear canal safety. Choose a washable or removable head, a comfortable grip and a lithium-ion battery. Those features protect trimmer longevity and keep cuts clean without snagging. Some models use a dual rotary blade inside a protective casing, which delivers smooth cuts without nicks.
Prep matters as much. Clean and dry your ears first, after a warm shower when hair is soft. Stand under bright light and use two mirrors so you can see every hair. Ear sensitivity varies, so go slow. Skip scissors, razors and tweezers. Good prep and post-cleaning make safe trimming technique easy.
Once your prep is done, a gentle, well-built tool makes all the difference, so it helps to know what to look for in a nose and ear trimmer before you buy.
How Deep Can an Ear Trimmer Safely Go?

Not deep at all. Your depth limit is the outer, visible part of the ear, where hair grows. That’s the answer to How Deep Can an Ear Trimmer Safely Go? Guards expose only 3-5 mm of blade, but your hand sets the real safety limit.
Follow these manual depth guidelines for ear canal safety:
- Stay in the outer third of the canal, where cartilage and hair live.
- Keep the guard tip at the opening and never push inward.
- Stop the moment you feel resistance or sensitivity.
- Leave the bony inner canal alone.
The eardrum sits about 2.5 cm in, so always respect that distance.
That’s separate from the 2.5 inch fade rule, which measures upward from the top of your ear, as these low fade length measurements show.
How Do You Use an Ear Trimmer?
Once your ears are clean, dry, and ready, you’re set to start trimming. Work through three simple steps, and keep your slow, steady strokes light the whole way. Here’s how it goes, from the outer rim to the final check.
Trim Visible Outer-Ear Hair

Picture a few stray wires poking out along the curve of your ear, catching the light. That’s your target.
Once those strays are tamed, a fragrance-free wax from these natural mustache styling products will hold your shape without irritating sensitive skin.
Start with mirror-assisted trimming. Turn your head, tilt the mirror, and spot hairs on the outside edges. Trim the rim first, keeping the head flat against the skin. Pull the ear gently to smooth folds. Use depth control: skim the surface, never press. Short, light passes win.
Gently Trim Around The Canal Opening
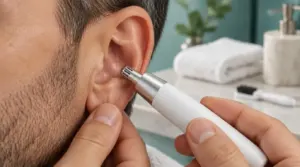
Outer rim done? Now gently trim around canal opening. Tilt your head 45 degrees and stretch your earlobe down. Hold the trimmer parallel, using angled insertion only at the visible rim. Make short upward strokes and stay within 5-6mm.
Depth control matters: apply zero pressure. Stop immediately if you feel any resistance. Then always clean the device after every use.
Check for Missed Hairs Without Overtrimming

You’ll want to Check for Missed Hairs Without Overtrimming once the main pass is done. Grab a good light and tilt your head side to side. Feel the area with a clean fingertip.
If you spot stragglers, a well-reviewed best nose hair trimmer with a rounded, safety-tipped head makes touch-ups quicker and gentler on sensitive skin.
If you spot strays, use light strokes over long stray hairs at a slight angle. Try small circular or slow sweeping motions, inspecting inner and outer edges.
Avoid Common Ear Trimming Mistakes
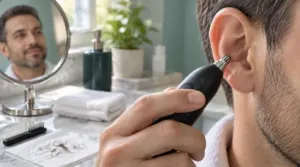
Avoid inserting too far, because the canal is delicate and deeper hair helps trap dust and debris. Stay at the entrance, and stop if the head feels too large.
Don’t angle the blade toward the inside edge of the canal opening. Keep the guard flat against skin you can see.
Skip using pressure. Pressing hard or passing over one spot again and again leaves skin sore or bleeding. Let the trimmer do the work with light, short strokes.
Don’t trim over cuts, rash, or irritated skin, and never use the trimmer to clear wax.
Skipping the clean and neglecting blade maintenance dulls the head.
Clean and Maintain Your Ear Trimmer

Think of your trimmer as a chef’s knife: neglect it and it’ll bite back. Keep it clean and it’ll stay sharp and safe.
Treat your trimmer like a chef’s knife: keep it clean and it stays sharp and safe, neglect it and it bites back
Clean the ear first, so wax doesn’t gum up the blades. Then finish with posttrim cleaning every time:
- Brush hair from between the blades.
- Rinse the head under warm water if it’s waterproof, or use spray cleaner.
- Add 3 drops of oil, run it 10 seconds, then wipe off the excess.
- Dry every part with a clean cloth.
Waterproof heads make cleaning ease a perk. Weekly, disinfect the blades, and replace dull ones for solid blade maintenance, which protects your skin.
Frequently Asked Questions (FAQs)
How to use an ear trimmer?
Picture a client who nicked his ear with scissors. Treat ear hair trimming like sensitive area trimming: keep the protective cap on, trim only visible hairs, and rinse your personal grooming tools for cleaning ease.
Is it good to trim ear hair?
Ear hair is a doorman: keep him tidy, don’t fire him.
Yes, ear hair trimming is good for hair removal safety. Use rotary and reciprocating trimmers, stay clear of your eardrum, and rinse the head.
What is the best way to trim ear hair?
Picture a guy nicking his ear with scissors. Don’t. For ear hair trimming, clean the ear first, use a guarded rotary and reciprocating trimmer, trim the inside edge, and never go below the ear canal.
How to use a trimmer correctly?
Clean the ear first and dry it, then turn the device on before it touches skin. Use gentle circular motion trimming on visible hair.
Use clean removable blades and stay shallow to prevent skin irritation.
How often should you trim your ear hair?
Trim your ear hair every two weeks. That keeps it from getting noticeable. Use a rotary head trimmer on dry ears as part of your personal grooming routine, and don’t over-trim, since irritation follows.
Can you share an ear trimmer with someone?
Think of your ear trimmer like a toothbrush: it’s yours alone. Don’t share it. Earwax, skin debris, and tiny cuts carry germs. Check your user manual guidance, and keep ear hair removal personal.
Should you trim nose hair with the same trimmer?
Yes, you can, if your trimmer is built for both. Most ear and nose trimmers are. Rinse the head between uses to keep bacteria from spreading, since that’s the real risk for nose hair trimming.
Does ear hair grow back thicker after trimming?
No, trimming won’t make ear hair grow back thicker. Your ear hair trimmer only cuts the shaft, never the follicle. Blunt tips just feel coarser at first, and age is what really thickens things.
When should you replace an ear trimmer blade?
A dull edge is a blunt promise. Swap it when hair tugging starts, after cleaning and oiling. Blade dulling shows as repeated passes or snagging. Check model-specific limits, keep up device maintenance, and replace yearly at minimum.
Conclusion
Worried you’ll slip and hurt yourself? Stick to the outer third of the canal and the risk drops to almost nothing. Short passes, light pressure, steady hands.
Once you know how to use ear trimmer blades safely, the routine takes about two minutes. Clean the blade after every session, check your work in good light, and stop the moment you feel resistance.
Your ears will look sharp, and you’ll never need a barber’s hint again.