This site is supported by our readers. We may earn a commission, at no cost to you, if you purchase through links.

You step out of the shower with beautifully defined curls, but by the time they air-dry, you’re left with a frizzy, shrunken mess that looks nothing like what you started with. This frustrating transformation happens because curly hair loses its structure and moisture as it dries naturally, causing the cuticle to roughen and the curl pattern to contract.
Diffusing solves this problem by using controlled heat and airflow to dry your curls while maintaining their shape, locking in moisture, and minimizing frizz. The key lies in mastering the right technique, from prep work to tool positioning, so you can achieve salon-quality results at home.
With the proper approach, you’ll transform your drying routine from a gamble into a reliable method for gorgeous, bouncy curls every time.
Table Of Contents
- Key Takeaways
- Why Diffusing Benefits Curly Hair
- Preparing Curly Hair for Diffusing
- Essential Diffusing Tools and Settings
- Step-by-Step Diffusing Techniques
- Tips for Achieving Defined, Frizz-Free Curls
- Common Diffusing Mistakes to Avoid
- Top 5 Products for Diffusing Curly Hair
- Frequently Asked Questions (FAQs)
- Conclusion
Key Takeaways
- Diffusing curly hair with controlled heat and proper technique locks in moisture while maintaining your natural curl pattern, delivering up to 34% more root lift and volume compared to air-drying alone.
- The key to frizz-free results lies in starting with soaking-wet hair, using low to medium heat (below 140°F), applying products in the right order, and finishing with cool air to seal the cuticle and set your style.
- Common mistakes like touching your hair too much during drying, using high heat settings, or starting with partially dry hair can increase frizz by up to 50% and destroy the curl definition you worked to create.
- Sectioning your hair into four to six parts and choosing the right diffuser attachment for your curl type ensures even drying, prevents inner layers from staying damp, and gives you consistent, salon-quality definition throughout.
Why Diffusing Benefits Curly Hair
If you’ve ever air-dried your curls and ended up with a frizzy, shapeless mess, you’re not alone. Diffusing changes the game by using controlled, indirect heat that works with your natural texture instead of against it.
Let’s look at three key reasons why this tool deserves a permanent spot in your curly hair routine.
Enhancing Natural Curl Pattern
When diffusing curly hair, you’re working with keratin bond alignment to lock in your natural curl pattern as it dries. A 2024 study found fully wet hair increases curl spring factor by up to 25%, meaning diffusing from soaking-wet locks strengthens pattern expression.
This controlled heat method enhances curl definition while reducing curl shrinkage, giving you more volume and bounce than air-drying alone. Strong-hold gels are often needed for diffusing to help create a protective cast and prevent frizz.
Reducing Frizz and Heat Damage
You’re not just setting your pattern—you’re protecting it. Heat protectants create a barrier that slows heat penetration, reducing moisture loss and breakage during diffusing curly hair.
The secret to reducing frizz in curly hair? Keep your diffuser on low to medium heat (below 140°F), finish with cool air to seal the cuticle, and avoid rough towel drying. Product ingredients like hemisqualane lock in moisture, cutting frizz by over 70% while minimizing heat damage. Frizz often results from a lack of moisture.
Increasing Volume and Definition
Beyond frizz control, you’re unlocking real shape. Diffusing curly hair generates volume enhancement and curl definition that air drying can’t match—up to 34% more root lift when you start upside down. The diffuser’s bowl encourages curl clumping, creating bounce maximization and tighter coils. Technique impact matters: section-wise drying, low heat, and scrunching boost volume longevity and definition across all curl types.
Diffusing curly hair unlocks up to 34% more root lift and volume than air drying, especially when you start upside down
- Start upside down for maximum root lift
- Use low to medium heat to preserve curl structure
- Section hair before diffusing for even volume distribution
- Scrunch in intervals of 20–30 seconds per section
- Choose a wide-bowl diffuser for uniform airflow
Preparing Curly Hair for Diffusing

Think of prepping your hair for diffusing like laying the foundation for a house—you can’t skip it and expect great results. Your curls need the right moisture balance and product setup before any heat comes into play.
Let’s walk through the two essential steps that set you up for defined, frizz-free curls every time.
Washing and Conditioning for Moisture
Your wash routine is the foundation of frizz-free diffusing. Aim to cleanse your curls every two to three weeks to preserve natural oils, which curly hair desperately needs since sebum struggles to travel down each twist and turn. Choose a sulfate-free shampoo with a slightly acidic pH to keep the cuticle smooth and lock in moisture.
After shampooing, apply a thick rinse-out conditioner from roots to ends to restore hydration. Follow up with a leave-in conditioner on damp hair, and consider deep conditioning weekly to boost hair hydration and elasticity.
Removing Excess Water With a Microfiber Towel
Once your hair is clean and conditioned, the way you remove water makes all the difference. A microfiber towel minimizes friction and breakage compared to standard cotton terry cloth, which can lift cuticle scales and create frizz on curly hair.
Follow these steps for drying curly hair efficiently:
- Gently blot sections with your microfiber towel instead of rubbing.
- Scrunch curls upward to encourage definition and absorb water.
- Try plopping for 20–30 minutes to set your pattern.
- Avoid over-drying; hair should remain damp for diffusing.
- Use a scrunching technique to preserve clumps before heat styling.
Essential Diffusing Tools and Settings

Getting the right tools and settings makes all the difference when it comes to diffusing curly hair without causing damage or frizz. Your diffuser attachment, heat level, and speed setting work together to either improve your curls or work against them.
Let’s break down what you need to know about each essential element before you start drying.
Choosing The Right Diffuser Attachment
Not every diffuser works the same, and choosing the right attachment makes all the difference. You’ll want to match bowl depth, prong design, and airflow pattern to your curl type and length. Fine curls benefit from smaller diameters around 13–14 cm, while thick or long hair thrives with 15–18 cm deep-bowl diffusers that hold more sections at once.
| Feature | Fine/Short Curls | Long/Thick Curls |
|---|---|---|
| Bowl Diameter | 13–14 cm for concentrated sections | 15–18 cm for faster coverage |
| Prong Length | Shorter for gentle support | Longer to reach roots and lift |
| Airflow Holes | Many small openings reduce frizz | Evenly distributed for consistent heat |
Check compatibility before you buy—universal diffusers with flexible silicone collars fit most hair dryer nozzles between 1.7 and 2.2 inches, but snap-on models lock securely for professional use.
Selecting Optimal Heat and Speed Settings
Why risk heat damage when most dryers operate between 130–160°F on regular settings—plenty to dry curls gently? Pair low heat with low speed for maximum curl definition and moisture retention; experts confirm up to 73% improvement in this range.
Medium heat and medium speed balance efficiency without sacrificing integrity.
Always finish with a cold setting to lock in your style and boost longevity by 31%.
Using Heat Protectant for Curl Health
Think of heat protectant as your curl’s armor—lab tests show it cuts surface damage by 20–50% and helps retain moisture during diffusing. Applying heat protectant consistently before diffusing curly hair means you’re actively minimizing heat damage while keeping frizz at bay. Apply it evenly to damp hair before picking up your diffuser, focusing on mid-lengths to ends where damage strikes first.
- Silicone Concerns: Film-forming agents like dimethicone shield against heat transfer while locking in hydration
- Oil Penetration: Coconut oil strengthens fibers, reducing breakage from repeated drying cycles
- Application Practices: Spray 6–8 inches away, working through sections for complete coverage
- Damage Reduction: Reapply each session—previous applications won’t protect your curls during the next round
Step-by-Step Diffusing Techniques
The way you handle your diffuser can make or break your curl definition. Getting the technique right means knowing how to section your hair, where to position the diffuser, and whether to keep your hands off or scrunch as you dry.
Let’s walk through the essential methods that’ll help you achieve consistent, frizz-free results every time.
Sectioning Hair for Even Drying

You’ll want to divide your hair into four to six sections for balanced drying and frizz control. Start at the nape and work upward in horizontal layers, clipping unused sections away with duckbill clips.
This sectioning pattern ensures even airflow, reduces drying time, and prevents inner layers from staying damp while outer curls overdry—giving you consistent definition throughout.
Positioning and Angling The Diffuser

How you hold your hair diffuser determines whether you’ll get volume or flatness. Position the diffuser at your roots with vertical angling to boost lift by up to 28%—flip your head upside down for maximum impact.
Use lateral motion, shifting side-to-side between sections for even airflow and frizz minimization. Hold each spot for 30 seconds, then rotate around your head.
Keep contact duration short to prevent over-drying while diffusing curly hair effectively.
Hands-Free Vs. Scrunching Diffusing Methods

Once you’ve positioned the diffuser, choose your drying approach. Hands-free diffusing—hovering the diffuser near your curls without touching—minimizes frizz and maintains curl definition, especially for fine or wavy hair.
Scrunching diffusing curly hair by cupping sections into the bowl creates volume and tighter bounce, ideal for 2B–3B types seeking shrinkage control. Match your method to your hair goals: hover for elongation, scrunch for springiness.
Tips for Achieving Defined, Frizz-Free Curls

Getting your curls to look their best isn’t just about technique—it’s about the small choices you make while drying. A few simple adjustments can mean the difference between defined spirals and a frizzy mess.
Here are three key tips that will help you lock in your curl pattern and keep frizz at bay.
Avoiding Excessive Touching During Drying
When you’re diffusing curly hair, keeping your hands off makes all the difference—touching repeatedly can increase frizz by up to 30% and disrupt curl integrity. Here’s how to protect your progress:
- Position the diffuser once and let it work—moving it around your head instead of rearranging curls with your fingers
- Resist the urge to scrunch mid-process, even if sections look uneven
- Tilt your head in different directions rather than manipulating strands manually
- Wait until hair is completely dry before any additional styling
This hands-free approach reduces breakage risk, improves volume outcomes, and delivers consistent results every time you diffuse.
Using Cool Air to Set The Style
Once your curls are 80–90% dry, switching to cool air locks in your pattern through hydrogen bond setting—this simple shift protects the cuticle while boosting frizz reduction and moisture retention.
Direct the diffuser at your roots and outer sections in short bursts, keeping it close without touching. This final cool-air pass seals curl definition and adds lasting hold, a pro technique that transforms diffusing curly hair techniques into salon-quality results.
Scrunching for Extra Definition and Volume
After that cool-air finish, scrunching adds another layer of control. Cup sections of your curls—ends toward scalp—using your full palm while diffusing curly hair at medium intervals.
This compresses each clump, lifts roots for volume, and distributes product evenly along the shaft.
Avoid rapid squeezing near the crown; deliberate pulses improve your curl pattern without inviting frizz, especially when hair is still damp and responsive.
Common Diffusing Mistakes to Avoid

Even the best diffusing products and tools won’t give you great results if you’re making a few common errors along the way. Small mistakes like starting with the wrong moisture level or cranking up the heat can undo all your careful prep work and leave you with frizz instead of definition.
Let’s look at the most frequent diffusing missteps so you can skip the frustration and get consistent, beautiful curls every time.
Diffusing on Dry or Damp Hair
Timing is everything when diffusing curly hair—start when your curls are about 60–80% wet, not bone dry. This approach preserves clumping, prevents cuticle disturbance, and shortens heat exposure. Here’s why damp hair benefits matter:
- Frizz and cuticle protection: Airflow smooths the cuticle as it closes, reducing flyaways
- Scalp health: Faster drying limits moisture buildup that invites irritation
- Volume and shape: Lifting damp roots creates lasting bounce
- Defined curl pattern: Water helps mold clumps before setting
- Reduced re-wetting: You won’t need extra sprays or products later
Using High Heat Settings
When you crank your hair dryer above 356°F, you’re inviting cuticle damage and protein denaturation that permanently weakens your strands. High heat accelerates moisture depletion by up to 20%, triggering frizz increase and curl relaxation you can’t undo.
Stick to low or medium settings on your diffuser—temperatures below 140°F preserve definition, prevent hair damage, and keep diffusing curly hair safe and effective.
Overhandling Hair During The Process
When you constantly run your fingers through damp curls, you’re sabotaging hours of careful prep work. Overhandling during diffusing curly hair triggers frizz increase by up to 50% and destroys curl clumps before they set.
Professional recommendations stress hands-off drying to optimize drying efficiency and prevent curl distortion:
- Keep the diffuser stationary in each section
- Resist touching until hair is 90% dry
- Avoid breaking the product cast early
- Minimize repositioning to reduce breakage risk
- Let heat and airflow do the work, not your hands
Top 5 Products for Diffusing Curly Hair
The right products can make or break your diffusing results, especially when you’re working with curly hair that needs both definition and protection. Quality tools and styling products help you maintain moisture while creating the curl pattern you want without causing damage.
Here are five reliable options that work well for different curl types and budgets.
1. Rizos Curls Collapsible Hair Diffuser
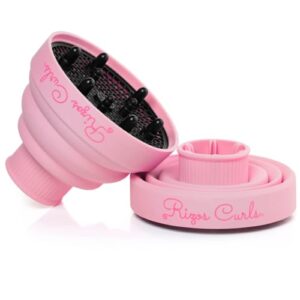
If you want a diffuser that travels as easily as it performs, the Rizos Curls Collapsible Hair Diffuser is worth your attention. Its heat-resistant silicone construction tolerates temperatures up to 140°F, protecting your curls from excessive heat damage during drying.
The universal compatibility means it’ll fit most hair dryers you already own, and the collapsible design folds flat for packing. You’ll notice enhanced curl definition and volume thanks to the wide bowl that distributes airflow evenly, reducing frizz while maintaining your natural curl pattern throughout the diffusing process.
Best For: Curly-haired travelers and anyone who wants to enhance their curl definition and volume without investing in a new hair dryer or sacrificing storage space.
- Collapses flat for easy packing and storage, making it perfect for travel or small bathrooms
- Universal fit works with most standard hair dryers you already own, so no need to buy specialized equipment
- Heat-resistant silicone distributes airflow gently to define curls and reduce frizz without overheating your hair
- Some users report it doesn’t fit all dryers securely despite the universal size claim, and it can slip off during use
- The silicone material may melt, warp, or distort when exposed to high heat settings on certain dryers
- Quality control issues have been reported, with some customers receiving damaged or previously used products
2. Not Your Mothers Curl Talk Set
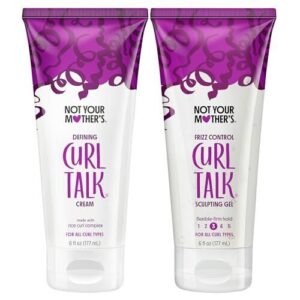
Getting complete definition and hold without breaking your budget can feel like a puzzle, but the Not Your Mother’s Curl Talk Set simplifies the equation. This affordable diffusing system pairs a defining cream with sculpting gel, both formulated with Rice Curl Complex to hydrate and boost curl retention during hair drying.
Consumer reviews highlight reduced frizz and lasting definition when you layer both products before diffusing. The flexible-firm hold is suitable for different diffusing techniques for curly hair, letting you control how much cast you create while keeping your curls soft and touchable.
Best For: Budget-conscious curly-hair users who want a complete styling system that layers cream and gel for customizable hold and frizz control during diffusing.
- Affordable two-pack lets you build flexible-to-firm hold by layering products, so you can adjust definition based on your curl type and diffusing technique
- Rice Curl Complex hydrates while styling, and reviewers consistently report reduced frizz and curls that hold their shape through the day
- Sulfate-free, silicone-free, and paraben-free formula works across all curl patterns (2A–4C) without weighing down fine hair or leaving buildup
- Some users with bleached or highly processed curls find definition fades after a few hours, requiring touch-ups or additional product
- No built-in heat protection, so you’ll need a separate protectant before diffusing to shield your curls from damage
- A few reviewers mention the Citrus Jasmine scent is strong, and the gel can feel crunchy or leave residue on fingers if you touch dry hair
3. Dyson Supersonic Nural Jasper Plum Dryer
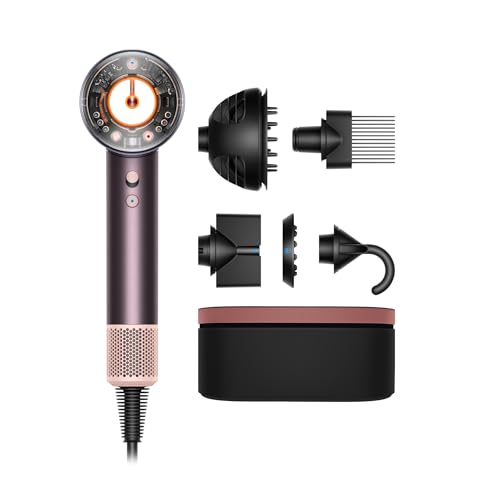
If precision and scalp protection matter most to you, the Dyson Supersonic Nural Jasper Plum Dryer brings sophisticated Nural technology to diffusing curly hair. Its time-of-flight sensor adjusts heat to roughly 131°F in Scalp protect mode, shielding your scalp while drying efficiently. The Wave+Curl diffuser attachment offers Dome and Diffuse modes with reversible airflow to boost definition without frizz.
With four heat settings, three speed options, and 1,600 watts of controlled power, this dryer adjusts to your hair diffusing techniques.
However, the pricing analysis reveals a steep $499.99 tag, making it a serious investment for enthusiasts committed to mastering using hair diffusers.
Best For: People with curly or coily hair who want smart scalp protection and precision diffusing, and don’t mind paying premium prices for sensor-driven heat control.
- Nural sensors automatically adjust heat to protect your scalp at around 131°F, strengthening the scalp barrier up to 3 times compared to high-heat settings
- WaveCurl diffuser with reversible Dome and Diffuse modes delivers targeted airflow that enhances curl definition while minimizing frizz
- Attachment learning remembers your preferred settings for each accessory, so you get consistent results every time you switch between the five included tools
- At $499.99, it’s one of the most expensive hair dryers on the market and may be overkill if you’re not deeply invested in curl care
- Some users report that Scalp protect mode overrides manual heat settings, limiting control when you want higher temperatures for faster drying
- Mixed feedback on heat output—a few reviewers find it not hot enough for their needs, especially if they’re used to traditional high-heat dryers
4. Ouidad Vitalcurl Curl Defining Hair Mousse
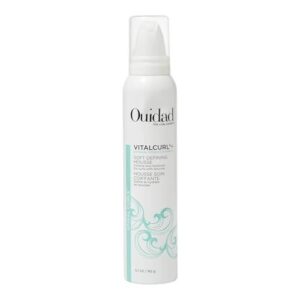
If you prefer a soft, flexible hold without the crunch, Ouidad Vitalcurl Curl Defining Hair Mousse fits beautifully into your curly hair care routine.
This
If you prefer a soft, flexible hold without the crunch, Ouidad Vitalcurl Curl Defining Hair Mousse fits beautifully into your curly hair care routine.
This 5.7-ounce foam delivers curl definition through a Botanical Omega 3-6-9 Complex that aids moisture retention and frizz control, especially on spiral curls.
Apply it to dripping-wet hair before using hair diffusers to lock in shape and hydration. User experiences highlight multi-day styles and improved manageability.
Ingredient analysis shows it’s free from silicones and sulfates, aligning with clean hair diffusing techniques you can trust.
Best For: People with spiral curls who want soft, defined curls without crunch or heavy buildup.
- Lightweight foam gives curls definition and bounce without stiffness
- Packed with nourishing ingredients like vitamins B5 & E, olive, and sunflower oils
- Free from silicones, sulfates, and other harsh chemicals—great for sensitive or clean routines
- Some users report sticky residue or a chemical scent
- Nozzle can be faulty, making it hard to dispense the product
- More expensive than many other curl mousses on the market
5. Mane Ionic Compact Hair Dryer Set
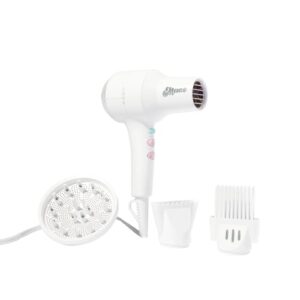
For those who travel often or value compact tools, the Mane Ionic Compact Hair Dryer Set delivers professional power in a lightweight package. Weighing under one pound, this 1875-watt dryer includes three attachments—concentrator, diffuser, and wide-tooth comb—making it adaptable for diffusing curly hair on the go.
Ionic technology cuts frizz while two speed settings and three heat settings give you control over airflow. The cool-shot button sets your style without compromising curl integrity, and its compact design fits easily in any carry-on for travel use.
Best For: Travelers and people with curly or wavy hair who need a lightweight, compact dryer that won’t sacrifice power or attachments.
- Weighs less than a pound but still packs 1875 watts, so you get salon-level drying without the arm fatigue
- Comes with three attachments (diffuser, concentrator, wide-tooth comb) that cover most styling needs for curly hair
- Ionic technology plus multiple heat and speed settings help you dry faster while keeping frizz under control
- The diffuser attachment is on the smaller side, which might not work as well for people with really thick or dense hair
- Gets quite hot during use, so you need to be careful when handling or switching attachments
- At $125–$148, it’s pricier than basic travel dryers, though you’re paying for the power and attachments
Frequently Asked Questions (FAQs)
Can I diffuse second-day curls?
Yes, you can absolutely diffuse second-day curls. A light water spritz and refresh product reactivate styling agents already in your hair, and diffusing on low heat restores up to 88% of lost curl definition.
How long does diffusing typically take?
Diffusing curly hair usually takes 20 to 45 minutes, depending on hair type, dryer technology, and technique. Dense, long curls may need up to an hour, while fine curls can dry faster than air drying alone.
Should I diffuse until completely dry?
You don’t need to chase bone-dry flawlessness—stopping at 80–90% prevents curl stiffness and frizz while letting products set naturally.
Using a diffuser gently on curly hair drying methods, then allowing root dampness to air-finish, maintains definition without over-drying risks.
Does diffuser type affect curl results?
Think of it like choosing the right tool for your curl type—your diffuser directly impacts results. Bowl styles preserve curl shape, finger designs boost root volume, and using a diffuser matched to your hair texture minimizes frizz by 40%.
Can I air-dry partway before diffusing?
Partial air-drying for ten to twenty minutes before diffusing curly hair can reduce frizz and improve definition by allowing products to set, while cutting total drying time and limiting heat exposure compared to full air-drying.
Conclusion
What if mastering how to diffuse curly hair could finally end your battle with frizz and unpredictable results? With the right preparation, tools, and technique, you’re no longer leaving your curls to chance.
You’ve learned to control heat, position your diffuser correctly, and avoid the common mistakes that sabotage definition.
Now, each wash day becomes an opportunity to showcase your curls at their best—bouncy, defined, and full of life. Your routine just became your greatest advantage.
- https://www.laifentech.com/blogs/news/how-hot-does-a-hair-dryer-get
- https://www.chinakangroad.com/news/the-ultimate-guide-to-hair-dryer-temperatures-how-hot-is-too-hot-and-how-to-master-the-heat-for-healthy-hair/
- https://us.davines.com/blogs/news/how-to-diffuse-curly-hair-without-frizz
- https://www.livingproof.com/blogs/hair-101/how-to-diffuse-curly-hair
- https://www.evoqsalon.com/post/how-to-diffuse-curly-hair-embrace-your-natural-curls