This site is supported by our readers. We may earn a commission, at no cost to you, if you purchase through links.

Your curls deserve better than the rough-towel-rubbing, high-heat-blasting routine that leaves them looking like they lost a fight with humidity. Most people unknowingly sabotage their natural texture the moment they step out of the shower, using techniques that create frizz, stretch out curl patterns, and cause unnecessary breakage.
The difference between limp, undefined waves and bouncy, well-formed spirals often comes down to how you handle those first critical minutes when your hair is soaking wet. Breaking free from damaging habits means understanding that curly hair needs a completely different approach than straight hair—one that works with your natural texture instead of against it.
Whether you’re short on time or ready to commit to a full styling routine, mastering the right drying methods gives you the control to show off your curls exactly how you want them.
Table Of Contents
Key Takeaways
- Your curls need sulfate-free shampoo and silicone-free conditioner with a pH around 4.5-6.5, plus gentle detangling with a wide-tooth comb on wet hair to prevent the 30% stretch that causes breakage.
- Air drying with microfiber towels or T-shirts slashes friction by 45% compared to regular towels, and plopping for 15-30 minutes cuts total drying time in half while boosting root volume and curl definition.
- Diffusing on low heat (55-65°C) held 15 cm from your hair delivers faster results than air drying alone without causing the moisture loss and protein breakdown that wrecks your curl pattern.
- The first minutes after your shower determine whether you get frizzy, stretched-out waves or bouncy, well-defined spirals—product layering with leave-in conditioner and gel, then hands-off until 100% dry, locks in your natural texture.
Preparing Curly Hair for Drying
Before you even think about drying your curls, you need to set the stage in the shower. The products you use and how you handle your hair while it’s soaking wet can make or break your final results.
Let’s break down the two non-negotiables that’ll give you a fighting chance at frizz-free, defined curls.
Choosing The Right Shampoo and Conditioner
The right shampoo and conditioner can make or break your curls—and you deserve products that work with your texture, not against it. Start with sulfate-free formulas that won’t strip your hair’s natural oils, because curly strands already struggle to stay hydrated.
Look for moisturizing shampoo with a pH balance around 4.5 to 6.5 to keep your cuticles smooth and frizz-free. Skip silicone-heavy conditioners that build up over time; instead, choose silicone alternatives packed with moisturizing ingredients like shea butter, glycerin, and jojoba oil.
These gentle cleansers and protein conditioners strengthen your curls while keeping them bouncy—essential groundwork for any drying method ahead. Using a sulfate free approach can help reduce scalp irritation and promote healthier hair.
Detangling Without Causing Breakage
Once your hair is washed, detangling becomes your next power move—and doing it right means keeping every precious strand intact. Wet curls stretch up to 30% before snapping, so gentle combing with the right detangling tools is non-negotiable for breakage prevention and curl preservation.
Wet curls stretch up to 30% before snapping, so gentle detangling is non-negotiable for keeping every strand intact
Here’s how to detangle like a pro:
- Start at the ends and work up to avoid yanking through stubborn knots that cause long-segment breaks higher on the shaft.
- Use a wide-tooth comb to reduce tension and contact points—denser brushes tear out more hair.
- Add slip with conditioner or oil for hair lubrication that cuts friction and protects fragile curly hair during detangling.
- Work in small sections to control force and prevent unexpected snags that lead to hair breakage and ruin curl maintenance.
Using a wide tooth comb is essential for gentle detangling.
This mindful hair care approach sets you up for damage-free drying and gorgeous, defined curls.
Air Drying Curly Hair Effectively

Air drying is hands down the gentlest way to dry your curls, letting them form naturally without heat damage or friction. But here’s the thing—air drying isn’t just about walking away and waiting.
There’s a method to getting soft, defined curls instead of a frizzy mess, and it starts with how you handle your hair right out of the shower.
Blotting With Microfiber Towels or T-Shirts
Skip the standard bath towel—it’s a friction monster that’ll wreck your curl pattern. Instead, grab a microfiber towel or soft cotton T-shirt to gently blot water from your hair.
These materials absorb moisture fast while slashing friction by 45%, which means less breakage and way less frizz. Just squeeze sections of hair in the fabric; don’t rub.
This simple swap preserves your curl formation and sets you up perfectly for air drying or plopping.
Enhancing Curl Definition While Air Drying
Once your hair’s blotted, it’s game time for curl definition. Layer a leave-in conditioner first—it locks in hydration and preps curls to clump naturally as they air dry.
Then add a curl activator or lightweight gel using the glazing method: smooth product over each section without breaking up your curl clumps. Scrunch upward from ends to roots, then hands off.
This product layering delivers serious frizz control and long-lasting curl enhancement without heat.
Avoiding Frizz and Damage During Air Drying
Most damage during air drying happens when you can’t leave your hair alone. Touching wet curls disrupts cuticle alignment and breaks up clumps—that’s your fast track to frizz. Stay indoors while drying; wind separates strands before they set.
Research shows microfiber-dried hair resists damage 45% better than cotton-dried, so fabric choice matters for frizz prevention.
Once you’ve applied your gel cast, hands off until 100% dry for maximum curl enhancement and damage control.
Plopping Technique for Defined Curls
Plopping is one of those game-changing techniques that can seriously transform how your curls dry. It’s a heat-free method that encourages your curls to set in their natural shape while cutting down drying time and frizz.
Here’s everything you need to know to master this curl-defining powerhouse.
Step-by-Step Guide to Plopping

Think of plopping as cocooning your curls while they set—it’s pure curl enhancement magic. Start with soaking wet hair loaded with your favorite curl-friendly products, then flip forward at the waist and lower your curls onto a microfiber towel or old T-shirt spread flat.
- Bring the fabric edges up and over the back of your head
- Tie the sleeves or ends securely at your nape or forehead
- Leave your plop for 15–30 minutes before you air dry or diffuse
Benefits of Plopping for Curl Formation

Plopping transforms curl formation by keeping your coils compressed at the scalp—research shows this accordion position delivers visible bounce and definition in a single wash day.
You’ll slash drying time by up to 50% while smooth microfiber fabric cuts friction that causes frizz and cuticle cracks.
The real win? Curls dry lifted at the roots for serious volume, all without a single blast of heat to compromise your hair health.
Combining Plopping With Other Methods

Why settle for just one weapon when you can stack techniques? Most curl stylists now combine plopping with a second phase to optimize curl enhancement and hybrid drying benefits:
- Plop 15–30 minutes, then air dry for zero-heat, frizz reduction magic—your curls stay elongated and smooth.
- Plop 20 minutes, then diffuse on low heat—you’ll cut total drying time by up to 40% while locking in definition.
- Use a microfiber towel during your plop to slash friction and preserve those clumped, curl-friendly ringlets.
- Apply leave-in and gel before plopping—products set better when curls compress, giving you serious hold and bounce.
Diffusing Curly Hair for Fast Results

When you’re racing against the clock and air drying isn’t an option, a diffuser attachment can be your best friend for fast, frizz-free results. The key is using the right technique to protect your curls from heat damage while still getting that volume and definition you’re after.
Let’s break down exactly how to diffuse your curls like a pro without sacrificing their health or bounce.
How to Use a Diffuser Properly
You want your diffuser settings on low for both heat and airflow—high speeds wreck curl formation and invite frizz.
Start at the roots, flip your head upside down for volume, and gently cup sections into the diffuser bowl without touching the curls with your hands. Hold each section for 20 to 60 seconds before moving on, and let your curls settle naturally inside the diffuser’s prongs.
Minimizing Heat Damage While Diffusing
Heat protectants are your first line of defense—they create a barrier that stops moisture loss and protein breakdown when diffusing.
Keep your diffuser at 55–65°C and hold it at least 15 cm from your hair, constantly moving to avoid hot spots.
Studies show that moderate heat at proper distance causes less internal damage than prolonged air drying, so low-temperature diffuser settings deliver gentle drying without sacrificing your curl definition or inviting frizz.
Maximizing Volume and Curl Definition
Once you’ve locked in safe heat settings, flip your head upside down and diffuse from underneath—this single move delivers visible root lifting and volume boosting that beats flat air drying every time.
Anchor the diffuser at your roots, lift an inch or two, and hover while scrunching sections upward. That combination sets curl definition, refines each spiral, and gives you the frizz control and bounce your curly hair deserves without endless plopping or waiting around.
Top 4 Tools for Drying Curly Hair
You’ve learned the techniques—now let’s talk about the tools that’ll actually make those methods work. Having the right gear in your arsenal means the difference between fighting your curls and letting them thrive on their own terms.
Here are four game-changing tools that’ll help you take control of your drying routine and finally get the results you deserve.
1. BaByliss Pro Nano Hair Dryer
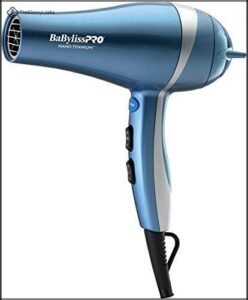
Your curls deserve a blow dryer that won’t turn them into a frizzy mess. The BaBylissPRO Nano Titanium dryer packs 2000 watts of power with ionic settings that cut drying time in half—think 30 minutes instead of an hour for thick hair.
Its nano technology delivers even heat control across six settings, so you can customize airflow without disrupting your curl pattern.
Hair dryer reviews consistently praise how it enhances definition, while the included diffuser lets you master drying techniques that air dry alone can’t match.
Best For: Anyone with thick, curly, or coarse hair who wants to cut drying time in half while keeping frizz under control and definition intact.
- 2000 watts with nano titanium technology delivers consistent, even heat that dries dense curls fast without creating hot spots or damaging your curl pattern.
- Six heat and speed settings plus a diffuser attachment let you dial in the exact airflow your hair needs, whether you want volume or smooth definition.
- Ionic technology reduces frizz and boosts shine in one session, so your curls look salon-quality without extra products or passes.
- Some users report the heat levels are inconsistent—either not hot enough to dry efficiently or so hot it risks burning hair.
- Durability is hit or miss, with several customers receiving faulty units or experiencing breakdowns after just a few months of use.
- The price point is higher than many drugstore dryers, which stings more if you end up with one of the unreliable units.
2. Titanium Universal Hair Diffuser Attachment
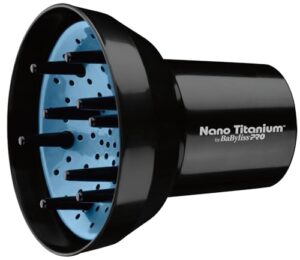
Not every dryer comes with the diffuser you need—that’s where the BaByliss Pro Nano Titanium Universal Diffuser changes everything. Its titanium technology spreads heat evenly across your curls, eliminating those harsh hot spots that wreck your curl definition.
The finger-style prongs lift your roots while dispersing airflow in all directions, so you get volume without the frizz. It fits most dryers with 1.7–2.2 inch nozzles, and the far-infrared heat cuts drying time while keeping your cuticles sealed.
This attachment turns any decent dryer into a curl-enhancing powerhouse.
Best For: Anyone with curly, wavy, or permed hair who wants to get salon-quality volume and definition from a dryer they already own.
- Titanium technology distributes heat evenly to prevent hot spots that damage curls and cause frizz
- Finger prongs lift at the roots while 360-degree airflow dries curls without disturbing their natural pattern
- Universal fit works with most dryers (1.7–2.2 inch nozzles), so you don’t need to buy a whole new system
- Doesn’t fit all dryers, especially those with tapered or oddly shaped barrels
- Can fall off during use when exposed to high heat, which interrupts your routine
- Some users report durability issues like melting or cracking over time
3. Microfiber Hair Drying Towels Set
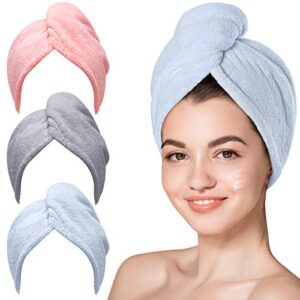
While diffusers work wonders, the real breakthrough starts before you even turn on the dryer. Microfiber towels for curly hair care absorb three times more water than cotton—without the friction that causes frizz and breakage.
Their smooth fibers wick away moisture fast, cutting air drying time by half while protecting your curl pattern. Use them for plopping or gentle scrunching, and you’ll notice softer, more defined curls with zero heat damage.
This isn’t just another towel—it’s your first line of defense against frizz.
Best For: Anyone with curly, wavy, or textured hair who wants to cut drying time in half while reducing frizz and breakage without using heat.
- Absorbs three times more water than cotton and cuts air drying time by roughly 50%, so you spend less time waiting for your hair to dry
- Smooth microfiber surface creates way less friction than regular towels, which means less frizz, fewer tangles, and healthier curls over time
- Perfect for plopping and scrunching techniques that help define your curl pattern while keeping everything soft and bouncy
- A few users mentioned their towels didn’t dry hair as quickly as they expected, so results might vary depending on your hair thickness
- One person got a different color than what they ordered, which suggests occasional mix-ups in shipping
- There’s sometimes a slight “new fabric” smell when you first get them, though it usually goes away after the first wash
4. Curl Keeper Hair Clips Set
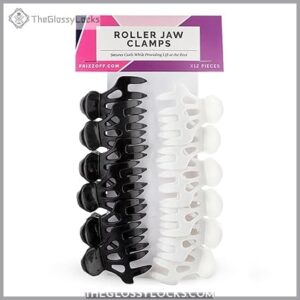
Root lifting changes everything when your curls dry flat against your scalp. Curl Keeper’s Roller Jaw Clamps lift wet sections at the crown while you air dry or diffuse, creating volume without backcombing.
Their smooth plastic design won’t snag strands like metal clips do, and the jaw mechanism holds curls from within instead of crushing them flat.
Place them near your part and problem areas, leave them in until hair’s completely dry, then remove gently. The result? Bouncy, separated curls with serious lift—no teasing required.
Best For: People with curly hair who struggle with flat roots and want to add volume without heat styling or teasing.
- Lifts roots while drying to create natural volume and bounce without damaging backcombing
- Smooth plastic design won’t snag or break curls like metal clips with rough edges
- Works on all curl types and can be used during air drying or diffusing
- Size may not work for everyone—some users find them too large or too small for their hair type
- May not hold properly on very fine or thin hair, with clips potentially slipping out
- Quality concerns from some customers who report flimsy construction and weak springs
Frequently Asked Questions (FAQs)
Can I sleep on wet curly hair overnight?
Hitting the pillow with damp strands might sound tempting, but wet hair risks overnight curl care disasters—think frizz, breakage, and fungal flare-ups.
Instead, try air dry methods or plopping before sleeping with curls.
How often should curly hair be washed?
Most curly hair thrives on washing once or twice weekly to lock in curl hydration and prevent dryness.
If you’re hitting the gym daily or battling product buildup, bump your wash frequency to maintain scalp health.
What ingredients cause frizz in curly hair?
Your styling products might be sabotaging your curls. Harsh sulfates strip moisture, non-water-soluble silicones create occlusive layers that block hydration, and drying alcohols damage hair porosity—all turning defined spirals into frizzy chaos.
Does cold water help seal hair cuticles?
Cold water won’t seal your cuticles—that’s a myth. Cuticle science shows pH balance and conditioners smooth the hair shaft, not water temperature. A brief cool rinse may reduce frizz temporarily without structural changes.
Should curly hair be brushed when dry?
Brushing your curls when they’re bone-dry is practically a rebellion against everything your hair wants. Dry brushing risks serious curl breakage, unleashes wild frizz, and disrupts your natural pattern—wet detangling methods with conditioner protect fragile strands better.
Conclusion
They say the devil’s in the details, and regarding how to dry curly hair, every choice counts. Whether you’re plopping, diffusing, or air drying, your curls thrive when you treat them with intention.
The right tools and techniques can turn the daily battle with frizz into a celebration of texture.
So, ditch old habits, trust your hands, and let your curls speak for themselves—bold, defined, and unapologetically yours. Your hair deserves nothing less.
- https://pmc.ncbi.nlm.nih.gov/articles/PMC3229938/
- https://blog.functionofbeauty.com/lightreads/is-blow-drying-your-hair-bad/
- https://www.mizutowel.com/blogs/articles/curly-hair-towel-vs-regular-towel-the-secret-to-frizz-free-curls
- https://olaplex.com/blogs/news/all-about-curly-girl-method-aka-plopping
- https://www.christopherobin.com/my-advice/advice/how-to-plop-your-hair-curly-hair-drying-method/