This site is supported by our readers. We may earn a commission, at no cost to you, if you purchase through links. This content is for general informational and educational purposes only and is not a substitute for professional medical, dermatological, or nutritional advice.

The neck ruins more shaves than any other part of your face. Curved skin, shifting grain direction, and a bone-thin margin for error turn what should be a 60-second zone into the spot every barber warns new clients about first.
Neck hair grows in at least two directions on most men, and shaving against even one of them without preparation guarantees irritation. That’s not a skin sensitivity problem. That’s a technique problem.
Mastering close shaving techniques for neck starts with understanding your grain, choosing a sharp blade, and building a prep routine that protects skin before the razor touches it.
Table Of Contents
- Key Takeaways
- Map Your Neck Hair Growth Direction
- Choose and Maintain Your Neck Razor
- Prepare Your Neck for a Close Shave
- Shave Your Neck Closely Step by Step
- Prevent Neck Razor Burn and Ingrown Hairs
- Frequently Asked Questions (FAQs)
- How often should I replace my razor blades?
- Can I shave my neck against the grain safely?
- What causes different neck hair growth patterns?
- How long should I wait between neck shaves?
- Are electric razors better than manual for necks?
- How long should I wait between shaving sessions?
- Can diet and hydration affect neck skin quality?
- What causes neck hair to grow back faster?
- Is shaving cream better than shaving gel?
- How do I shave around a prominent Adams apple?
- Conclusion
Key Takeaways
- Mapping your neck’s grain direction before every shave is the single most effective way to prevent razor burn, since most men’s necks grow hair in at least two competing directions.
- A blade past five shaves doesn’t just underperform — it drags, tugs, and causes microabrasions on curved neck skin, making replacement a non-negotiable part of the routine.
- Prep work — warm water, pre-shave oil, and a dense lather — does more to protect your neck than any aftershave balm can after the damage is already done.
- Short, light strokes at a 30-degree angle with skin pulled taut are what separate a clean neck shave from one that ends in nicks, irritation, and ingrown hairs.
Map Your Neck Hair Growth Direction
Your neck isn’t a flat canvas — it’s a landscape of competing directions, whorls, and grain shifts that’ll punish you if you ignore them. Before a single blade touches skin, you need to read what’s already there. Here’s how to map it correctly.
Think of it as reading your neck’s terrain before shaving — follow the wrong contour, and razor burn is almost guaranteed.
Your neck is a landscape of whorls and grain shifts that will punish any blade that ignores them
Check Grain on Dry Stubble
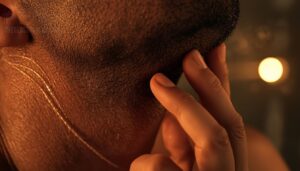
Before a single stroke touches skin, run your fingers across dry stubble. Smooth movement signals you’re shaving with the grain; resistance reveals your beard grain direction and hair growth pattern.
- Stroke downward along your jawline
- Test the lateral neck with light pressure
- Check upward toward your chin
This quick grain mapping reads your hair follicle direction in under a minute. The neck area especially benefits from careful attention, as neck grain direction patterns are often multi-directional and require personal mapping rather than general rules.
Find Whorls and Sideways Growth
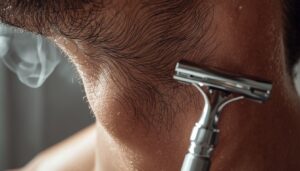
Once you’ve traced basic grain, hunt for whorls and sideways growth. These are spots where hair grows in every direction around a center point, not a clean line.
Press your fingertip into that center and trace outward. The local follicle direction rotates as you move.
Sideways growth demands zone-by-zone beard direction mapping, or your blade crosses the grain every pass.
Identify Coarse, Sensitive Areas

After mapping whorls, drag your fingertips firmly across the neck. Coarse zones feel rough, almost bristled. Those hairs reach 0.12mm thick and sit in deeper follicles, so your blade works much harder there.
Sensitive skin reacts fast. Press lightly and watch for redness within 30 seconds. That’s erythema, your clearest signal to shorten your strokes and ease the pressure.
Plan Each Shaving Pass

Now that you’ve located coarse and sensitive zones, your plan takes shape. Build your shaving pass technique around what you found.
- First pass: short strokes, light pressure, always shaving with the grain.
- Second pass: relather fully, then cross the grain where needed.
- Third pass: against the grain, skin taut, on non-sensitive areas only.
Fewer total passes mean less irritation. Stay deliberate.
Choose and Maintain Your Neck Razor
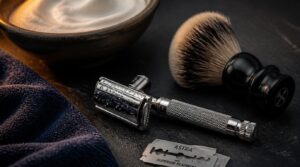
The razor you pick — and how you care for it — can mean the difference between a clean result and a neck full of irritation. Not every blade suits every person, and even the right one fails fast without proper upkeep. Here’s what you need to know across five key areas.
Manual Versus Electric Razors
Your razor choice shapes every pass on your neck. A safety razor or cartridge razor rewards proper wet shaving technique with a noticeably closer first pass.
Single-blade safety razors also dramatically cut down on ingrown hairs along the beard neckline, since they slice cleanly at skin level rather than tugging hairs beneath the surface.
Electric razors run on speed and dry shaving convenience, no lather required. But on curved neck skin, that trades closeness for comfort.
Blade costs add up, but for precision control, the manual wins.
Select Sharp, Clean Blades
A dull blade doesn’t just miss hairs. It drags them, and on curved neck skin, that drag causes erythema and microabrasions. Check your blade carefully before each shave. Run it lightly across your thumbnail. A sharp edge glides; a dull one catches.
Blade cleanliness matters equally. Rinse thoroughly between every stroke to clear lather buildup before it dulls your edge.
Replace Blades Every Five Shaves
Think of your blade like a tire: invisible wear builds until the damage becomes real. On neck skin, that means erythema, tugging, and missed hairs. Replace every five shaves, sooner if strokes stop feeling smooth.
Signs it’s time:
- Each pass demands noticeably more pressure
- Skin irritation flares along curved areas
- The edge catches and tugs instead of cutting clean
Rinse Between Shaving Strokes
Hair and lather clog a blade within two or three strokes. That’s why rinsing between strokes matters more than most people realize.
Tap the blade under warm running water after each short pass, clearing buildup before it forces you to press harder. Pressure on neck skin is how you earn razor burn. Keep the blade clean, keep your touch light.
Dry and Store Razors Properly
A wet blade left standing is a rust trap. Dry yours right, and it will hold its edge far longer.
- Shake off excess water right after rinsing
- Air-dry upright on a stand for better airflow
- Store outside the shower, away from steam and heat
- Wipe with rubbing alcohol weekly for blade hygiene
- Cap it with a blade guard between shaves
Prepare Your Neck for a Close Shave

Good technique starts before the razor ever touches your skin. Neck skin is thinner than facial skin, so skipping prep isn’t just lazy — it’s how you earn razor burn. Here’s what to do first.
Cleanse With Warm Water
Skin preparation starts before the razor ever touches your neck. Run warm water at 98 to 105°F over your face and neck for 10 to 15 seconds. This dissolves sebum, breaks down surface oils, and increases skin permeability.
Your preshave products will penetrate much deeper into properly prepared skin. Skip this step entirely, and you’re shaving on a compromised surface.
Soften Stubble for One Minute
Warm water primed your skin. Now beard softening earns its full minute.
- Press a warm, damp cloth firmly to your neck for 30 seconds
- Apply preshave product over the damp stubble
- Hold the razor off for a full 60 seconds
- Work the product in with light fingertip pressure
Softer stubble means fewer razor passes and far less irritation.
Exfoliate Gently Between Shaves
Stubble softening clears the razor’s path. Exfoliating between shaves locks in that skin preparation.
Massage a fine-grain scrub onto clean, damp skin using gentle circular motions for 30 seconds. Dead cells, oil, and dirt block your blade and can feed ingrown hairs. For sensitive skin, a damp washcloth works just as well. Rinse with lukewarm water, then follow with moisturizer.
Apply Pre-Shave Oil
A clean, exfoliated neck is ready for pre-shave oil. Don’t skip this step.
Dispense 3 to 4 drops into your palms, rub them together for warmth, then massage the oil into your neck with gentle circular motions. Let it absorb for 30 to 60 seconds. That wait builds a slick barrier and gets nesting hormones ready your skin for real razor glide efficiency.
Build a Slick Lather
The pre-shave oil is set. Now build the barrier that guides the blade.
Load your shaving brush with 20 to 30 seconds of circular strokes on soap or cream. Add warm water in small drops until lather reaches a dense, yogurt-like texture. Wet lather loses blade protection fast. Dry, pasty lather drags. Nail the consistency, and your razor glides clean.
Shave Your Neck Closely Step by Step

Good prep gets you to the door — proper technique is what takes you through it. The neck’s curves and grain changes demand a disciplined, step-by-step approach, or you’re fighting the razor the whole way. Here’s exactly how to execute each pass with control and precision.
Stretch Skin Across Neck Curves
The neck isn’t flat. Skin tension determines whether your razor glides or tugs.
- Turn your head slightly to expose each curve
- Pull skin taut with two fingers before every stroke
- Follow the neck’s natural contour with each pass
- Release and re-stretch between passes
- Avoid excessive force to prevent irritation
Skin tautness is what keeps the razor tracking smoothly across curves.
Hold a 30-Degree Angle
Getting the angle right separates a clean cut from a bloody nick. Hold your safety razor so the handle sits roughly 45 degrees from your skin. That sets the blade at the ideal 30-degree cutting angle.
Let the razor’s own weight do the work. Pressing harder won’t get you closer. It actually increases skin irritation and the risk of nicks.
Use Short, Light Strokes
Think of each stroke as a scalpel pass, not a lawn mower run. Keep strokes half an inch to one inch long, letting the razor glide without dragging.
Light pressure prevents razor burn far better than any aftershave balm. The razor’s weight alone cuts cleanly. Around the Adam’s Apple, those short, controlled passes give you precision that longer strokes simply can’t.
Shave With Grain First
Your first pass should be a foundation, not a finish line.
- Map your neck into zones based on growth direction.
- Keep light pressure and move only with the grain.
- Use short strokes, no longer than half an inch.
Shaving with the grain first removes bulk cleanly. One focused pass cuts hair without dragging, protecting your neck skin from early irritation.
Relather Before Additional Passes
Dry skin doesn’t forgive a second pass. After rinsing with warm water, reload your brush and work fresh lather into the neck using circular strokes. Build it to a thick, creamy cushion before you touch the razor again.
A quality superlather softens residual stubble in 15-30 seconds. Light pressure only. Short strokes. That’s how clean passes stay painless.
Prevent Neck Razor Burn and Ingrown Hairs

Getting a close shave is only half the battle — what you do afterward determines whether your neck stays smooth or breaks out in angry red bumps. The neck’s thin skin is especially unforgiving, so even small mistakes in your post-shave routine can trigger razor burn or ingrown hairs fast.
Here’s what to do to keep irritation from taking hold.
Avoid Repeated Dry Passes
A single dry pass strips your skin’s acid mantle and sends friction through the roof. Every pass needs fresh shaving cream or lubricating gel. No exceptions. That’s what skin preparation is for.
- Apply pre-shave oil before your first stroke.
- Re-lather with warm water and shaving cream between passes.
- Proper lubrication cuts ingrown hair risk by up to 60%.
Rinse With Cool Water
Once lubrication does its job, the cold water rinse takes over. Cold water drops skin temperature fast, which slows razor burn before it locks in. That’s the cold water shaving benefit barbers count on. Run it at 50-60°F for 20 seconds after your final pass. Proper skin preparation doesn’t stop at lather. Cold water closes the loop cleanly.
| Step | Water Temp | Purpose |
|---|---|---|
| After final pass | 50-60°F | Reduces razor burn |
| Between passes | Lukewarm | Clears foam residue |
| Before patting dry | Cold | Completes skin preparation |
Apply Alcohol-Free Aftershave Balm
Cold water does the setup. Now seal the work with alcohol-free aftershave balm. Alcohol strips skin lipids and worsens razor burn on sensitive skin, so skip it.
Rub a dime-sized amount into both palms, then spread evenly across your neck on damp skin.
- Soothes post-shave erythema fast
- Restores moisture like a light moisturizer
- Helps close shaving techniques for neck recovery
Moisturize After Every Shave
The balm sets the stage, but moisturizer locks it in. Shaving strips natural oils, so your skin needs replenishment immediately. Pat skin dry, leaving it slightly damp, then apply a glycerin moisturizer or one with hyaluronic acid to pull moisture into the tissue. Use a thin, even layer. Focus extra product on tight spots along your jawline and neck.
Treat Nicks and Irritation
Even with perfect prep, nicks happen. Press a clean cloth on the cut and hold firm, direct pressure for 30 seconds.
Witch hazel astringent tightens pores and pulls redness down fast. A quality aftershave balm forms a protective layer over irritated skin.
For persistent razor burn, 1% hydrocortisone cream applied sparingly stops the cycle. Reactive skin benefits from colloidal oatmeal.
Frequently Asked Questions (FAQs)
How often should I replace my razor blades?
Replace your blade every five shaves. A dull edge tugs rather than cuts, raising your risk of irritation and persistent ingrown hairs. That blade replacement cycle is your first serious act of blade maintenance.
Can I shave my neck against the grain safely?
Old barbers called it "chasing the ghost." Shaving against the grain on your neck invites razor burn, ingrown hairs, and cuts quickly. Your neck’s thinner skin and multi-directional growth demand real restraint, not raw aggression.
What causes different neck hair growth patterns?
Genetics and androgens like DHT shape your neck’s multidirectional patterns. Follicle density varies a lot by zone, and each follicle responds differently to hormone levels, producing the whorls and grain shifts that make beard mapping essential.
How long should I wait between neck shaves?
Most razor burn cases trace back to one mistake: shaving too soon. Wait 24 to 48 hours between shaves. If you have sensitive skin or coarse neck hair, that recovery window stretches to 3 days.
Are electric razors better than manual for necks?
Electric razors cause less friction and reduce skin irritation compared to manual blades, especially across the neck area. You trade some closeness, but you dodge razor bumps, nicks, and the recurring cost of blade replacements.
How long should I wait between shaving sessions?
Your skin isn’t a clock. Wait 24 to 48 hours between shaving sessions. That shaving frequency interval helps prevent skin irritation and cuts razor burn treatment time. Shaving frequency optimization means listening to your skin.
Can diet and hydration affect neck skin quality?
Yes. What you eat and drink shows on your neck. Poor hydration raises transepidermal water loss, leaving skin tight and prone to irritation. A moisturizer with hyaluronic acid locks in moisture after warm water cleansing.
What causes neck hair to grow back faster?
Your neck stubble can feel like it grows back before you’ve even rinsed the sink. That’s perception, not speed.
Blunt cut ends always feel coarser immediately. High follicle density on the neck compounds that illusion.
Is shaving cream better than shaving gel?
Neither wins outright. Shaving cream delivers richer cushion and moisture, making it the smarter call for dry skin and irritation prevention. Shaving gel spreads easily, keeping your shaving area clearly visible. Your skin type decides.
How do I shave around a prominent Adams apple?
Flat one second, a hard ridge the next. Pull skin taut, build skin tension, and hold a 30-degree razor angle. Short strokes protect neckline placement. Swallowing briefly flattens the Adams apple for safer neck shaving.
Before you start, check the edge, because unremoved burrs can snap off mid-shave and scratch your skin, which is why razor blade sharpening for women’s safety matters.
Conclusion
Studies show that razor burn affects nearly 40% of men who shave their neck daily, most of them skipping grain-mapping entirely. That single oversight costs you more than just comfort.
Mastering close shaving techniques for neck means treating that curved, stubborn zone as its own discipline, not an afterthought. Map your grain. Maintain a sharp, clean blade. Protect the skin before and after every pass. Do that consistently, and the neck stops being the problem.