This site is supported by our readers. We may earn a commission, at no cost to you, if you purchase through links.

You don’t need a stylist’s chair to transform your hair color. Bleaching at home puts professional-level results in your hands, but the process demands precision.
One wrong move—over-processing by just 10 minutes or choosing the wrong developer volume—can mean the difference between platinum ideal and brittle breakage. Your hair’s porosity, current condition, and processing time all determine whether you’ll achieve that lighter shade you’re after or end up scrambling for damage control.
Understanding how bleach interacts with your unique hair structure, from strand testing to final rinse, protects your hair while delivering the lift you want.
Table Of Contents
- Key Takeaways
- Preparing Your Hair for Bleaching
- Choosing The Right Bleaching Method
- Essential Supplies for Bleaching Hair
- Step-by-Step Hair Bleaching Process
- Minimizing Damage During Bleaching
- Top Products for Bleached Hair Care
- Post-Bleaching Hair Care and Maintenance
- Frequently Asked Questions (FAQs)
- What products do I need to bleach my hair?
- How do I choose the right bleach for my hair?
- How to treat hair whitening naturally?
- Can you bleach your hair at home?
- How do you bleach a hair strand?
- How do you bleach your hair in a salon?
- How does a hair colorist bleach hair?
- What is the safest way to bleach your hair?
- Should I use 20 or 30 developer with bleach?
- How long should bleach sit on hair?
- Conclusion
Key Takeaways
- Your hair’s porosity and current condition determine whether you’ll achieve safe, even lift or end up with brittle, patchy damage—strand testing and proper developer selection (20-40 volume) aren’t optional steps.
- Timing separates successful bleaching from disaster: check progress every 5-10 minutes after the first 15, never exceed 45 minutes total, and apply to mid-lengths first since scalp heat accelerates root processing.
- Post-bleach maintenance requires alternating weekly deep conditioning masks with protein treatments to rebuild bonds, plus purple shampoo 1-3 times weekly to neutralize brassy yellow tones.
- Professional results at home demand precise mixing ratios (1:2 bleach to developer), proper sectioning for even saturation, and protective barriers like coconut oil on mid-lengths to prevent excessive protein loss.
Preparing Your Hair for Bleaching
Bleaching your hair isn’t something you should jump into without a plan. Your hair’s current condition will determine whether you get the platinum blonde you’re dreaming of or a damaged mess.
Once you’ve bleached it, knowing when and how to dye your hair safely becomes just as important as the bleaching process itself.
Before you mix up that bleach, you need to evaluate a few critical factors that’ll set you up for success.
Assessing Hair Condition and Porosity
Before you even think about cracking open that bleach, you need to understand what you’re working with. Hair porosity tests—like the water drop or float test—reveal how your cuticles absorb moisture. High porosity means faster lightening but higher damage risk.
Check elasticity by gently stretching a wet strand; if it snaps instead of bouncing back, your moisture levels and hair health need serious attention first.
Avoiding Recently Dyed or Chemically Treated Hair
If you’ve dyed your hair within the last two weeks, hold off on bleaching. Chemical reactions from fresh color raise cuticles unevenly, creating hot spots that lift unpredictably.
Scalp protection becomes nearly impossible when previous treatments leave residual ammonia. Color fading and shifting hair porosity mean some sections will process faster than others, inviting banding and serious damage prevention concerns.
Wait it out—your hair will thank you.
Pre-Bleaching Care Routine
Once you’ve given your hair time to recover, start building strength from the inside out. Use a bond-strengthening conditioner one to two weeks before bleaching to boost resilience. Deep condition 24 to 72 hours ahead to lock in moisture and reduce breakage.
Check your hair porosity—high-porosity strands absorb products quickly but lose moisture fast, so adjust your pre-bleach conditioning routine accordingly.
Choosing The Right Bleaching Method

The bleaching method you choose determines how much lift you’ll get and how your hair manages the process. Your developer strength, bleach formula, and whether you go natural or chemical all shape your results.
Here’s what you need to know to pick the right approach for your hair.
Understanding Developer Volumes
Developer volume controls how much pigment you lift and how fast. Think of 20 vol hydrogen peroxide as your standard—it achieves two to three shades lighter in under 40 minutes.
Volume selection directly impacts lift rates and scalp safety. Higher peroxide strength means faster bleaching but greater risk.
Developer ratios matter too: mix bleach with developer at 2:1 for predictable hair bleaching results.
Selecting Between Powder and Cream Bleach
Powder bleach lifts aggressively on coarse hair when you use a strong developer, but it can irritate your scalp and creates dust during mixing.
Cream bleach formulations stay put without dripping, making them gentler and easier to control on fine to medium hair.
Both bleach types require proper developer ratios and strand tests—your hair porosity determines which formula works best for safe hair bleaching.
Considering Natural Vs. Chemical Options
Natural alternatives like lemon juice or honey lighten your hair one to two levels over several hours, while chemical hydrogen peroxide formulas deliver faster, more dramatic color results at home.
Chemical bleach types pose greater risks of hair damage and scalp irritation, but natural bleaching methods produce uneven lift on dark or previously dyed strands—weigh control against predictability.
Essential Supplies for Bleaching Hair

Having the right supplies makes all the difference between a smooth bleaching session and a mess you’ll regret. You don’t need a salon’s worth of equipment, but skipping essentials will cost you in damaged hair or uneven results.
Here’s what you need to grab before you start mixing anything.
Bleach Powder and Developer
You’ll need bleach powder and developer to lift your hair’s natural pigment. Bleach powder composition includes persulfates that release active oxygen to break down color.
Developer volume ranges from 10 to 40—higher volumes work faster but risk more damage. Mix at a 1:1 ratio for a thick, non-dripping bleach consistency.
Store powder away from moisture to maintain its shelf life.
Application Tools (Brushes, Bowls, Clips)
You can’t control the bleach if your tools fight you. Grab the right gear for hair bleaching at home and you’ll own the process:
- Brush selection matters—use tapered nylon bristles that resist ammonia and won’t snag at your scalp
- Bowl materials like nonreactive glass prevent staining and let you portion your bleach kit accurately
- Clip types with stainless steel hold thick sections without slipping
Ergonomic grips reduce fatigue. Tool sanitization between batches keeps your at-home hair care clean.
Protective Gear and Safety Equipment
Bleach fumes and splashes won’t ask permission. Eye protection with polycarbonate lenses shields you from peroxide vapors during hair bleaching at home. Skin guards like petroleum jelly create barriers along your hairline, while nitrile gloves prevent dermatitis.
Ventilation systems—even a simple window fan—reduce scalp irritation risks.
Keep emergency kits nearby: saline solution, clean water, and your bleach kit instructions ready.
Step-by-Step Hair Bleaching Process
You’ve got your supplies ready—now it’s time to actually bleach your hair. The process requires precision and patience to avoid patchy results or unnecessary damage.
Here’s how to section, mix, apply, and monitor your bleach from start to finish.
Sectioning Hair for Even Application

Think of sectioning as creating zones that guarantee uniform lift from roots to ends. Use a tail comb to carve thin horizontal sections—usually 1 to 2 centimeters wide—working in a diagonal back pattern to balance density. Secure each with wide-toothed clips to avoid denting your strands.
This DIY hair bleaching technique prevents patchiness and ensures your at-home transformation delivers salon-quality results.
Mixing and Applying The Bleach

Grab your bowl and combine bleach powder with developer at a 1:2 ratio—one scoop powder, two scoops developer. Stir until you hit a smooth, creamy consistency that won’t drip.
Start applying mid-lengths to ends using your tint brush, working in thin layers for even saturation. Skip the roots for now—heat from your scalp accelerates lift there.
Processing Time and Monitoring Progress

Once bleach is on, set a timer for 15 minutes—that’s your first checkpoint. Check a strand from each section to gauge lift levels and spot uneven processing early. You’re aiming for pale yellow with minimal brass. Don’t exceed 45 minutes total or you’ll risk serious damage control issues later.
- Pale yellow strands signal ideal lift
- Orange or red tones mean you need more time
- Gummy texture screams over-processing—rinse immediately
Minimizing Damage During Bleaching

Bleaching doesn’t have to mean destroying your hair if you take the right precautions. The difference between healthy, lightened hair and a fried disaster comes down to three critical safety steps.
Here’s how to protect your strands while you transform your color.
Performing Strand and Patch Tests
Before you mix anything, run two critical tests to avoid disaster. A patch test catches signs of allergic reaction—dab bleach behind your ear, wait 48 hours, and check for redness or itching.
The strand test reveals how fast your hair lifts and whether you’re headed for damage or brilliance.
For a thorough overview of these safety measures, explore the importance of patch and strand testing.
| Test Type | What It Reveals | Action Required |
|---|---|---|
| Patch Test | Bleach sensitivity and allergic reaction signs | Apply small amount behind ear, wait 48 hours, check for irritation |
| Strand Test Basics | Processing time and lift level | Test hidden section, monitor at 10-minute intervals, record results |
| Combined Results | Hair damage prevention strategy | Adjust developer volume or processing time based on both outcomes |
| Patch Test Results | Safe proceeding or product change needed | Negative result means go ahead; positive means stop and consult pro |
Using Protective Oils and Barriers
Protective layers work while you bleach. Coconut oil creates a barrier that reduces protein loss by forming a microscopic shield around strands. Apply one to two teaspoons to midlengths and ends thirty minutes before mixing your developer.
Argan oil delivers moisture for twenty-four hours while silicone serums slow peroxide penetration without blocking lift—your hair stays flexible instead of fried.
Avoiding Over-Processing and Breakage
Timing defines the line between lift and over-processing. Check your sections every five minutes after the first fifteen—dense or high-porosity strands absorb bleach faster, increasing hair breakage risk.
Never exceed forty-five minutes total, even if you’re chasing platinum. Damage control starts when you rinse at the first sign of desired lightness, protecting hair integrity through careful bleach timing and constant monitoring.
Stop bleaching at the first sign of your desired lightness—never push past forty-five minutes, even for platinum
Top Products for Bleached Hair Care
After you’ve stripped your hair of its natural pigment, the real work begins—keeping it healthy and vibrant. The right products can mean the difference between fried, straw-like strands and soft, shiny blonde hair.
Here are six must-have products that’ll help you maintain your bleached hair without breaking the bank or your ends.
1. Olaplex Purple Toning Shampoo
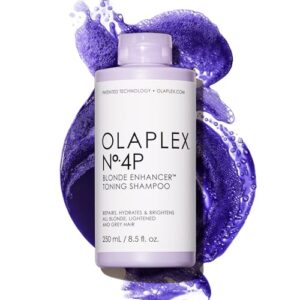
You won’t keep your hard-won blonde bright without tackling brassiness head-on. Olaplex No. 4P Purple Blonde Enhancer Toning Shampoo deposits violet pigments to neutralize yellow and orange tones in a single wash.
This sulfate-free formula uses bond-building technology to repair damage while it tones, leaving your hair softer and less brittle.
Use it two to three times per week, leaving it on for one to three minutes depending on how much toning you need.
| Best For | Blondes who want to keep their color bright and brass-free while repairing damage at the same time. |
|---|---|
| Brand | Olaplex |
| Form | Liquid |
| Volume/Size | 250 mL / 8.5 Fl Oz |
| Hair Type | All types |
| Scent | Unscented |
| Price Range | Not specified |
| Additional Features |
|
- Tones out brassiness and repairs hair in one step thanks to Olaplex’s bond-building technology
- Works fast—you only need to leave it on for one to three minutes to see results
- Sulfate-free formula is gentle enough for color-treated and damaged hair
- Can stain your scalp if you leave it on too long, so you need to watch the clock
- Might dry out your hair if you overuse it or don’t follow up with a good moisturizing conditioner
- Pretty potent, so it’s not a daily shampoo—stick to two or three times a week max
2. Matrix Brass Neutralizing Hair Spray
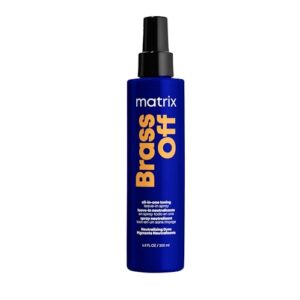
Matrix Brass Off All In One Toning Leave In Spray works double duty—it neutralizes brassy orange tones while conditioning your bleached hair. The blue-violet pigments counteract warmth without weighing down your strands or leaving them sticky.
You’ll spray it on damp hair after washing, no rinsing required. Use it between salon visits to maintain cool tones, and you’ll notice softer, more manageable hair with less frizz.
Build up the toning intensity by applying more product if your hair pulls especially warm.
| Best For | Brunettes and dark blondes with color-treated hair who want to eliminate brassy, orange tones between salon visits while keeping hair soft and frizz-free. |
|---|---|
| Brand | Not specified |
| Form | Spray |
| Volume/Size | 6.8 Fl Oz |
| Hair Type | Color-treated |
| Scent | Fruity, Floral, Woody |
| Price Range | Not specified |
| Additional Features |
|
- Neutralizes unwanted warm tones with blue-violet pigments without rinsing or weighing hair down
- Doubles as a leave-in conditioner that detangles, moisturizes, and controls frizz
- Buildable formula lets you adjust toning intensity based on how brassy your hair is
- Scent might not appeal to everyone (fruity, floral, woody blend)
- Can stain furniture or surfaces if you’re not careful during application
- Some bottles may arrive without the expected blue-violet tint, coming out clear instead
3. Diane Processing Hair Cap
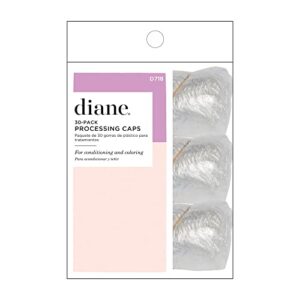
You’ll need a processing cap to trap heat and speed up the bleaching reaction. The Diane Processing Cap fits most head sizes with its soft elastic band and clear plastic design, so you can check your hair’s progress without removing it.
Grab the 30-count pack if you’re bleaching regularly—they’re reusable when you wash them between sessions. The reinforced edges resist tearing when you peel the cap off, and the snug fit prevents bleach from dripping onto your skin or clothes.
| Best For | Anyone doing at-home bleaching, coloring, or deep conditioning treatments who wants to trap heat and check progress without constantly removing the cap. |
|---|---|
| Brand | Diane |
| Form | Elastic cap |
| Volume/Size | 30-count pack |
| Hair Type | All types |
| Scent | Unscented |
| Price Range | Budget-friendly |
| Additional Features |
|
- Reusable when washed between sessions, making the 30-count pack last for regular treatments
- Clear plastic lets you monitor hair color development without removing the cap
- Soft elastic band and reinforced edges prevent tearing and keep bleach from dripping
- Not the most eco-friendly option since they’re disposable plastic caps
- Can rip or tear if you’re not gentle when putting them on or taking them off
- The elastic band might feel tight or uncomfortable for some users during longer treatments
4. Alaffia Pure Coconut Oil
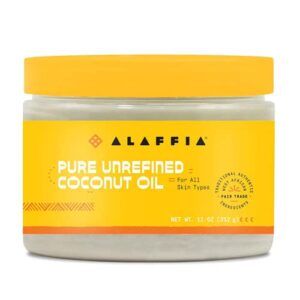
Protect your strands before you even mix the bleach—that’s where coconut oil comes in. Alaffia Pure Coconut Oil creates a barrier on your hair and scalp, blocking bleach from penetrating too deeply and causing unnecessary damage.
This 11-ounce jar of unrefined, cold-pressed oil is Fair Trade certified and free from parabens, sulfates, and synthetic fragrances. Warm a small amount between your palms, then coat your mid-lengths and ends thoroughly.
The natural fatty acids seal your cuticle while the bleach lifts color, keeping breakage at bay.
| Best For | People with normal to dry hair who want to protect their strands from bleach damage while keeping things natural and ethically sourced. |
|---|---|
| Brand | Not specified |
| Form | Oil |
| Volume/Size | 11 fluid ounces |
| Hair Type | Normal to dry |
| Scent | Coconut/Unscented |
| Price Range | Not specified |
| Additional Features |
|
- Unrefined and cold-pressed so you get all the natural fatty acids and vitamins without chemical processing
- Fair trade certified and free from parabens, sulfates, and synthetic fragrances
- Works as a pre-bleach barrier and doubles as a moisturizer for skin and scalp
- Can melt into liquid in warm temperatures, making it messy to handle
- May leave a greasy residue if you don’t wash it out completely
- Pricier than standard coconut oil you’d find at the grocery store
5. Olaplex Bond Maintenance Conditioner
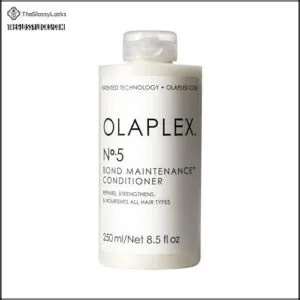
After bleach strips your bonds apart, you need something to rebuild them from the inside out. Olaplex No.5 Bond Maintenance Conditioner uses patented technology to relink broken disulfide bonds in your hair shaft, reversing damage from chemical processing.
Apply this 8.5-ounce formula from mid-lengths to ends after every wash, focusing on your most compromised areas. It strengthens without weighing hair down, reduces breakage, and makes detangling a breeze.
At $32, it’s part of a system that actually repairs—not just coats.
| Best For | Anyone with bleached, chemically treated, or damaged hair who needs serious bond repair and strengthening. |
|---|---|
| Brand | Olaplex |
| Form | Liquid |
| Volume/Size | 250 mL / 8.5 Fl Oz |
| Hair Type | All types |
| Scent | Not specified |
| Price Range | $32.00 |
| Additional Features |
|
- Rebuilds broken hair bonds from the inside out using patented technology
- Strengthens hair and reduces breakage without weighing it down
- Makes detangling easy while improving overall hair health
- Pricey at $32 for 8.5 oz compared to regular conditioners
- Might feel too heavy if you have very fine or thin hair
- Works best as part of the full Olaplex system, adding to the cost
6. R Plus Co Baobab Oil Repair Masque
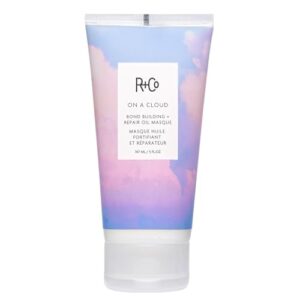
While Olaplex rebuilds your internal structure, you’ll want surface-level rescue too. R Plus Co Baobab Oil Repair Masque costs $44 for 5 ounces, but it delivers protein-rich hydration that makes bleach-fried strands feel cloud-soft again.
The formula blends baobab oil with tacuma, macadamia, and sweet almond oils to seal moisture back into porous hair. Apply to damp hair, leave for 20 minutes, then rinse. Don’t overdo it—this is intense treatment territory, not your everyday conditioner.
| Best For | Anyone with bleach-damaged or severely dry hair who needs intense repair and deep hydration without relying solely on bond-building treatments. |
|---|---|
| Brand | Not specified |
| Form | Oil |
| Volume/Size | 4.8 ounces |
| Hair Type | Damaged |
| Scent | Not specified |
| Price Range | $44.00 |
| Additional Features |
|
- Combines protein technology with multiple nourishing oils to repair damage and restore softness
- Works well as a multi-purpose product that can replace leave-in conditioner or curl cream
- Contains shea butter to soothe scalp irritation while repairing hair fibers
- Pricey at $44 for less than 5 ounces
- Can cause buildup or leave hair greasy if used too often or not rinsed thoroughly
- Too rich for daily use, making it less convenient than lighter conditioners
Post-Bleaching Hair Care and Maintenance

Bleaching transforms your hair, but the real work starts after you rinse.
Your strands need serious attention to stay healthy and vibrant now that they’re lighter.
Here’s how to protect your investment and keep your bleached hair looking its best.
Deep Conditioning and Protein Treatments
Balance is everything after you’ve stripped your hair down.
Deep conditioning masks work weekly to restore moisture and flexibility, while protein repair strengthens weak, stretchy strands. Alternate between bond building treatments and hydrating formulas to prevent brittleness without overdoing protein.
Watch how your hair behaves—frizzy and snapping signals you need moisture; stiff and straw-like means you’ve overdone the strengthening game.
For a deeper understanding, explore the importance of bond protectors and protein treatments in maintaining hair strength.
Maintaining Color With Purple Shampoos
Your bleached hair will turn brassy without regular toning. Purple shampoo deposits violet pigments that cancel yellow tones—use it one to three times weekly based on your hair porosity.
High-porosity strands grab color fast, so you’ll need shorter contact time to avoid lavender buildup. Start with damp hair, apply mid-lengths to ends, leave for one to five minutes, then rinse cool.
Scheduling Root Touch-Ups and Regular Trims
Your hair regrowth will show fast after bleaching—book root touchups every four to six weeks to keep color balance sharp. Hair maintenance means pairing those root sessions with trims every six to eight weeks.
This timing prevents split ends from traveling upward while your touch up timing handles visible regrowth lines before they wreck your blonde.
Frequently Asked Questions (FAQs)
What products do I need to bleach my hair?
You’ll need bleach powder, developer (10-40 volume hydrogen peroxide), toner, application tools like brushes and bowls, sectioning clips, gloves, and aftercare products. Quality bleach kits often bundle these essentials together.
How do I choose the right bleach for my hair?
Choose developer strength based on your hair analysis and porosity test. Powder bleach formulas lift fastest, while cream versions reduce dryness.
Match bleaching techniques and bleach types to your hair’s current condition for safer results.
How to treat hair whitening naturally?
Like ancient rituals promising eternal youth, certain vitamin supplements and herbal remedies may slow graying.
Try scalp massage with natural oils, dietary changes rich in copper, and gentle hair care routines alongside bleaching techniques.
Can you bleach your hair at home?
Yes, you can bleach your hair at home using proper DIY bleaching techniques and damage control methods.
At-home risks include breakage and uneven lift, so understanding bleach safety for different hair types is essential before starting.
How do you bleach a hair strand?
Apply bleach from midshaft to ends using a fine brush, ensuring strand saturation.
Monitor lift assessment every five to ten minutes, rinse at desired lightening, then follow with cuticle sealing conditioner.
How do you bleach your hair in a salon?
A salon consultation starts the bleaching process, where your stylist sections hair, applies bleach from mid-lengths to roots using professional techniques, monitors processing time carefully, then provides color correction and aftercare treatment.
How does a hair colorist bleach hair?
A hair colorist evaluates your hair’s condition, selects the appropriate bleach formulas and developer volume, applies product strategically for even hair lightening, monitors processing carefully, then follows with toner applications and color correction as needed.
What is the safest way to bleach your hair?
Protect your process with patch tests, strand checks, and smart application—using 20-volume developer on midshafts first, then roots last.
Aftercare tips demand deep conditioning, bond treatments, and limiting heat for damage control and bleach safety.
Should I use 20 or 30 developer with bleach?
Your choice between 20 and 30 volume developer depends on your hair’s current level and how much lift you need.
Twenty volume offers gentler lightening with less damage risk, while 30 volume delivers faster, more dramatic results.
How long should bleach sit on hair?
Most bleaching sessions need 20 to 30 minutes of processing time, but never exceed 40 minutes total. Check your hair lift every 10 minutes to prevent over-processing and minimize damage risk.
Conclusion
Your hair doesn’t hold you hostage to salon pricing or appointment books. Learning how to bleach hair at home hands you the power to reinvent your look on your terms, your timeline.
The difference between stunning transformation and damage lies in respecting the process—testing strands, choosing proper volumes, monitoring lift carefully. Treat bleach like the powerful tool it’s, not a shortcut. Your hair will reward that precision with the vibrant, lasting color you’re chasing.
- https://www.instagram.com/richykanda/?hl=en
- https://www.wella.com/professional/en-US/home
- https://www.oreateai.com/blog/the-best-deep-conditioners-for-reviving-bleached-hair/0cf16841158c62ec55589f7a69f38da7
- https://www.clinikally.com/blogs/news/protein-filler-for-bleached-hair-essential-treatment-for-hair-recovery
- https://www.marieclaire.com/beauty/best-deep-conditioners-for-bleached-hair/