This site is supported by our readers. We may earn a commission, at no cost to you, if you purchase through links.
 Blending a beard is like painting a masterpiece—you need the right tools and techniques!
Start with a quality trimmer with adjustable guards to shape your canvas.
Use precision scissors for detail work, and don’t forget both wide-toothed and fine-toothed combs for prepping and styling.
Begin by washing and conditioning your beard, then apply beard oil before trimming.
Start with the longest guard and work downward, gradually flicking the trimmer outwards for that seamless fade.
Blend your sideburns and keep an eye on the neckline.
Up for a challenge?
Master cheek lines and tackle the mystery of patchy areas.
Ready to become your own grooming guru?
Let’s get started!
Table Of Contents
- Key Takeaways
- Essential Tools for Blending a Beard
- Preparing Your Beard for Blending
- Mastering the Basic Beard Blending Technique
- Creating a Seamless Neckline Fade
- Perfecting the Cheek Line Blend
- Advanced Blending Techniques for Different Beard Styles
- 7 Best Tools to Blend Your Beard
- Troubleshooting Common Beard Blending Issues
- Maintaining Your Perfectly Blended Beard
- Professional Tips for a Salon-Quality Beard Blend
- Frequently Asked Questions (FAQs)
- What is the 2 finger rule for beard?
- How do you transition a beard?
- How do you blend beard lengths?
- How do you blend a patchy beard?
- How can I style a blended beard?
- What is the best beard length to blend?
- Are there any risks to fading a beard?
- Can a faded beard suit all face shapes?
- What is the ideal frequency for trimming fades?
- Conclusion
Key Takeaways
- Start by gathering essential tools. Your beard’s like a masterpiece; you’ll need a quality trimmer with adjustable guards, a boar bristle brush, and precision scissors to shape it up with finesse. Don’t forget those trusty wide-toothed and fine-toothed combs for prepping and styling.
- Before you dive into trimming, prep your beard like a pro. Wash and condition it to get everything squeaky clean. A few drops of beard oil will make those whiskers soft and ready for action—it’s like giving your beard a spa day.
- Got pesky patchy areas? Don’t sweat it! Let your beard grow a bit longer and use a trimmer with a slightly shorter guard to blend it all in smoothly. And hey, regular use of beard oil might just boost that growth and fill in the gaps.
- To keep that fade looking sharp, make it a habit to trim every 2-3 days. Think of it like mowing your lawn—regular maintenance keeps things tidy and stops you from looking like a wild bush. Your face will thank you for it!
Essential Tools for Blending a Beard

You’re ready to master the art of beard blending, but first, let’s gear up with the right tools for the job.
From a really good trimmer to a trusty boar bristle brush, having these essentials in your grooming arsenal will set you up for beard-blending success.
Quality Beard Trimmer With Adjustable Guards
A quality beard trimmer with adjustable guards is your ticket to fade fame.
You’ll want sharp blades, long battery life, and easy cleaning.
Choose a trimmer with multiple guards for precision fading.
Don’t skimp—your beard deserves the best!
Precision Scissors for Detail Work
You’ll need precision scissors to put the finishing touches on your beard blend.
These bad boys are perfect for snipping stray hairs and shaping those tricky areas around your lips and nose.
Keep ’em sharp, and you’ll be sculpting like a pro in no time!
Wide-Toothed Comb for Detangling
Your beard-blending toolkit isn’t complete without a wide-toothed comb. This detangling hero is essential for taming your facial mane.
Here’s why it’s a game-changer:
- Gently separates tangled hairs
- Distributes beard oil evenly
- Prepares beard for trimming
- Reduces breakage and split ends
Fine-Toothed Comb for Styling
A fine-toothed comb is your secret weapon for beard styling precision.
It’s perfect for detailing and shaping, especially on shorter beards.
Use it to distribute products evenly, tame flyaways, and create crisp lines.
Just remember, gentle strokes prevent snagging and breakage.
Boar Bristle Brush for Smoothing
After styling, it’s time to tame those unruly whiskers.
A boar bristle brush is your secret weapon for a polished look.
This versatile tool offers:
- Natural oil distribution
- Exfoliation for healthier skin
- Frizz reduction and shine boost
Say hello to a smoother, more manageable mane!
Preparing Your Beard for Blending

Before you start blending your beard, you’ll need to prep it properly for the best results.
Let’s walk through the essential steps to get your facial hair in prime condition for that perfect fade, from washing and drying to detangling and applying pre-trim products.
Washing and Conditioning Your Beard
Now that you’ve got your tools ready, let’s get that beard squeaky clean.
Grab a gentle beard wash and lather up, massaging it into your facial hair and skin.
Rinse thoroughly, then apply a nourishing beard conditioner.
This’ll soften your whiskers, making them more manageable for blending.
Don’t skip this step – a clean, well-conditioned beard is like a blank canvas for your fade masterpiece.
Trust me, your beard will thank you later!
Drying and Detangling Techniques
Once you’ve given your beard a good wash, it’s time to dry and detangle.
Forget harsh towel rubbing – that’s a recipe for frizz!
Instead, try these beard-friendly techniques:
- Pat gently with a soft microfiber towel
- Let it air dry for that natural, rugged look
- Use a wide-toothed comb to gently work out knots
For those aiming for a sleek style, consider using a blow dryer on low heat.
Just remember, patience is key – rushing this step can lead to a tangled mess!
Applying Pre-Trim Beard Oil
With your beard dry and detangled, it’s time for some pre-trim TLC.
Grab your favorite beard oil – argan, jojoba, or coconut work wonders.
A few drops go a long way.
Massage it in, working from roots to tips.
This step’s your secret weapon for a smooth trim.
It softens your beard but also preps those stubborn hairs for the blade.
Your trimmer will thank you, and so will your skin!
Mastering the Basic Beard Blending Technique

Mastering the basic beard blending technique is your ticket to a polished, professional look that’ll turn heads and boost your confidence. Check out this guide for a step-by-step breakdown.
Starting With the Longest Guard
Like a sculptor starting with a large block of marble, begin your beard blending journey with the longest guard. This safeguards against over-trimming and sets the stage for precision blending.
Here’s your game plan:
- Identify your desired overall length
- Select the corresponding longest guard
- Trim your entire beard evenly
Gradually Decreasing Guard Sizes
After setting your longest guard, it’s time to play the size game.
Swap out your guard for the next size down, trimming the lower sections of your beard.
Keep stepping down in size as you move upward, creating that coveted gradient effect.
Using the Flicking Motion for Smooth Transitions
To get a smooth blend in your beard, mastering the flicking motion is key.
You’ll create a seamless gradient by:
- Angling the trimmer slightly outward
- Using short, upward strokes
- Applying gentle pressure
- Gradually increasing the flicking motion as you move up
This technique is like painting with hair—each flick adds depth to your manly masterpiece.
Blending Sideburns Into Beard
Now, let’s tackle blending sideburns into your beard. This step’s a game-changer for a seamless look. You’ll want to match your sideburn length to your beard’s fade, considering your face shape and hair type when choosing trimmer guards.
Here’s a quick guide to help you nail it:
| Face Shape | Sideburn Length | Fade Technique |
|---|---|---|
| Round | Short | Gradual |
| Square | Medium | Sharp |
| Oval | Long | Tapered |
| Diamond | Varied | Textured |
| Triangle | Short to Medium | Blended |
Creating a Seamless Neckline Fade

You’re on your way to beard perfection, but the neckline can make or break your look.
neckline fade that’ll have everyone wondering if you’ve got a personal barber on speed dial.
Identifying the Proper Neckline
Identifying your proper neckline is important for a polished beard fade.
The ideal neckline should:
- Follow your natural jawline contour
- Sit about two finger-widths above your Adam’s apple
- Create a subtle U-shape under your chin
Picture an imaginary line from ear to ear, passing through that sweet spot above your Adam’s apple. This is your neckline blueprint.
Fading Technique for Natural-Looking Neckline
Your beard’s neckline fade can make or break your look.
Start with a longer guard, gradually decreasing as you move down.
Use a gentle flicking motion to create a seamless blend.
Angle your clipper at 45 degrees for a natural blend.
It’s like painting a masterpiece, but your face is the canvas!
Addressing Common Neckline Blending Mistakes
Avoiding neckline blending mishaps is key to a polished beard. Watch out for these common pitfalls:
- Going too high, creating a "double chin" effect
- Fading too abruptly, leaving harsh lines
- Neglecting to follow your natural neckline curve
Over-trimming can also lead to issues:
- Over-trimming, resulting in patchy areas
- Using the wrong guard size for your beard length
Perfecting the Cheek Line Blend

You’ve mastered the neckline fade, but now it’s time to tackle the cheek line blend.
This key step will elevate your beard game, creating a polished look that seamlessly moves from your facial hair to your skin.
Determining Ideal Cheek Line Shape
Now that you’ve nailed your neckline, let’s shape those cheeks!
The ideal cheek line complements your face shape and beard length.
Picture a line from your ear to the corner of your mouth – that’s your starting point.
For round faces, go higher to add definition.
Square-jawed? Keep it natural.
Got killer cheekbones? Show ’em off with a slightly lower line.
Fading Technique for Softer Cheek Lines
To achieve softer cheek lines, master the fade-away technique. Start with a longer guard on your trimmer and work your way down, creating a smooth change from full beard to bare skin.
Here are key tips:
- Use a gentle flicking motion to blend seamlessly
- Experiment with different angles for natural-looking results
- Apply beard oil beforehand for easier trimming and less irritation
Blending Patchy Areas on Cheeks
Dealing with patchy cheeks? Don’t fret! You can still achieve a flawless fade.
Start by letting your beard grow a bit longer to cover sparse areas.
Then, use a slightly shorter guard on your trimmer to blend these patches seamlessly.
Apply beard oil daily to promote healthier growth and minimize patchiness.
Advanced Blending Techniques for Different Beard Styles

You’ve mastered the basics, now it’s time to level up your beard game with advanced blending techniques.
Whether you’re rocking a short stubble, full beard, or stylish goatee, we’ll show you how to achieve that perfectly blended look that’ll turn heads and have everyone asking for your beard secrets.
Blending Short Stubble Beards
Then, gradually decrease to 1-2mm as you move down. Remember, stubble’s all about that effortless look, so don’t go too precise. A light touch with your trimmer creates natural-looking changes.
Pro tip: Use beard oil to keep that short scruff soft and itch-free.
Creating a Tapered Look for Full Beards
Moving from stubble to full beards, let’s tackle the art of tapering.
For a polished look, start with your longest guard at the chin, gradually decreasing as you move up.
Work in upward motions, focusing on the sideburns and cheeks.
Don’t rush; small, incremental changes will give you that enviable, natural-looking fade that turns heads.
Blending Techniques for Goatees and Circle Beards
For goatees and circle beards, precision is key.
Start by trimming your beard to your desired length, then focus on creating clean lines around the edges.
For a goatee, blend the soul patch into the chin hair using progressively shorter guard lengths.
With circle beards, gradually fade the cheek line into the mustache for a seamless look.
7 Best Tools to Blend Your Beard
You’re ready to take your beard game to the next level, but do you have the right tools for the job?
Let’s explore the seven best tools that’ll help you achieve that perfectly blended beard, from precision trimmers to essential grooming accessories.
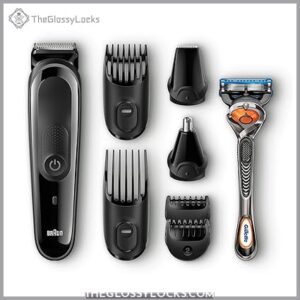
1. MGK3060 Series Generator
 View On Amazon
Get ready to transform your beard game with the MGK3060 Series Generator. This versatile tool is your all-in-one solution for achieving that perfect fade.
With 13 precision length settings ranging from 0.5 to 21mm, you’ll have complete control over your look. The detail trimmer attachment lets you sculpt those crisp lines, while the ear and nose trimmer keeps everything tidy.
Don’t worry about making a mess – it’s fully washable for easy cleaning. Plus, its quiet operation means you can groom without waking the whole house. Talk about a smooth operator!
Best For: The MGK3060 Series Generator is best for those looking for a versatile all-in-one grooming tool for a variety of needs.
- Offers 13 precision length settings for precise trimming.
- Includes a detail trimmer and ear & nose trimmer attachments for a complete grooming experience.
- Fully washable for easy cleaning.
- Some users found the hair razor to be not sharp enough.
- Recharge time can be lengthy (over 12 hours).
- Some users reported issues with the razor turning on intermittently.
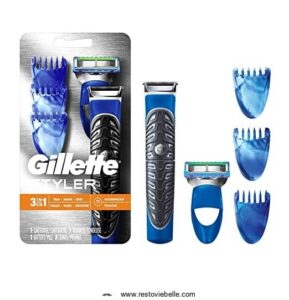
2. Gillette Styler Beard Trimmer Kit
 View On Amazon
The Gillette Styler Beard Trimmer Kit is your secret weapon for a flawless fade.
This 3-in-1 powerhouse trims, edges, and shaves with precision.
You’ll love its waterproof design, perfect for touch-ups in the shower.
With three comb attachments, you can easily create the perfect length for your style.
The ProGlide blade refill provides a close, comfortable shave where you need it.
Don’t let its compact size fool you – this little dynamo packs a punch.
It’s like having a professional barber in your bathroom, ready to help you conquer any beard-blending challenge.
Best For: The Gillette Styler Beard Trimmer Kit is best for guys who want a versatile tool for maintaining their beard, from trimming to edging to shaving.
- Waterproof design makes it easy to use in the shower.
- 3-in-1 functionality provides versatility for various beard styles.
- ProGlide blade refill offers a close and comfortable shave.
- Comb attachments may be fragile.
- Battery life is limited.
- May be difficult to find in stores.
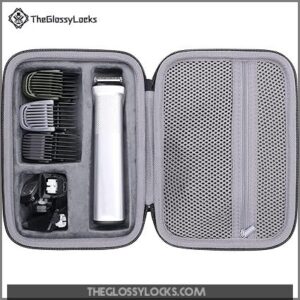
3. Multigroom Trimmer Hard Case
 View On Amazon
You’ll love this handy co2CREA hard case for your Philips Norelco Multigroom trimmer.
It’s a game-changer for keeping your beard-blending tools organized and protected.
Imagine never losing those tiny guard attachments again!
This sturdy EVA shell laughs in the face of drops, splashes, and dust.
There’s plenty of room for your trimmer, charger, and all those pesky accessories.
A soft lining keeps everything scratch-free, while the hand strap makes it perfect for travel.
It’s like a bulletproof vest for your grooming gear – talk about beard security!
Best For: This co2CREA hard case is best for Philips Norelco Multigroom trimmer owners who want to protect their investment and keep their grooming tools organized.
- Provides excellent protection against drops, scratches, bumps, splash, and dust.
- Offers ample storage for the trimmer, charger, and accessories.
- Includes a convenient hand strap for easy carrying.
- Only compatible with specific Philips Norelco Multigroom models.
- It’s a dedicated case, so it might not be suitable for other grooming tools.
- The case itself might be a bit bulky for some users.
4. Cordless Beard Trimmer for Men
Looking for a game-changer in your beard-blending arsenal? Enter the cordless beard trimmer – your new best friend for achieving that perfect fade.
With no pesky cords to contangle with, you’ll have the freedom to maneuver like a pro.
Opt for a model with adjustable guards and a long battery life, like the Bevel Trimmer. Its 6-hour charge means you won’t be left high and dry mid-trim. Plus, its zero-gapped blade guarantees precision every time.
Best For: The Bevel Trimmer is best for men who want a premium, long-lasting cordless beard trimmer with a zero-gapped blade for precise trimming.
- Long-Lasting Battery Life: The Bevel Trimmer boasts an impressive 6-hour rechargeable battery life, ensuring you can tackle any grooming task without interruption.
- Zero-Gapped Blade: The zero-gapped blade guarantees precise trimming, allowing you to achieve sharp, clean lines and fades with ease.
- Versatile Mustache Trimmer: The Bevel Trimmer is designed for versatility and can be used to trim your mustache, beard, and sideburns with precision.
- Premium Price: The Bevel Trimmer is a premium product and may be priced higher than some other cordless beard trimmers on the market.
- Limited Availability: The Bevel Trimmer is a limited edition product and may not be readily available in all stores.
- No T-Liner Blade Yet: While the Bevel Team has announced a T-Liner blade, it is not yet available for purchase.
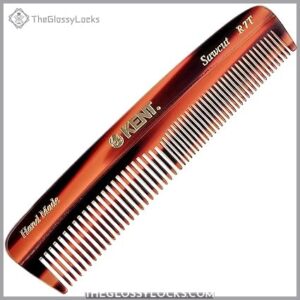
5. Kent R7T Apsley Beard Hair Comb
 View On Amazon
Ever wondered why your beard looks unkempt?
Enter the Kent R7T Apsley Beard Hair Comb.
This pocket-sized powerhouse, crafted from cellulose acetate, boasts smooth, rounded teeth that’ll tame even the wildest manes.
Handmade and polished to perfection, it’s not just a comb – it’s your secret weapon for beard mastery.
The tortoiseshell design adds a touch of class, while the thumb grip makes sure you’re always in control.
Plus, it stimulates those natural oils, leaving your beard softer than a kitten’s belly.
Ready to transform your facial fuzz? Check out these popular patchy beard styles https://theglossylocks.com/patchy-beard-styles/
Best For: Those looking for a high-quality, durable comb to tame and style their beard.
- Handmade with smooth, rounded teeth for a comfortable experience.
- Stimulates natural hair oils, leaving your beard softer and healthier.
- Durable and designed to last for years.
- More expensive than other combs.
- May not be suitable for all beard types.
- The tortoiseshell design might not appeal to everyone.
6. Boar Bristle Beard Brush for Men
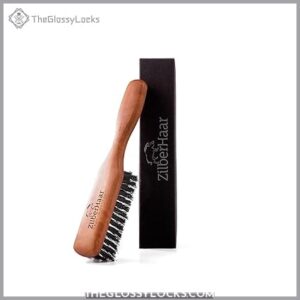 View On Amazon
Ready to tame that wild mane? Enter the ZilberHaar Boar Bristle Beard Brush. This German-engineered beauty is your ticket to beard blending nirvana.
Its uneven bristles exfoliate like a champ, while the firm boar hair promotes healthy growth and softens your facial forest.
Don’t let its small size fool you – it’s perfect for most beards. The matte finish handle mightn’t be everyone’s cup of tea, but the lifetime guarantee sweetens the deal.
Just remember to treat it gently and rinse daily. Your beard will thank you!
Best For: The ZilberHaar Boar Bristle Beard Brush is best for men with average-sized beards who want to promote healthy growth and soften their beard.
- Exfoliates the skin beneath the beard.
- Promotes healthy beard growth.
- Softens and straightens the beard.
- May be too short for some users.
- Aggressive bristles may be too harsh for sensitive skin.
- Matte finish handle might not appeal to everyone.
7. Gillette Fusion ProGlide Razor
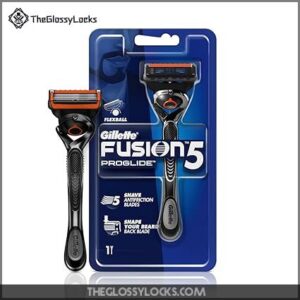 View On Amazon
You might not think of a razor when blending your beard, but the Gillette Fusion ProGlide is a game-changer.
Its precision trimmer on the back is perfect for those tricky spots.
With FlexBall technology, it hugs every contour of your face, catching even the most stubborn hairs.
The five anti-friction blades provide a smooth, irritation-free trim.
Plus, one blade refill lasts up to a month, making it a cost-effective choice.
It’s like having a mini-stylist in your bathroom!
Just remember, slow and steady wins the beard-blending race.
Best For: The Gillette Fusion ProGlide is best for men who want a close, comfortable shave with precision trimming capabilities.
- FlexBall technology provides a smooth, comfortable shave.
- Precision trimmer on the back helps with hard-to-reach areas.
- One blade refill lasts up to a month, making it a cost-effective choice.
- May not be ideal for sensitive skin.
- Can be expensive over time due to the need for replacement blades.
- It is not specifically designed for beard blending.
Troubleshooting Common Beard Blending Issues

Even the most skilled beard blenders encounter hiccups along the way.
Let’s tackle some common beard blending issues head-on, from fixing uneven lines to taming those pesky multicolored or patchy areas that can make your fade look less than flawless.
Fixing Uneven Beard Lines
Dealing with uneven beard lines? No sweat!
First, identify the problem areas – is it the neckline, cheeks, or sideburns?
Then, use your trimmer’s adjustable guards to gradually fade those tricky spots.
Don’t forget beard oil to keep things soft and manageable.
And a boar bristle brush works wonders for smoothing out any stragglers.
Blending Multicolored Beards
Got uneven beard lines sorted? Now, let’s tackle those multicolored beards. Think of your beard as a sunset—a blend of hues needing perfect harmony.
Start by matching colors using beard dye for consistency.
Gradually blend using natural highlights for a seamless color change.
Like mixing paints, a steady hand and subtle touch go a long way.
Addressing Patchy Areas in Your Beard
Patchy beard solutions are like buddies at a BBQ—essential and reliable! To tackle those tricky gaps, consider beard fillers or growth products to plump things up.
If patience isn’t your virtue, a beard transplant or clever beard camouflage techniques might be your ticket.
Maintaining Your Perfectly Blended Beard

Keeping your beard looking fantastic is like maintaining a classic car—it’s all about the routine and regular check-ups.
You’ll want to stick to a daily grooming habit and a weekly touch-up schedule to keep that fade crisply defined and your face runway ready.
Daily Grooming Routine for Blended Beards
By starting your day with a quick beard grooming routine, you’ll keep that perfectly blended fade looking sharp.
First, use a beard wash to cleanse and condition your facial hair, just like you would with your hair on your head. a beard wash will help to remove dirt and oil, and it will also help to keep your beard soft and manageable.
Follow up with a few drops of nourishing beard oil, massaging it from roots to tips.
Run a wide-tooth comb through your beard to detangle and style.
Finally, apply a small amount of beard balm to tame flyaways and add a touch of shine.
This simple daily ritual will help your blended beard stay healthy, hydrated, and looking its best.
Consistency is key – make this routine a seamless part of your morning regimen.
Weekly Touch-Up Trimming Schedule
To keep your beard fade looking sharp, plan on a weekly touch-up.
Regular beard trimming maintains the style and avoids irritation from stray hairs.
Grab your best tools and focus on those tricky spots where fade maintenance might be needed.
You’ll likely find that keeping your hand steady is half the battle, like threading a needle.
Avoid classic trimming mistakes by using the correct guard size and keep your eyes peeled for uneven patches.
Think of it like mowing the lawn; regular care keeps it tidy without becoming a weekend-long project.
Professional Tips for a Salon-Quality Beard Blend

If you’re aiming for a beard that looks like you just walked out of a salon, mastering a few expert tips can make all the difference.
From using multiple combs to layering and razor precision, these tricks can transform your beard fade from homemade to professional with just a few simple steps.
Using Multiple Combs for Precision Blending
You’ve got that perfectly blended beard, now let’s up the ante. Using multiple combs gives you the freedom to tailor the fade perfectly to your hair type. Think of it like painting a masterpiece!
- Comb Size Selection: Match comb sizes to different beard lengths for controlled fade changes.
- Blending Techniques: Use combs to blend seamlessly.
- Cherish Experimentation: Every beard’s unique—find your style!
Layering Technique for Natural-Looking Fades
For a salon-worthy fade, layer your blending technique.
Start with the longest guard, then gradually work your way down, using a scooping motion to seamlessly blend each section.
This layered approach creates a natural, dimensional look that’s far more polished than harsh lines.
Take your time – the key is smooth, gradual changes.
Incorporating Razor Work for Clean Lines
When blending your beard, a razor’s your secret weapon for those clean lines that make everything pop.
To prevent razor burn, use a gentle shaving technique; imagine you’re gliding over soft butter.
Pick the right razor and keep it sharp, like a samurai’s sword.
Maintain those sharp edges with precision.
And, while safety’s important, don’t forget to enjoy the process – it’s all about mastering your look!
Frequently Asked Questions (FAQs)
What is the 2 finger rule for beard?
The 2-finger rule for beards is simple – use two fingers to determine the ideal length.
Trim your beard so it falls just below your fingertips for a neat, well-groomed look that complements your face shape.
How do you transition a beard?
Think of your beard as a rugged mountain range.
Start with the longest guard and gradually step down.
Blend the sides evenly using a scooping motion, ensuring your beard looks sharp and well-groomed.
How do you blend beard lengths?
Start your beard blend using the longest trimmer guard, then gradually switch to shorter ones.
Visualize it like molding clay—smoothly sculpt a seamless change between lengths.
Patience and practice will have those edges looking sharp in no time!
How do you blend a patchy beard?
Did you know 55% of men experience patchy beards?
Focus on longer hair to cover sparse areas.
Use a trimmer for even length, brush regularly, and apply beard oil for growth.
Embrace your unique beard journey!
How can I style a blended beard?
You can style a blended beard by using a beard trimmer with adjustable guards to gradually fade the length from your jawline to your sideburns.
Take your time, work in sections, and use a light touch for a seamless, polished look.
What is the best beard length to blend?
Think of beard blending like painting a masterpiece.
Aim for half an inch to one inch for the best versatility and control.
It’s long enough for finesse, yet short enough to prevent looking like a grizzly bear.
Are there any risks to fading a beard?
Fading a beard might cause uneven lengths if you rush or lack practice.
It’s like playing Jenga—one wrong move, and things can topple.
Use the right tools, have patience, and celebrate small victories along the way.
Can a faded beard suit all face shapes?
Mastering the art of the beard fade is like finding the perfect dance partner.
Every face shape can rock it find the right beard shape!
Just tailor the fade to highlight your jawline and features, making your mug a masterpiece.
What is the ideal frequency for trimming fades?
You’ll want to trim your faded beard every 2-3 days to keep it looking sharp.
Consistent upkeep makes the fading process a breeze and prevents that scraggly, overgrown look.
Trust us, your face will thank you!
Conclusion
Imagine wielding the power to transform your beard into a masterpiece.
With these expert secrets on how to blend a beard, you’re now equipped to sculpt a stunning, seamless fade worthy of envy.
Approach each trim with precision, and don’t ignore those tricky cheek lines or patchy areas.
Keep refining your technique, and soon, your beard will become the talk of the town—or at least your barbecue!