This site is supported by our readers. We may earn a commission, at no cost to you, if you purchase through links. This content is for general informational and educational purposes only and is not a substitute for professional medical, dermatological, or nutritional advice.
I’ve cut a lot of heads that walked in asking for the same thing: tight waves up top, sides faded down clean. That’s the 180. No spinning pattern wrapping the whole scalp, just crisp lines rolling front to back across the crown.
Here’s the truth most guys skip past. Waves aren’t magic, they’re mechanics. Right brush, right product, right timing, and your follicles do the rest.
Grab a comb and get ready, because how to get 180 waves comes down to five moves you can start tonight.
Table Of Contents
- Key Takeaways
- What Are 180 Waves, and Who Can Get Them?
- How to Get 180 Waves Step by Step
- Which Tools and Products Build 180 Waves?
- How to Wolf and Maintain 180 Waves
- How Long Do 180 Waves Take?
- Frequently Asked Questions (FAQs)
- How to get 180 waves step by step?
- What is the brush pattern for getting 180 waves?
- Do you need a durag for 180 waves?
- What’s the quickest way to get waves?
- How do you get 180 waves?
- How to get 180 waves with straight hair?
- How to maintain 180 waves?
- How long does it take to get 180 waves?
- How to master 180 waves?
- How to use 180 waves if your hair is dry?
- Conclusion
Key Takeaways
- Getting 180 waves starts with a proper 1.5–2 inch guard cut on top with faded sides, then follows a daily routine of washing, moisturizing, applying pomade, and brushing front to back for 10-15 minutes.
- Your hair type determines your timeline and product needs, with Type 3 and 4 curls training fastest (weeks 2-3) while coarser or straighter hair takes 4-6 weeks to show results.
- A silk or satin durag worn nightly for at least 30 minutes locks in your brushing work and speeds up pattern formation during the wolfing phase.
- Full wave lock-in typically takes 10-12 weeks of consistent brushing, moisturizing, and durag compression, with most setbacks tracing back to using the wrong brush or skipping nightly durag protection.
What Are 180 Waves, and Who Can Get Them?
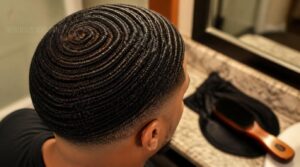
180 waves cover just the top of your head, not the sides. Not every hair type gets there the same way, and not every length is ready to start. Here’s what you need to know before you pick up a brush.
Since your brush routine sets the pace, check out this step-by-step 180 waves brushing guide before you get started.
Top-Only Wave Pattern
One question I hear a lot: why do waves only show up on top? Simple. The top-only wave pattern is the whole game with 180 waves, sides stay buzzed and faded. Three things matter here:
- Wave formation happens through directional brushing on top hair only
- Sides get cut short, not trained
- That contrast is what makes waves pop
For those aiming for a different orientation, achieving reverse 180 wave direction requires the same top-only focus but with brushing trained backward from the hairline toward the crown.
Hair Textures That Form Waves
Not every head of hair waves the same way, and that’s down to strand shape. Oval follicles bend easier than round ones, so Type 3 and 4 curls train fastest. Type 2 works too, just slower.
| Type | Wave Speed | Product Needed |
|---|---|---|
| 2A | Slow | Lightweight pomade |
| 3C | Fast | Medium-hold pomade |
| 4A | Fastest | Creamy, heavier hold |
Ideal Starting Hair Length
Texture tells you which pattern you’re working with. Length tells you if you’ve got enough hair to hold it.
Length directly shapes wave depth. Go with 1.5 to 2 inches on top, the sweet spot for most textures. Type 4 curls need the full 2 inches. Under an inch, hair’s too light to hold a pattern once you start wolfing.
Realistic Wave Development Timeline
Now that length’s sorted, let’s talk timing. Coarse hair needs 4-6 weeks to show waves, medium texture shows results in 2-3.
| Hair Type | Time to First Waves |
|---|---|
| Curly | Week 3 |
| Medium | Weeks 2-3 |
| Coarse/Straight | Weeks 4-6 |
Stick with the daily routine, and wolfing locks the pattern by week 12.
How to Get 180 Waves Step by Step
Alright, let’s get into the real work. Waves don’t happen by accident, they happen by routine. Here’s the five-step process I walk every new client through, start to finish.
Start With a 1.5–2 Cut
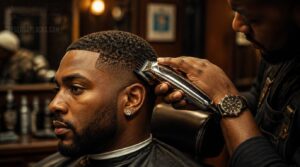
Everything starts in the barber chair. A 1.5–2 guard cut gives you the ideal length, short enough for tight compression, long enough to train into waves. This haircut suits Type 3 and Type 4 curl patterns best.
Ask your barber to blend the guard length with your natural hairline, especially if thinning is a concern—these hairstyles for balding men show how the right cut can maximize fullness while still setting up great waves.
You’ll get a clean, face-framing silhouette while setting up sharp wave definition once brushing and wolfing begin.
Wash and Condition Hair

Fresh cut done, hit the shower. Grab a sulfate-free wave shampoo like WaveBuilder and work it into your scalp, not just the hair, that’s where oil builds up. Warm water only, hot water dries you out. Massage for a minute, it boosts blood flow and loosens buildup. Rinse fully, apply conditioner for manageability, rinse again. This is a weekly cleansing, not daily.
Apply Moisturizer and Pomade
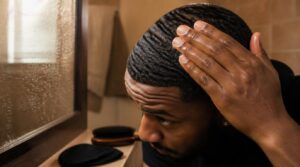
Once hair’s dry, layer products right: moisturizer first, then pomade. Rub a dime-sized amount between your palms till it’s thin, spread evenly front to back, then side to side for uniform coverage.
Focus on top only, that’s your canvas. Too much product weighs waves down.
Timing matters here, this prep sets up everything your brush does next.
Brush Front to Back
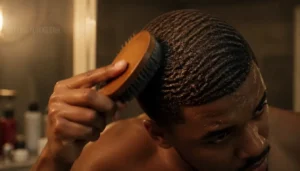
Now grab your brush. One direction only, front to back, starting at the crown.
Use vertical brush alignment, not horizontal, working overlapping brush strokes down toward your brow. This front-to-brow motion trains the crown-to-hairline flow your waves need.
Brush 10-15 minutes, moderate pressure. No scraping the scalp. That’s the brushing pattern that builds real wave progression, session after session.
Tie Durag After Brushing
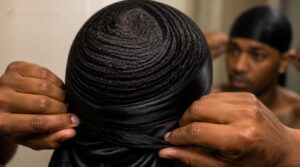
That brush work means nothing without the cap-off. Grab your silk or satin durag, turn it inside out first, seam centered down the middle so it won’t press a line into your part.
Cross the straps behind your head, tight but comfortable, one finger should fit under the fabric. Wear it 30 minutes minimum. That’s your compression window.
Which Tools and Products Build 180 Waves?
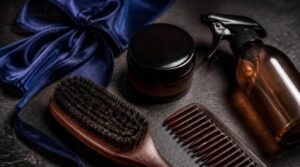
Good waves don’t happen by accident. You need the right gear in your corner, or you’re fighting an uphill battle. Here’s exactly what belongs in your kit.
Medium Boar Bristle Brush
Your brush makes or breaks the whole routine. A medium boar bristle brush distributes scalp oil down the shaft, aids scalp stimulation, and smooths cuticles for shine.
- Bristle density spreads oil evenly
- Cushioned base protects hair
- Sturdy handle grip controls angles
- Rounded tips prevent scalp damage
That combo trains wave formation during wolfing without tearing up your progress.
Sulfate-Free Wave Shampoo
That brush works best on a clean scalp, and sulfates strip too much oil for wave work. Look for cocamidopropyl betaine or decyl glucoside on the label, pH near 5.5, weekly cleansing.
| Ingredient Type | Effect on Scalp |
|---|---|
| Sulfates (SLS/SLES) | Dries, irritates |
| Mild surfactants | Cleans, protects |
| Balanced pH | Preserves shine |
Lightweight Conditioner or Moisturizer
Clean scalp is only half the battle. You still need hydration balance, and that’s where a lightweight conditioner earns its spot.
- Water or aloe base
- Glycerin for moisture
- Panthenol, no grease
- Rinses clean, no buildup
- pH near 5
Apply mid-length to ends, one to three minutes, rinse well. Light hands keep your wave pattern breathing.
Medium-Hold Wave Pomade
Once conditioner sets your moisture base, pomade locks the pattern in place. A dime-sized amount, worked into damp hair, spreads smooth without clumping. Hold lasts a full day, no flaking, no grease buildup.
| Quality | Benefit |
|---|---|
| Texture | Creamy, spreads evenly |
| Hold | All-day, reworkable |
| Shine | Steady, humidity-resistant |
| Ingredients | Sulfate-free, non-drying |
Silk or Satin Durag
Pomade holds the pattern, but a silk or satin durag protects it overnight. Both cut friction, lock in moisture, and stop breakage along your wave forming zones.
- Silk gives a glossy, premium feel
- Satin breathes better, resists snagging
- Snug fit prevents forehead compression
- Hand wash and air dry flat
Cotton dries you out. Don’t wolf your progress away.
How to Wolf and Maintain 180 Waves
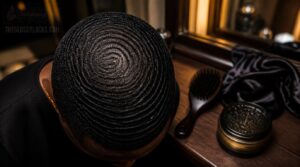
Getting the pattern started is one thing. Keeping it and pushing it further is a whole different game, called wolfing. Here’s exactly what that routine looks like, day by day.
Brush Twice Every Day
Twice a day, no exceptions. That’s the rule that separates real wave patterns from wishful thinking.
Brush twice a day, no exceptions, that’s what separates real wave patterns from wishful thinking
| Session | Duration | Pressure |
|---|---|---|
| Morning | 10-15 min | Light |
| Evening | 30+ min | Firm |
Morning brushing wakes up hair coherence after sleep. Evening sets the pattern for overnight. Skip one, lose 20-30% definition. Simple math, real results.
Dampen Hair Before Brushing
Before that brush touches your head, check your dampness level. Not soaking, not bone dry, just enough moisture to make hair pliable.
Squeeze a section. Water drips? Too wet. Feels barely moist? You’re ready.
- The pattern you’re chasing today
- The confidence that comes with control
- The consistency that separates real waves from wishful thinking
Add pomade now for even moisture application, then brush.
Switch Brushes as Hair Grows
Your Torino Pro won’t cut it forever. As hair length increases, bristle spacing and stiffness need to change too.
| Growth Phase | Brush Type |
|---|---|
| Weeks 1-2 | Medium bristle |
| Weeks 3-5 | Stiffer, wider-spaced |
Brush progression matches texture. Softer grip early, firmer pressure later. Switching keeps every hair length pressed into pattern.
Wolf for Three to Five Weeks
Three to five weeks is the sweet spot. Long enough to build real pattern, short enough to stay manageable.
Stick to your brushing pattern, keep durag compression tight every night, and moisturize daily. Hair texture affects timing some, but this range fits most beginners.
- Coarser hair may lean toward five weeks
- Medium texture often sees results by week four
- Straighter strands need the full stretch
Wash and Style Weekly
Even during wolfing, your hair needs a reset. Once a week, wash with a sulfate-free wave shampoo to clear buildup without stripping moisture. Condition right after.
Pat dry, apply moisturizer, then your pomade. Brush your usual pattern, front to back, and tie your durag. This weekly wash and style keeps your scalp healthy and your waves progressing on schedule.
How Long Do 180 Waves Take?
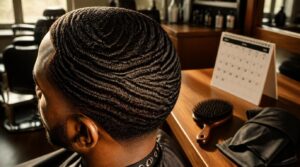
Let’s talk timeline, because that’s what everybody really wants to know. Waves don’t show up overnight, and they don’t come in on a fixed schedule either. Here’s what to expect, week by week.
Week One: Build The Foundation
Week one won’t show waves. Don’t panic, that’s normal.
You’re laying groundwork here. Damp hair prep, light pomade, then crown brushing forward for 10-15 minutes, twice daily. Tie your durag right after.
Consistency is the whole game right now. Skip a session, you lose progress. Stick to the routine and your hair texture starts responding, even if you can’t see it yet.
Weeks Two–Three: Waves Appear
Now the payoff starts showing. By day 10-14, faint horizontal lines appear across your crown, roughly 1-2 inches long.
Bump brushing to three sessions daily, 10-15 minutes each. Apply pomade before every session, not after.
Durag compression every single night locks it in. Skip one night, you’ll lose days of progress. Stay strict here.
Weeks Four–Five: Connections Improve
Your crown does the real work now. Hair up top lies closer together, and connections start tightening where lines used to sit apart.
Ease off heavy pomade, switch to a lighter hold. Brush strokes get more deliberate, following the grain instead of fighting it. That’s wave definition taking shape, not luck.
Weeks Ten–Twelve: Pattern Locks In
This stretch is where the pattern locks in for good. Your hair follicle actually restructures now, proteins aligning so waves hold permanent shape.
Cut brushing to twice daily, gentler strokes. Durag compression every night, no exceptions. Wash weekly, moisturize post-brush only.
No haircuts this phase. Let the lock-in finish undisturbed.
Common Mistakes Slowing Progress
Most stalled progress traces back to one culprit: wrong brush selection. Hard bristles tear hair instead of training it.
Improper brushing, dry hair, wrong direction, only once a day, kills momentum too.
Add a bad haircut, skipped durag nights, or overwashing that strips moisture and builds product residue, and wolfing gets derailed fast.
Fix the basics first.
Frequently Asked Questions (FAQs)
How to get 180 waves step by step?
Picture a rookie hunched over the mirror, brush going in five directions like he’s fighting a losing battle. Five steps fix that: fresh cut, wash, pomade, brush front to back, durag on. Consistency wins.
What is the brush pattern for getting 180 waves?
One direction, one goal. Brush front to back, crown to hairline, using consistent pressure and short, repeated strokes. Keep angles even, check the mirror for missed spots, and let the pattern build over time.
Do you need a durag for 180 waves?
Yes. A silk or satin durag locks in compression after brushing, holding your pattern while you sleep. Skip it during wolfing and waves set slower. Wash it every few days, replace it every 2-4 months.
What’s the quickest way to get waves?
Funny thing, there’s no magic shortcut, just discipline dressed up as speed. Get that #2 cut, brush 2-3 times daily, apply pomade daily, wear your durag every night. Skip a night and you’re starting over.
How do you get 180 waves?
Get a fresh cut, then run through your hair preparation routine: wash, moisturize, apply pomade, and brush front to back for 10-15 minutes. Tie your durag, repeat twice daily, and let wolfing build the pattern.
How to get 180 waves with straight hair?
Straight hair still lays down into waves, just slower. Flat texture needs longer wolfing, a crown-to-forehead brushing technique, light pomade, and nightly durag use to force that ripple pattern into place.
How to maintain 180 waves?
Maintenance comes down to daily brushing, moisture control, and nightly durag protection. Brush twice daily, keep hair hydrated with light pomade, wear silk durag every night, and trim every 2-3 weeks to lock your pattern in for good.
How long does it take to get 180 waves?
Solid 180 waves take 4-6 weeks of wolfing, with real definition by weeks 6- Hair texture, brushing consistency, and product choice all shift that timeline. Full lock-in, where waves hold with barely any brushing, lands around week 10-
How to master 180 waves?
Mastering 180 waves takes discipline. Lock in your haircut foundation, brush daily with a wave brush and pomade, moisturize often, and wear your durag nightly. Consistency, not shortcuts, builds sharp, connected waves that lock in for good.
How to use 180 waves if your hair is dry?
Dry hair fights 180 waves. Use hydrating shampoo, then a lightweight moisturizer or pomade on damp strands. Re-dampen mid-session if hair stiffens while brushing, and sleep in a durag to lock moisture in overnight.
Conclusion
Right brush. Right product. Right patience. That’s the whole game behind how to get 180 waves, no shortcuts, no shortcuts, no gimmicks. Your scalp’s the canvas, your comb’s the tool, and time takes care of the rest.
I’ve watched plenty of guys wolf their way from patchy fuzz to a clean, tight crown with faded sides underneath. Stick to the routine, brush twice daily, and trust the grind.
Weeks from now, you’ll catch your reflection and see it: waves rolling deep, connected, undeniably yours.