This site is supported by our readers. We may earn a commission, at no cost to you, if you purchase through links.

Your first attempt with clippers can go one of two ways. You’ll either walk away with a solid cut that saves you money and time, or you’ll reach for a hat and wait three weeks for damage control. The difference comes down to preparation and technique.
Clean hair cuts smoother than oily hair. Guard numbers control length. Moving against the grain creates evenness. These basics matter more than expensive equipment.
Once you understand how blades interact with hair texture and growth patterns, you can achieve barbershop results at home. The process requires focus and patience, but it’s simpler than most people think.
Table Of Contents
- Key Takeaways
- Essential Preparation Before Using Hair Clippers
- Choosing The Right Hair Clippers and Guards
- Step-by-Step Guide to Cutting Hair With Clippers
- Top Hair Clippers and Essential Tools
- Cleaning, Maintenance, and Safety Tips
- Frequently Asked Questions (FAQs)
- How do I choose the right hair clippers for my hair type?
- How do I cut my own hair with hair clippers?
- How do I care for my hair clippers?
- How often should I use hair clippers?
- How can I avoid damaging my hair when using hair clippers?
- How do I troubleshoot hair clippers that are not working properly?
- How often should I replace clipper blades?
- Can I use clippers on wet hair?
- Whats the best way to fix clipper mistakes?
- How do I create fades and tapers?
- Conclusion
Key Takeaways
- Clean, dry hair and proper sectioning make the difference between smooth cuts and patchy mistakes—preparation matters more than expensive equipment.
- Guard numbers control length directly (higher numbers leave longer hair), and moving clippers against hair growth creates the most even results.
- Blade maintenance through regular oiling and cleaning after every use extends clipper life and prevents pulling, while proper storage protects your investment from rust and damage.
- Start with longer guards and work downward using scooping motions to blend sections—you can always cut shorter, but you can’t add length back.
Essential Preparation Before Using Hair Clippers
Getting a clean haircut with clippers starts before you even turn them on. The right prep work makes the difference between a smooth cut and a frustrating mess. Here’s what you need to do before you start cutting.
Washing and Drying Hair Properly
Before you reach for the clippers, start with clean hair. Wash your hair at least every two to three days to clear away oils and product buildup that can clog blades. Rinse well to avoid shampoo residue. If your water is hard, consider using softer water for a smoother finish. Dry your hair completely or leave it just slightly damp—fully wet hair can snag and cut unevenly.
According to experts, washing frequency depends on hair type and scalp condition.
Removing Tangles and Detangling
Once your hair is clean and dry, remove all knots before you start clipping. Wet detangling with conditioner works best for curly or coily hair care—it cuts breakage by up to 50 percent and lets the comb glide through without snagging hair strands. For these hair types, wet hair detangling is often the gentlest approach.
Use a wide-tooth comb or detangling brush and work from the ends up. This simple step protects your clippers and delivers smoother cuts every time.
Setting Up Your Cutting Area
Now that your hair is ready, pick your space. Surface selection matters—tile or vinyl floors cut cleanup time by about 40 percent compared with carpet. You’ll need at least 1.5 meters of clearance around your chair so you can move freely without tripping over tools or tangled cords.
Follow this five-step setup for cleaner, safer cuts:
- Choose a room with hard flooring and good ventilation to contain airborne hair clippings for easier sweeping
- Position strong lighting setup at multiple angles—aim for 300 to 500 lux—to catch uneven spots and blend lines
- Arrange mirror placement so you can see front, sides, and back without straining your neck or repositioning constantly
- Clear counters within one meter of your cutting zone to prevent hair from settling on toiletries and electronics
- Check electrical safety by using GFCI-protected outlets, keeping cords dry, and securing cables to avoid trips
Bathrooms and garages top the list for home cuts. Bathrooms offer mirrors and water access. Garages give you open floor space and simpler cleanup. Both work well if you follow hygiene control basics—sweep loose hair promptly and wipe surfaces after each session to stop microbial buildup.
Lay out your cape, cleaning brush, and clippers within arm’s reach. A tidy station prevents mid-cut interruptions. Professional stylists know that proper hair preparation includes the workspace, not just the head. When your area is dialed in, you’ll move faster and cut cleaner every time.
Choosing a Comfortable Chair and Cape
Your setup won’t work if your chair wobbles or your cape itches. Chair ergonomics matter—pick a stable seat 48–53 cm high so the person cutting reaches comfortably without straining their back. Pair it with a water-resistant hair salon cape that closes snugly at the neck to stop clippings from sneaking inside.
Cape hygiene is non-negotiable: wash fabric capes after every use or grab a disposable one. Neck comfort and material safety prevent irritation when cutting hair at home.
| Feature | Why It Matters for Home Haircuts |
|---|---|
| Stable base | Reduces tipping when you shift or lean |
| Adjustable height | Matches cutter’s reach and body dimensions |
| Back support | Keeps spine neutral during longer sessions |
| Water-resistant cape | Blocks hair from clothes and washes easily |
| Size adjustability | Fits different neck sizes without choking |
Preparing Clipper Attachments and Tools
Before you power on, verify each guard attachment clicks flush across the blade—misaligned guards slip mid-cut and leave uneven patches.
Apply one to two drops of oil along the moving blade while running your clippers briefly so friction stays low and heat doesn’t build.
Brush away old hair, wash plastic guards with soap, dry them completely, then store everything in a clean spot to prevent rust and contamination.
Choosing The Right Hair Clippers and Guards

The right clippers and guards make the difference between a clean cut and a patchy mess. You need to understand what you’re working with before you turn on the machine.
Here’s what you should know about choosing clippers and getting the guard sizes right for your style.
Selecting Quality Clippers for Home Use
Motor Performance matters when choosing hair clippers for home use. Top models run at 5,000–7,000 strokes per minute to cut thick hair smoothly.
Decide between corded vs cordless based on your needs—corded clippers offer consistent power, while cordless options like the Wahl Magic Clip Cordless or Wahl Senior Cordless Clipper provide flexibility.
Check Battery Life, Blade Material, and Warranty Coverage before buying.
Understanding Clipper Guard Numbers and Lengths
When choosing clipper guards, you’ll see numbers like 1 through 8—higher numbers leave longer hair. Guard 1 cuts to 1/8 inch (3 mm), while guard 4 leaves 1/2 inch (13 mm). Millimeter equivalents vary slightly between brands like Wahl and Andis, so check your specific chart. Lever adjustments add about 1/16 inch to any guard.
Understanding clipper guard numbers means knowing these descriptive lengths before you start cutting.
Matching Guard Size to Desired Hairstyle
Buzz cut lengths start at guard 1 (3 mm) for tight military crops and go up to guard 4 (13 mm) for fuller coverage. Fade guard sizes blend from 0.5 at the hairline through guards 2 and 3 on the sides.
Classic short styles use guards 4–6 on top for textured crops. Beginners should start with guard 4 or higher—you can always cut shorter.
Attaching and Changing Clipper Guards Safely
Turn off and unplug your hair clippers before changing any blade guard. Line up the guard’s teeth with the clipper blade and press down until you hear a clear click—that snap tells you it’s locked in place.
Using third-party clipper guards can loosen mid-cut and create electrical hazards or injury.
Store guards in a dry case to prevent cracks that compromise hygiene protocols and guard compatibility.
Step-by-Step Guide to Cutting Hair With Clippers
Now that you’ve got your clippers ready and your guard selected, it’s time to make the first pass.
Cutting hair with clippers isn’t hard, but technique matters if you want clean results without patchy spots or harsh lines.
Follow these steps to work through each section with control and confidence.
Sectioning Hair for Even Cutting

Think of sectioning hair like drawing a map on the head—it guides every pass of your hair clippers. Use anatomical sectioning by dividing the head into clear zones: top, sides, crown, and nape. Secure unused sections with sectioning tools to avoid accidental cuts.
Work in subsections about 1/4 inch thick for better control. Clean partings and maintaining integrity throughout the haircut ensures even results when cutting hair.
Starting With Sides and Back

After sectioning, begin at the base of the neck with your blade guard. Select a guard between #2 and #4 for the sides and back—higher numbers leave more length and fewer mistakes.
Move clippers upward against hair growth in smooth, steady strokes. Cover one side completely before mirroring the other.
Keep the guard flat against your scalp for safety control and even results when trimming hair.
Using Scooping and Blending Techniques

Once you’ve covered each side, perfect the blend. The scooping motion is your secret weapon—start flat against the head, then pivot and lift away as you move upward. This creates soft transitions instead of harsh lines.
For tighter fades, try clipper-over-comb to control length precisely. If needed, use blending shears for refinement near the top, but keep strokes light to protect skin safety.
Cutting Against Hair Growth for Best Results

Going against the grain—clipping opposite your hair’s natural lay—is where uniformity happens. You’ll see fewer patchy areas and cleaner blending across the head.
Start with a higher guard to protect against irritation risks, especially if you have sensitive skin or tightly coiled hair. Keep your clipper flat, move slowly, and let the blade do the work for even, controlled results.
Cleaning Up The Hairline and Edges

Once bulk clipping is finished, edging technique defines the final look. Switch to a T-blade trimmer for precise work around your hairline, temples, and neckline. Comb hair forward to catch stray strands. Keep your strokes short and tapping—never drag—to avoid jagged edges.
Creating a clean hairline demands symmetry alignment: start at eye level and follow your natural contour for balance and density.
Top Hair Clippers and Essential Tools
The right clippers make all the difference when you’re cutting hair at home. You need tools that stay sharp and run smooth from start to finish.
Here are four solid options that professionals trust and beginners can handle with confidence.
1. Wahl Elite Pro Haircutting Kit
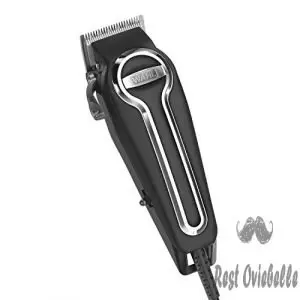
If you want motor performance that won’t quit when cutting thick hair, the Wahl Elite Pro delivers 15% more power than Wahl’s previous best consumer model. The self-sharpening blades cut 40% faster and handle all hair types without snagging.
What really sets this kit apart is the SECURE-FIT guards with stainless steel clips—they’re six times more rigid than standard plastic guards and won’t pop off mid-cut.
You get premium scissors, cape, oil, and a storage case, all backed by a 5-year warranty.
Best For: Home users who cut hair frequently for their family and want a powerful, durable clipper with premium guards that stay secure during fades and blends.
- 15% more motor power than Wahl’s previous best consumer clipper, cutting through thick hair 40% faster without bogging down
- SECURE-FIT guards with stainless steel clips are six times more rigid than standard plastic guards and won’t pop off during cuts
- Complete kit with premium accessories and a 5-year warranty, offering professional-level performance for home use
- Heavier and louder than some users expect for a home clipper
- Corded-only design means you’re tethered to an outlet with no cordless option
- Limited to home use in the USA only—warranty doesn’t cover international use due to voltage differences
2. Wahl 5 Star Magic Clip Clipper

The Wahl Magic Clip Cordless brings professional-level precision to your home cuts with its patented Stagger-Tooth Blade—designed to erase fade lines and blend seamlessly. You’ll get over 100 minutes of battery runtime per charge, perfect for multiple haircuts without interruption. The cordless convenience means no tangled cords while you work.
This clipper works with all hair types with a rotary motor that won’t bog down.
Clean the clipper blades after each use and oil them regularly—these maintenance tips keep your tool sharp. It’s built for professional use but accessible for dedicated home barbers.
Best For: Professional barbers and serious home users who need a reliable cordless clipper for precise fades, blends, and detailed work across all hair types.
- Patented stagger-tooth blade erases fade lines for seamless blends that look professionally done
- 100 minutes of runtime per charge handles multiple haircuts back-to-back without stopping
- Rotary motor maintains consistent power through thick or coarse hair without bogging down
- Some users report battery issues after several months, with the clipper not holding a charge as well over time
- Price point around $145 puts it in the premium range compared to basic home clippers
- Adjustable taper lever can feel imprecise without clear settings, making it tricky to dial in your preferred blade position
3. Wahl 5 Star Cordless Senior Clipper
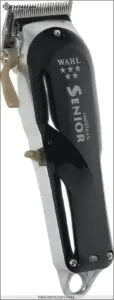
The Wahl 5 Star Cordless Senior Clipper delivers professional-grade power with a rotary motor that manages dense hair without stalling. Its metal housing offers durability for daily use, while the adjustable 2191 blade lets you zero-gap for tight fades.
You’ll get 70–80 minutes of battery runtime per charge, enough for several full cuts. The cord/cordless flexibility means you won’t stop mid-cut.
This clipper excels at tapering and blending work—built for barbers but manageable at home with practice.
Best For: Barbers and experienced home users who need reliable power for fades, tapers, and blends on all hair types, especially coarse or dense hair.
- Rotary motor delivers consistent cutting power through thick hair without bogging down, making bulk work and detailed fading smoother.
- Metal housing stands up to daily professional use and adds stability during precision work, while the adjustable fade blade zeros out for skin-close cuts.
- 70–80 minutes of cordless runtime handles multiple cuts per charge, and cord/cordless flexibility means you can plug in if the battery runs low mid-session.
- Higher price point compared to consumer-grade clippers, which may be steep if you’re just cutting your own hair occasionally.
- No battery level indicator on some models, so you won’t always know how much charge is left until it starts to fade.
- Weight and professional design create a learning curve for beginners—this isn’t the easiest clipper to master if you’re new to fading.
4. Equinox Professional Razor Edge Hair Scissors
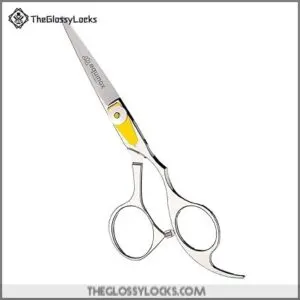
Even the best hair clippers need a backup tool for precision work. The Equinox Professional Razor Edge Hair Scissors give you that control with Japanese stainless steel blades and razor-sharp edges.
At 6.5 inches and 3.5 ounces, the ergonomic design fits comfortably in your hand for detailed hair cutting around ears and necklines.
Customers rate them 4.7 out of 5 stars for sharpness and cutting performance. You’ll find these hair scissors priced affordably across major retailers—solid value for both salon pros and home cutting techniques.
Best For: Barbers, stylists, and home users who need sharp, lightweight scissors for detailed cutting work around ears, necklines, and precision trimming.
- Japanese stainless steel blades stay sharp through multiple uses and resist corrosion
- Lightweight at 3.5 ounces with ergonomic finger rest for comfortable extended cutting sessions
- Adjustable tension screw lets you customize blade tightness for speed or precision
- Finger holes lack grip, which can cause slipping during use
- Some users find them smaller than expected at 6.5 inches overall length
- May struggle with very thick or long hair compared to larger professional shears
Cleaning, Maintenance, and Safety Tips

Taking care of your clippers is just as important as knowing how to use them. Clean blades cut better and last longer.
Let’s cover the basics of maintenance and safety so your clippers stay sharp and you stay safe.
Cleaning Blades and Guards After Use
After every cut, unplug your clippers and remove the blade guard. Brush away trapped hair with a dedicated cleaning tool—mechanical cleaning before disinfection is essential for workflow compliance.
Wash guards with soap and water, then apply an intermediate-level disinfectant like Barbicide or 70% alcohol for 30–60 seconds. Dry everything completely to prevent rust and reduce microbial risks on blade surfaces.
Oiling Clippers for Longevity
Friction kills blades faster than daily use. Maintaining hair clipper blades starts with proper care. After cleaning clipper blades, place one drop of clipper oil at each blade corner and the base, then run the motor for 10 seconds to distribute lubricant.
Oil frequency matters—after every haircut for professionals, monthly for home users. This oiling technique cuts heat, extends blade wear, and completes your infection control routine.
Safe Storage and Handling Practices
After oiling clipper blades, proper storage protects your investment. Store clippers in a dry case or pouch with blade guards attached—this prevents drawer damage and keeps kids safe.
Keep the cord loosely coiled, never wrapped tight. A cool cabinet away from humidity stops rust before it starts.
Always unplug before storing, and skip carrying by the cord to avoid internal wire damage.
Preventing and Avoiding Common Injuries
Beyond basic hair clipper maintenance, smart handling cuts your injury risk. Keep the blade flat against your scalp—lifting away causes nicks. Take breaks every fifteen minutes to prevent ergonomic strain and shaky hands.
Always disinfect between users to block bloodborne pathogens. Move slowly around ears and the neckline where skin folds hide.
These hair cutting tips prevent lacerations and skin irritation before they happen.
Frequently Asked Questions (FAQs)
How do I choose the right hair clippers for my hair type?
Your hair type determines the motor strength you need. Thick or curly hair requires high-torque rotary motors.
Thin or straight hair works well with adjustable-speed magnetic motors and adaptable blade materials.
How do I cut my own hair with hair clippers?
Start with clean, dry hair and a longer guard. Section your top hair, then cut sides and back using upward scooping strokes. Use a mirror for back visibility and blend carefully between guard lengths.
How do I care for my hair clippers?
Like a car that runs best with regular tune-ups, your hair clippers need consistent care. Brush hair from the blade after each use. Apply blade oil every few cuts.
Wash guards with soap and water. Store unplugged in a dry spot.
How often should I use hair clippers?
Your growth rate and style length drive the schedule. Most haircuts need clippers every three to four weeks.
Buzz cuts require hair trimming every two weeks, while maintaining longer styles stretches maintenance needs to six weeks.
How can I avoid damaging my hair when using hair clippers?
Every scalp nick invites infection risk—that’s why Blade Maintenance and gentle Technique matter most.
Use proper clipper settings, clean blade guard attachments, avoid pressure, and follow with Post-Cut Care to protect Hair Health.
How do I troubleshoot hair clippers that are not working properly?
When your hair clippers stop cutting, check for blade misalignment first. Motor humming without blade movement signals internal wear.
Overheating issues and power failures often stem from poor maintenance.
Guard problems cause uneven cuts.
How often should I replace clipper blades?
Professional barbers usually replace stainless steel blades every 6–12 months with heavy use.
Home users cutting weekly can expect at least 6 months before sharpening or replacement becomes necessary, depending on maintenance routine and hair thickness.
Can I use clippers on wet hair?
You shouldn’t use clippers on wet hair. Wet hair risks blade damage, pulling, and inaccurate cuts. Towel-dry to damp first—this protects your clippers and delivers cleaner results every time.
Whats the best way to fix clipper mistakes?
Start with a longer guard and blend downward using scooping motions. For patchy areas, point-cut with scissors to soften transitions.
Check symmetry in mirrors. Fix neckline errors with a trimmer for balanced edges.
How do I create fades and tapers?
Creating fades demands precise sectioning hair into three zones—bottom, middle, upper. Use lever control and blending techniques with short scooping strokes.
Work longer guards down to shorter, checking symmetry constantly.
Avoid common errors by establishing even guidelines first.
Conclusion
Learning how to use hair clippers is like learning to ride a bike. The first attempt feels awkward, but muscle memory builds fast.
Start with longer guards. Work slowly. Check your progress in a mirror. Clean your blades after every cut. Oil them regularly.
These habits separate clean cuts from choppy mistakes. You don’t need years of training to get solid results. You just need the right approach and enough patience to follow through.
- https://www.grandviewresearch.com/industry-analysis/electric-hair-clipper-trimmer-market
- https://www.credenceresearch.com/report/electric-hair-clipper-and-trimmer-market
- https://today.yougov.com/health/articles/30005-covid-19-home-haircut-poll-data
- https://www.economist.com/graphic-detail/2020/05/11/diy-hairdressers-under-covid-19-lockdown-tend-it-like-beckham
- https://pubmed.ncbi.nlm.nih.gov/22310135/