This site is supported by our readers. We may earn a commission, at no cost to you, if you purchase through links.

Your grandmother probably had a bottle of olive oil in the kitchen and another tucked away in her bathroom—and she wasn’t confused about which was which. She just knew what worked.
Long before the beauty industry packaged hair repair into expensive serums, olive oil was doing the same job quietly and effectively.
It penetrates the hair shaft, smooths the cuticle, locks in moisture, and cuts down on the kind of frizz that makes a bad hair day feel personal.
A solid homemade olive oil hair treatment costs a fraction of salon products and takes less than an hour from start to finish.
Table Of Contents
Key Takeaways
- Extra virgin olive oil penetrates the hair shaft, smooths the cuticle, and locks in moisture — making it one of the most effective natural treatments for dry, frizzy, or brittle hair.
- Always use cold-pressed, unrefined extra virgin olive oil for hair masks, since refined versions lose the antioxidants and fatty acids that actually do the work.
- Customize your treatment to your hair type — fine hair needs a lighter mix and shorter time, curly hair benefits from extra slip, and thick hair does best with richer blends like coconut oil or shea butter.
- Apply your mask from mid-lengths to ends only, leave it on for 15–30 minutes under a shower cap and warm towel, then shampoo twice to remove all residue without stripping your scalp.
Why Olive Oil Benefits Hair

Olive oil isn’t just a kitchen staple — it’s one of the most effective natural treatments you can use on your hair. Its rich mix of fatty acids, antioxidants, and natural emollients works from the inside out to transform dry, struggling strands.
From deep conditioning to scalp massage, there are plenty of ways to put it to work — this guide to using olive oil for hair growth walks you through the most effective techniques.
Here’s exactly what it does for your hair.
Deeply Hydrates Dry, Brittle Strands
When your hair feels more like straw than silk, an olive oil hair mask can turn things around fast. The oil’s hydrating power comes from its ability to penetrate the hair shaft directly, forming a barrier film that locks moisture in.
That means less evaporation, better nutrient absorption, and real deep conditioning that addresses dry hair at the source — not just the surface.
Including omega‑9 fatty acids can further restore the hair’s outer protective layer.
Smooths The Cuticle for More Shine
Moisture alone won’t give you that mirror-like shine — cuticle flattening is what actually does it. When olive oil coats each strand, it smooths those tiny overlapping scales along the shaft. That friction reduction lets light hit the surface evenly, creating a genuine light reflection boost instead of scattered dullness.
Think of it like polishing glass. This conditioning treatment provides end smoothing beautifully too, making tips look cleaner and more polished.
Helps Reduce Frizz and Puffiness
That cuticle-smoothing effect carries right into frizz control. When strands are coated, your Moisture Barrier stays intact — meaning humidity can’t sneak in and make everything puff up. This Humidity Defense is what separates a good olive oil hair mask from daily frustration. Here’s how frizz actually gets tamed:
- Seals moisture in for Volume Management
- Blocks outside humidity for Flyaway Control
- Smooths strands to reduce scattered light (Static Reduction)
- Softens texture so strands stop catching on each other
- Keeps ends aligned so hair looks less "big"
DIY olive oil hair mask recipes work because this natural hair care staple reduces frizz at the source.
Adds Slip to Lower Breakage Risk
Slip is olive oil’s quiet superpower. When oil penetration into hair shaft happens, it coats individual hair fibers with a thin lubricating layer — that’s the Slip Mechanism at work.
Friction Reduction means combing creates less Shear Force Mitigation across each strand, so Detangling Ease becomes real. Tension Distribution prevents one weak spot from snapping.
An olive oil hair mask offers serious deep conditioning that helps prevent breakage every wash day.
Softens The Feel of Split Ends
Split ends won’t disappear, but they don’t have to feel like sandpaper. Olive oil’s Lightweight Oil Penetration works fast, coating each strand with a Protective Film Creation that smooths those frayed edges. A regular olive oil hair mask for deep conditioning delivers real Softening via Squalane — reducing the Friction Reduction Mechanism between fibers.
You’ll notice:
- Ends feel supple instead of brittle
- Combing meets less resistance at the tips
- Hair hydration restores End-to-End Flexibility so strands bend rather than snap
Choosing The Right Olive Oil

Not all olive oil is created equal, and the bottle you grab really does matter for your hair. A few simple things to look for can make the difference between a treatment that works and one that just weighs your hair down. Here’s what to keep in mind before you pour.
Use Extra-virgin for The Richest Nutrients
Not all olive oils are created equal — and for your hair, that difference really matters.
Extra virgin olive oil is the go-to for DIY olive oil hair treatments because it keeps its full Polyphenol Power, Vitamin E Boost, and Squalene Conditioning intact.
You’re getting real antioxidant benefits, Oleic Acid Benefits, and omega-3 fatty acids for hair — all working together in one bottle.
Prefer Cold-pressed, Unrefined Oil
Cold-pressed, unrefined oil is where the real magic lives. Because it skips heavy heat and chemical refining, you get full Antioxidant Preservation and Natural Aroma Retention — the stuff that makes your olive oil hair mask actually work.
Cold-Press Benefits mean more vitamin E and polyphenols stay intact. Just know it has higher Oxidation Susceptibility, so Shelf-Life Management matters: store it dark and cool.
Avoid Refined Oil for Hair Masks
Refined olive oil is a shortcut that costs you results. Processing strips away the antioxidant levels, polyphenols, and squalene benefits that make an olive oil hair mask actually nourishing.
What’s left behind is a lighter, odorless liquid with far less nutrient preservation — and more potential for residue buildup.
For your DIY olive oil hair mask, always reach for extra virgin olive oil instead.
Choose a Fresh, Mild-smelling Bottle
Your nose knows more than you think. Fresh extra-virgin olive oil smells lightly fruity and grassy — never rancid, musty, or sharp. Warmed oil makes off-odors unmistakable, so sniff before you apply.
When shopping, keep these in mind:
- Bottle Material Choice — dark glass benefits preservation by blocking UV light
- Tight Seal Importance — limits oxygen exposure and slows spoilage
- Small Batch Size — less headspace means longer shelf life after opening
- Temperature Controlled Storage — store it in the fridge or a cool cupboard
- Environmental Storage Considerations — keep away from stoves to avoid oil residue buildup and heat damage
Warm Only What You Need
Only heat what you’re about to use. Precise heat levels matter more than most people realize — too much warmth irritates your scalp, too little and the oil won’t spread evenly.
Gentle warmth is the goal. Set your container in warm water for even heat distribution, wrist-test before you apply oil to hair, and time your warmth timing carefully.
Avoid overheating at all costs.
Classic Olive Oil Hair Mask

The classic olive oil hair mask doesn’t ask much of you — just a few tablespoons of oil and about half an hour of your time. No fancy tools, no complicated steps.
Here’s exactly how to do it right.
Measure 2–3 Tablespoons of Oil
Start your DIY olive oil hair mask with the right volume — 2 tablespoons for short or fine hair, 3 tablespoons for longer or thicker strands. This simple hair length ratio keeps your consistency check on point.
Use a measuring spoon for volume accuracy:
- Short hair: 2 tablespoons
- Shoulder-length: 2–3 tablespoons
- Long/thick hair: 3 tablespoons
No guesswork needed.
Warm The Oil Until Lukewarm
Now that you’ve measured your oil, it’s time to warm it — but gently. Pour it into a small bowl and use one of three methods: microwave short bursts of 10 seconds, a stovetop double boiler, or a warm water bath.
Stir between rounds for even stirring heat distribution.
Your thermometer use is optional — just trust your wrist for temperature control.
Apply From Mid-lengths to Ends
Your oil is warm — now put it to work. Skip the roots entirely. Starting at mid-lengths keeps scalp grease prevention front of mind, so your hair looks fresh, not weighed down. Use finger massage flow to work the olive oil hair mask downward, applying section isolation to coat each part evenly.
- Divide hair in sections for even coverage
- Apply a generous amount from mid-length targeting zones first
- Use downward strokes for finger massage flow into ends
- Avoid roots to prevent greasiness
- Re-check each section to confirm the mask evenly saturates every strand
Leave on for 15–30 Minutes
Now that every strand is coated, set a timer for 15–30 minutes.
Timing and Heat work together here — the warm oil steadily improves Absorption Rate and Capillary Saturation without overdoing it.
Wrap hair with a warm towel over your shower cap to lock in that warmth.
Your 30‑minute DIY olive oil hair mask window also keeps Scalp Comfort and Residue Prevention in check.
Shampoo Twice to Remove Residue
When it’s time to shampoo out your olive oil hair mask, don’t rush — two rounds beat one every time. Think of it as a two-act cleanse: First Wash Emulsification lifts the bulk, and Second Wash Targeting catches what’s left.
- Use a palm-sized amount, working scalp-first
- Rinse with lukewarm water for Water Temperature Control
- Check for Residue Detection Signs: hair should feel dry-to-touch, not slippery
Hot Oil Treatment Application Steps
Warming the oil is just the beginning — how you actually apply it makes all the difference. little structure goes a long way toward making sure every strand gets the attention it needs.
Follow these steps to get the most out of your hot oil treatment.
Test Temperature on Your Wrist First

Before you put warm oil anywhere near your hair, do a quick Wrist Warmth Check — your inner wrist is your best Skin Sensitivity Indicator. Dab a little oil there and wait.
Mild warmth? You’re good. Any burning or sharp heat sensation timing out fast? That’s your Temperature Safety Buffer doing its job.
Make this Repeat Test Routine every single time.
Section Hair for Even Coverage

Working in sections is what separates a rushed job from real results. Part your hair into four or five manageable chunks — your Section Order matters, so go top to bottom.
- Control Section Size to keep coverage even
- Maintain Scalp Margin near roots
- Apply a generous amount mid-length, root to tip
- Use Comb Direction to spread the mask evenly
- Apply Tension Control while you comb through hair
Cover With a Shower Cap

Once your olive oil hair mask is evenly applied, slip on a shower cap. A snug cap fit traps heat and locks in moisture — both essential for your DIY olive oil hair mask recipe to actually work.
Heat retention keeps strands flexible while moisture trapping prevents the oil from drying out.
Expect some condensation inside; that’s just the treatment doing its job.
Scalp comfort stays intact since the cap creates a clean barrier between skin and oil.
Wrap With a Warm Towel

Now layer a warm towel over your shower cap — this is what takes your DIY olive oil hair mask from good to genuinely great. Heat retention is the secret here: warmth softens strands and helps the oil sink deeper in less time.
- Use a thick cotton towel for better towel material and heat hold
- Wrap hair with a warm towel snugly from hairline to ends
- Aim for a wrap duration of 20–30 minutes for real deep conditioning
- Re-warming towel once keeps the heat consistent if you go the full 30 minutes
- Scalp comfort every 10 minutes — warmth should feel cozy, never stinging
Rinse Thoroughly After Treatment

Time to rinse — and don’t rush this part. Use a lukewarm water rinse to lift the oil without stripping your scalp dry.
Run a double shampoo cycle, working each pass into a gentle scalp massage.
Remove your shower cap and warm towel, then follow with a light conditioner on the ends.
Finish your residue check routine by patting dry with a microfiber towel.
Customizing for Hair Type

Not every head of hair plays by the same rules, and your olive oil treatment shouldn’t either. A small tweak to your mix can make a big difference depending on your hair type.
Here’s how to customize it so the treatment actually works for you.
Fine Hair Needs a Lighter Oil Mix
Fine hair gets weighed down fast — that’s just the reality. Your olive oil hair mask needs smart oil dilution ratios to work here.
Mix one tablespoon of olive oil with one to two tablespoons of lighter carrier oils like jojoba or squalane-rich grapeseed. These viscosity reduction techniques keep strands silky, not flat.
Stick to a shorter mask duration of 10–20 minutes, and make porosity adjustments as needed.
Curly Hair Benefits From Extra Slip
Curly hair thrives on slip — that’s not an opinion, it’s just how your curls work. Extra virgin olive oil delivers serious friction reduction, so detangling ease becomes part of every hair mask session. That smooth coating helps curl clumping control, moisture lock, and moisture retention all at once.
Curly hair craves slip, and extra virgin olive oil delivers exactly that
For frizzy hair, add one tablespoon of argan oil for deep conditioning results.
Thick Hair May Need Richer Blends
Thick hair drinks up moisture differently — even when your scalp is doing its job, those dense outer strands can still feel parched. That’s where rich blend ratios matter. Mix olive oil with coconut oil in a 1:1 ratio, or fold in shea butter for serious emollient density and slip enhancement.
- Use coconut oil and olive oil equally for deep conditioning
- Add shea butter to boost emollient density and softness
- Avocado olive oil blends improve protein oil balance without stiffness
- Focus richer carrier oils on mid-lengths to ends
- Apply under a warm towel for heat retention and absorption
Oily Hair Should Focus on Ends
If your scalp runs oily but your ends feel brittle, you’re dealing with combination hair — and the fix is all about targeted end care. Skip root sebum control and apply your olive oil hair treatment only from mid-lengths down.
This light oil ratio gives split ends the moisture they need while supporting oil buildup prevention near the roots, leaving a non-greasy finish with real volume preservation.
Dry Scalp Can Get Gentle Massage
A dry, flaky scalp actually welcomes olive oil — but technique matters. Divide your hair into sections and use fingertip pressure (never nails) in slow circular motions for 30 to 60 seconds per section.
This sectioned application promotes scalp circulation without causing friction.
Leave your olive oil deep conditioner on for 15 to 30 minutes, then rinse well.
Skip essential oils until you’ve patch-tested — irritation prevention starts before you even open the bottle.
Add-Ins for Better Results

Plain olive oil works great on its own, but the right add-ins can take your treatment from good to really good. A few simple kitchen ingredients can target exactly what your hair needs — whether that’s more moisture, strength, or smoothness.
Here are some of the best ones to try.
Mix Honey for Extra Softness
Honey might just be mask’s secret weapon. As a natural humectant, it pulls moisture straight to your strands — and when paired with olive oil, the results feel noticeably softer.
For olive oil and honey hair mask, use one part honey to two to four parts oil. Warm honey first so it blends smoothly. Rinse with warm water, then shampoo twice to clear residue.
Add Avocado for Creamy Moisture
Mash half a ripe avocado into your olive oil for an instant upgrade. Avocado fatty acids deliver a nutrient moisture lock that olive oil alone can’t quite match — together, they create a rich emollient texture with real creamy slip boost.
This avocado and olive oil hair mask blends into a smooth, avocado mask consistency that clings evenly to strands for a deeply moisturizing treatment.
Blend With Egg for Protein Care
Crack an egg into your olive oil and watch the texture transform instantly — that’s the egg emulsification method doing its job. The protein binding effect coats each strand, leaving hair feeling smoother and more structured.
- Whisk one egg with 2 tablespoons olive oil for a classic egg honey and olive oil hair mask
- Apply within the 15–30 minute application timing range before rinsing
- Shampoo twice for complete rinsing residue removal
This DIY hair mask recipe with olive oil delivers real protein enrichment and hair nourishment in one simple step.
Stir in Shea Butter for Deep Conditioning
Shea butter is the secret weapon your hair didn’t know it needed. Melting shea butter gently over a double boiler before stirring it into your olive oil hair mask creates a silky, even blend that’s easy to apply.
| Step | What to Do | Why It Matters |
|---|---|---|
| Melt | Warm shea butter until smooth | Removes grainy lumps for even coverage |
| Mix | Stir into olive oil evenly | Creates a rich emollient sealing base |
| Apply | Mid-lengths to ends | Targets driest, most damaged areas |
This DIY hair mask doubles as a deep conditioning treatment and natural hair conditioner. Leave-On Duration matters — keep it on for 30 minutes. Use proper rinsing technique and shampoo twice for cuticle smoothing results without greasiness.
Use Essential Oils With Caution
Essential oils can do a lot for your scalp — but they demand respect. Always dilute them in your olive oil base, never apply them straight. Before your first use, do a test patch on your inner elbow and wait 24 hours.
- Dilution Ratios matter: Use just 2–4 drops per tablespoon of carrier oil.
- Photosensitivity Risks: Avoid citrus oils before sun exposure.
- Pregnancy Precautions and Pet Safety: Skip strong oils entirely if pregnant or around cats — inhalation hazards are real.
Top 5 Oils for Hair Masks
Not all oils are created equal, and the one you pick can make or break your mask. Some are richer, some are lighter, and each brings something different to the table.
Here are five worth keeping in your routine.
1. Sky Organics Organic Extra Virgin Olive Oil
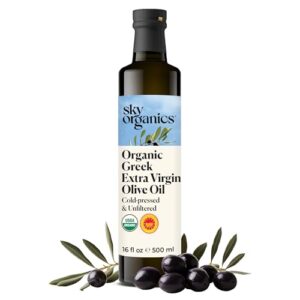
Organic Extra Virgin Olive Oil is a solid starting point if you want a clean, dependable base for your hair mask. It’s cold-pressed, unfiltered, and certified organic — sourced from Greek farms with a Protected Designation of Origin seal.
That matters because more vitamins and antioxidants stay intact. The dark-glass bottle helps preserve freshness, too.
At $19.99 for 16.9 fl oz, it’s reasonably priced for the quality you’re getting.
| Best For | Anyone who wants a clean, organic olive oil for cooking, skin care, or hair masks without overcomplicating their routine. |
|---|---|
| Form | Liquid oil |
| Purity | 100% pure EVOO |
| Certification | Organic, Kosher |
| Hair Use | Scalp oil, DIY treatment |
| Skin Use | Moisturizer, DIY beauty |
| Volume | 16.9 fl oz |
| Additional Features |
|
- Cold-pressed and unfiltered, so you’re getting more of the good stuff — vitamins, antioxidants, the works
- Dark-glass bottle actually does its job keeping the oil fresh longer
- Versatile enough for salads, low-heat cooking, and DIY beauty use
- That bitter, peppery aftertaste can catch you off guard if you’re used to milder oils
- The flavor is on the subtle side, so olive oil lovers who want something bold might feel shortchanged
- At $19.99 for under a pint, it gets pricey fast if you’re cooking in big batches
2. Rosemary Essential Oil for Hair Skin Aromatherapy
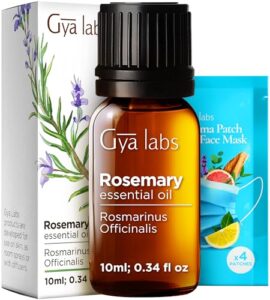
Once you’ve got your olive oil base sorted, it’s worth adding a few drops of rosemary essential oil to the mix. This one pulls double duty — it promotes scalp health and brings that fresh, invigorating scent that makes your mask feel more like a ritual than a chore.
Just don’t apply it straight; always dilute it in your carrier oil first. A good rule of thumb is 2–4 drops per tablespoon of olive oil.
At $7.89 for 10 mL, it goes a long way.
| Best For | Anyone looking to boost scalp health, support hair growth, or add a natural, calming scent to their skincare and wellness routine. |
|---|---|
| Form | Liquid oil |
| Purity | 100% pure essential oil |
| Certification | Quality-tested |
| Hair Use | Scalp nourishment, growth |
| Skin Use | Soothes skin, aches |
| Volume | 0.34 fl oz |
| Additional Features |
|
- Pure Spanish rosemary oil that works across hair care, skincare, and aromatherapy — one bottle, lots of uses
- A little goes a long way, so the $7.89 price tag stretches further than you’d expect
- That woody, fresh scent makes any DIY hair mask or bath product feel like an actual spa moment
- Hair regrowth results are hit or miss — some people swear by it, others see no change
- The 10 mL bottle is tiny, so if you use it regularly, you’ll be reordering pretty often
- Label and dropper issues have been reported, which can make dispensing a bit of a hassle
3. Cliganic Organic Jojoba Oil
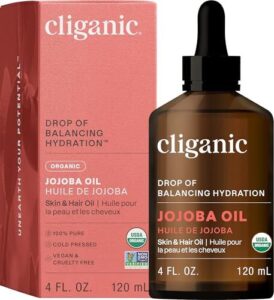
If rosemary brings the scalp benefits, jojoba brings the balance.
Cliganic’s Organic Jojoba Oil is cold-pressed, unrefined, and USDA certified organic — meaning nothing’s been stripped out before it reaches your hair.
What makes it special is how closely it mimics your scalp’s natural sebum. That means it conditions without weighing strands down.
Add a few drops to your olive oil base to improve slip, tame frizz, and leave hair looking noticeably shinier.
| Best For | Anyone who wants a clean, lightweight oil to balance scalp moisture and add shine without buildup or greasiness. |
|---|---|
| Form | Liquid oil |
| Purity | 100% pure jojoba |
| Certification | USDA Organic, Non-GMO |
| Hair Use | Scalp health, shine |
| Skin Use | Face, body, nails |
| Volume | 4 fl oz |
| Additional Features |
|
- Pure and simple — USDA organic, cold-pressed, and single-ingredient, so you know exactly what you’re putting on your scalp.
- Mimics your skin’s natural sebum, which means it moisturizes without making hair feel heavy or oily.
- Works for way more than just hair — face, nails, cuticles, dry skin patches — it pulls its weight.
- Sensitive to heat and light, so if it’s stored badly during shipping, you might get a compromised or leaky bottle.
- No scent and no extras — if you want something that smells nice or has added ingredients, you’ll have to DIY it.
- Not a fit for anyone with a jojoba allergy or someone who needs a medicated scalp treatment.
4. NOW Sweet Almond Moisturizing Oil
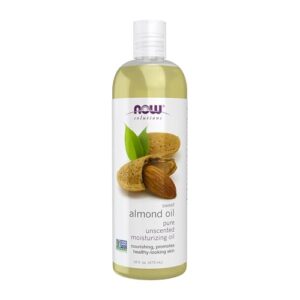
Now, if you want something ultra-gentle, sweet almond oil is worth keeping in your routine.
NOW’s Sweet Almond Moisturizing Oil is 100% pure, non-GMO, and cold-pressed — no fillers, no fragrance, no surprises. It absorbs quickly without leaving that heavy, greasy feeling behind. That makes it a smart choice for mixing into your olive oil base, especially if your hair often feels weighed down easily.
It’s also non-comedogenic, so no worries about clogged pores along your hairline.
| Best For | Anyone with sensitive or fragrance-intolerant skin who wants a pure, lightweight oil for moisturizing, hair care, or DIY beauty blends. |
|---|---|
| Form | Liquid oil |
| Purity | 100% pure almond oil |
| Certification | GMP-certified, Non-GMO |
| Hair Use | Hair conditioning |
| Skin Use | Body, face, baby massage |
| Volume | 16 fl oz |
| Additional Features |
|
- 100% pure sweet almond oil — no fillers, no fragrance, nothing extra
- Absorbs fast and won’t clog pores, so it works on both skin and hair without feeling heavy
- Versatile enough to use solo or mix into lotions, creams, and essential oil blends
- No pump dispenser, so the squeeze bottle can get slippery and messy
- The recycled bottle may look darker or show slight cloudiness — it’s fine quality-wise, but can be off-putting
- Pure oil texture isn’t for everyone — if you want something scented or lighter, this probably isn’t your pick
5. NOW Organic Jojoba Essential Oil
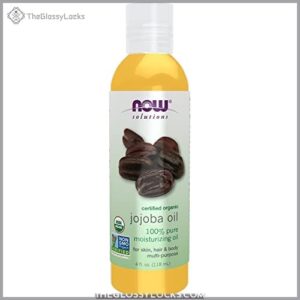
Jojoba oil might just be the most underrated item in your hair care toolkit.
NOW’s Organic Jojoba Oil is USDA-certified organic, Non-GMO verified, and lightweight enough to blend seamlessly with olive oil without weighing your hair down.
It conditions, reduces frizz, and adds shine — all without clogging pores. That neutral, faint-oat scent won’t clash with other ingredients either.
Mix a tablespoon into your olive oil base and apply it to your ends for soft, polished results.
| Best For | Anyone who wants a lightweight, natural oil to condition hair, moisturize dry skin, or use as a carrier oil for essential oil blends. |
|---|---|
| Form | Liquid oil |
| Purity | 100% pure jojoba |
| Certification | USDA Organic, Non-GMO |
| Hair Use | Frizz control, shine |
| Skin Use | Dry skin, eczema, acne marks |
| Volume | 4 fl oz |
| Additional Features |
|
- Light and non-greasy — absorbs fast without that heavy, oily feeling
- USDA Organic and Non-GMO verified, so you know what you’re putting on your skin
- Versatile enough for hair, skin, cuticles, and DIY essential oil mixes
- The dropper can leak and get messy, which makes it annoying to use daily
- Has a slightly gritty texture that might catch you off guard if you’re used to smoother oils
- Results aren’t guaranteed — some skin concerns just don’t respond well to jojoba
Safety, Storage, and Frequency

olive oil treatment right doesn’t stop when you rinse it out. simple habits around safety, storage, and how often you treat your hair can make a real difference in your results.
what you need to know before your next session.
Patch-test Essential Oils Before Use
Essential oils can do a lot for your hair — but your skin deserves a heads‑up first.
Before applying any blend to your scalp, do a forearm patch test.
Mix 1–2 drops into a teaspoon of olive oil, apply a small amount, and wait 24–48 hours.
This observation period tells you everything.
| Skin Sensitivity Types | Dilution Ratios | Reaction Indicators |
|---|---|---|
| Sensitive skin | 1 drop per tsp carrier oil | Redness, burning |
| Normal skin | 2 drops per tsp carrier oil | Mild itching |
| Reactive/allergy-prone | Skip or consult a dermatologist | Rash, swelling |
| Oily skin | 1–2 drops, ends only | Breakouts near hairline |
| Dry skin | 2 drops per tsp carrier oil | Flaking, tightness |
Safety considerations for essential oils start here — your test patch is your first line of defense against an allergic reaction.
Avoid Heavy Use on Fine Hair
Fine hair has lower porosity, which means it absorbs oil faster — and shows buildup just as quickly. For thin hair, sparse application technique matters more than you’d think.
Stick to an end focused treatment and use quantity control tips like halving your usual amount. If residue lingers, increase your clarifying rinse frequency.
lighter olive oil hair mask still produces benefits without the weight.
Store Masks in a Sealed Container
Your homemade olive oil hair mask deserves better than a random leftover container. Proper storage starts with airtight glass jars fitted with silicone lid seals — they block air and keep your DIY hair mask formulation fresh longer.
- Use portion control containers to avoid repeated opening
- Label each jar with date and ingredients
- Place on a refrigerated shelf interior — not the door
- Scoop with clean tools only
Keep Homemade Masks Cool and Dark
Think of your DIY hair mask formulation like fresh herbs — light and heat are its enemies. For the storage and shelf life of homemade masks, refrigerator placement matters: store yours at the back of the fridge, not the door, to avoid temperature swings. Use an opaque container choice with airtight sealing and minimize headspace to slow oxidation.
| Storage Factor | Best Practice |
|---|---|
| Avoid Bathroom Humidity | Use a bedroom drawer or kitchen cabinet |
| Cold Solidification Process | Natural thickening is normal — scoop and warm before use |
| Light Exposure | Opaque jars block degrading UV light |
| DIY Hair Mask Recipes with Olive Oil | Discard after 7 days for safety |
Your natural hair treatment stays fresher longer when you treat storage as seriously as the recipe itself.
Use Weekly or Twice Monthly as Needed
How often should you actually mask? It depends on hair’s needs.
Weekly treatments work well if you heat style regularly or notice persistent dryness. Twice a month suits hair that’s only dry at the ends.
Watch for grease buildup or scalp sensitivity — those are signs to scale back. Seasonal adjustments matter too.
Think of it as your personal home salon treatment, not a rigid schedule.
Frequently Asked Questions (FAQs)
Does olive oil reduce CRP?
Yes, it can. As the saying goes, "let food be thy medicine".
Research shows olive oil, rich in phenolic content, may lower CRP inflammation biomarkers, especially within a Mediterranean diet pattern.
How long before results become visibly noticeable?
After your first wash, shine and frizz drop are often immediate. Slip and breakage improve with each session.
For real moisture buildup and a weekly improvement curve, expect two to four weeks of consistent use.
Is olive oil safe for color-treated hair?
Good news for your color-treated hair — olive oil is generally safe. Wait at least 3 days after coloring to avoid disrupting pigment settling, and you’re good to go.
Does olive oil help with dandruff or scalp buildup?
Olive oil can soften dry flakes and soothe irritation, but it’s not a universal fix. If Malassezia yeast drives your dandruff, extra oil may worsen Yeast Overgrowth and scalp inflammation.
Conclusion
Why spend a fortune on products when your kitchen already holds the answer? A simple olive oil hair treatment, homemade with ingredients you trust, can transform dry, brittle strands into something you actually want to run your fingers through.
Start with what your grandmother knew, adjust it for your hair type, and give it time to work. The results won’t show up in a before-and-after ad—they’ll show up every time you look in the mirror.
- https://www.ncbi.nlm.nih.gov/pmc/articles/PMC5877547/
- https://www.hindawi.com/journals/ija/2018/1829160/
- https://www.healthline.com/health/lavender-oil-for-hair
- http://www.ijtrichology.com/article.asp?issn=0974-7753;year=2015;volume=7;issue=1;spage=2;epage=15;aulast=Gavazzoni
- https://holisticenchilada.com/hair-slip/