This site is supported by our readers. We may earn a commission, at no cost to you, if you purchase through links.

Most guys who nick themselves shaving aren’t using a dull blade or rushing—they’re holding the razor at the wrong angle. That single variable causes more cuts, razor burn, and ingrown hairs than anything else. A few degrees off and you’re dragging metal across skin instead of slicing cleanly through hair.
Angle control isn’t obvious. Nobody hands you a protractor at 16 and says "30 degrees for a safety razor, 20 for a straight." You figure it out through trial and error—usually on your face.
Getting shaving angle right as a beginner changes everything: smoother results, less irritation, and a technique that actually holds up over time.
Table Of Contents
- Key Takeaways
- Why Shaving Angle Matters for Beginners
- Understanding Razor Types and Blade Angles
- Finding The Ideal Shaving Angle
- Step-by-Step Shaving Angle Technique
- Adjusting Angle for Different Areas
- Common Shaving Angle Mistakes to Avoid
- Practicing and Perfecting Your Technique
- Post-Shave Care for Sensitive Skin
- Top 7 Shaving Tools for Angle Control
- Frequently Asked Questions (FAQs)
- Conclusion
Key Takeaways
- Holding your razor between 25–35 degrees is the single fix that eliminates most cuts, razor burn, and ingrown hairs — everything else is secondary.
- Each razor type has its own angle sweet spot: 30 degrees for safety razors, 20–30 for straight razors, and nearly flat for electric foil shavers.
- Your razor gives you real-time feedback through sound, feel, and skin response — a soft rasp means you’re right, scraping or tugging means adjust immediately.
- Short 1–3 cm strokes with zero added pressure let the blade’s own weight do the cutting, which is the difference between a clean shave and a rough one.
Why Shaving Angle Matters for Beginners
Angle is the one variable most beginners overlook — and it’s usually the reason your skin pays the price. Get it wrong, and you’re not shaving; you’re scraping.
Most single-blade razors actually make nailing that angle easier, since there’s less bulk getting between you and control.
Here’s exactly why it matters.
Preventing Cuts and Irritation
Angle is everything — get it wrong and no amount of shave preparation or quality lather saves your skin. Keep the blade between 25 and 35 degrees and you cut hair cleanly. Push past 45 degrees and you’re scraping skin, not shaving it. That’s where razor burn, skin irritation, and weepers come from.
- Wrong razor blade angle causes more cuts than dull blades
- Steep angles increase skin contact and trigger razor burn fast
- Proper shaving technique starts before the first stroke
- Skin conditions like dryness worsen irritation at bad angles
- Razor maintenance keeps edges predictable and angle-forgiving
Achieving a Close, Comfortable Shave
Getting a close shave isn’t just about the razor — it’s about the full picture. Solid shave preparation, proper razor maintenance, and understanding your skin type all feed into the result.
Keep your razor blade angle steady between 25 and 35 degrees and let the blade do the work. That combination of shaving technique and shave quality is what separates a smooth finish from a rough one.
Minimizing Ingrown Hairs
Ingrown hairs come down to two things: shave angle control and what you do before and after. Hold around 30 degrees — too steep and the blade cuts below the surface, leaving sharp tips that curl back in.
Pair that with exfoliation techniques two to three times weekly and an alcohol-free moisturizer post-shave. Razor blade selection matters too — single-blade safety razors cut once at the surface, reducing ingrown hairs markedly.
Understanding Razor Types and Blade Angles

Not all razors are built the same, and that difference changes everything about how you hold them. Each type has its own sweet spot — a blade angle that works with the tool, not against your skin.
Here’s what you need to know about the three main razor types and how angle plays into each one.
Safety Razors Vs. Cartridge Razors
Your razor choice shapes everything about angle control. Safety razors expose a single blade requiring a deliberate 30-degree razor blade angle — stray past 45 degrees and you’re scraping skin, not cutting hair. Cartridge razors build in blade exposure forgiveness, letting pivoting heads compensate for shaky wrists.
- Shaving safety: Safety razors demand conscious technique; cartridges handle angle automatically
- Shave quality: One clean blade at correct angle beats multiple blades dragging at odd ones
- Cost efficiency: Mastered safety razor technique reduces blade wear and replacement frequency
- Shaving technique: Cartridge razors shorten the learning curve — safety razors reward patience with better long-term results
Straight Razors and Angle Control
Straight razors demand the most from you — but reward the effort. Target a 20 to 30 degree razor blade angle, using the spine as your guide. Rest it flat, then lift one to two spine-widths off the skin. That’s your zone.
Proper skin preparation and razor balance do half the work. Master angle precision here, and every other shaving technique gets easier.
Electric Razors and Angle Considerations
Electric razors make shaving angle almost foolproof — but almost isn’t the same as automatic. Foil shavers need the head lying nearly flat against the skin, around 90 degrees. Rotary razor heads prefer circular passes with even pressure across all discs. Pivoting heads on modern electric shavers self-adjust through curves, absorbing wrist errors.
Still, tipping any electric shaver too far kills cutting efficiency and risks razor burn.
Finding The Ideal Shaving Angle

Finding the right angle isn’t guesswork — it’s a repeatable process once you know what to look for. Every razor has a sweet spot, and there are reliable ways to land on it without trial and error.
Here’s how to find yours.
Starting With Handle Perpendicular to Skin
Start with the handle perpendicular to your skin — that’s your reset position. With the handle upright, razor balance shifts toward the guard, keeping blade exposure low and controlled.
This handle position isn’t just a beginner crutch; it’s the foundation of smart shaving dynamics. Every stroke should begin here. It gives you consistent blade angle control and builds reliable shaving techniques and tips from day one.
Lowering Until Blade Just Touches Hair
From perpendicular, slowly rotate the handle outward until the blade just grazes the stubble — that’s your hair contact point. For most safety razors, that lands around 30 degrees.
Your razor grip technique matters here: loose fingers, zero added pressure. When blade angle control is right, you’ll hear a soft, even scritch. That sound is your guide.
Using Cap and Guard as Visual Guides
Your razor tells you everything — you just have to read it. When both the cap and guard kiss the skin lightly at the same time, your blade angle sits right around 30 degrees. That’s your sweet spot.
For shaving beginners, these visual cues beat guessing by handle position alone. Too much guard contact means too steep. Too much cap means too shallow. Trust the razor balance.
Step-by-Step Shaving Angle Technique
Knowing the right angle is one thing — using it consistently is another. Good technique comes down to three fundamentals: how you hold the razor, how you move it across your face, and how much ground each stroke covers.
Get these right, and everything else falls into place.
Holding The Razor Correctly

Your razor grip starts with three points of contact — thumb plus two fingers, mid-handle. That’s your foundation. Keep your wrist straight; let your forearm drive the stroke.
For shaving for beginners, finger placement is everything: spacing fingers along the handle gives you razor blade angle control without white-knuckling it. Light hold. Let the blade’s weight work.
Maintaining Consistent Angle Across Face

Think of your face as a map. Facial Zone Mapping breaks it into cheeks, jawline, chin, upper lip, and neck — each treated as its own flat surface. Angle consistency comes from reading each zone separately.
Use visual cues like your cheekbone edge for razor alignment. Keep skin tension light and steady. That’s how blade angle stops wandering.
Using Short, Controlled Strokes

Short strokes — 1 to 3 centimeters — keep blade angle locked and razor glide smooth. Stroke control is where shaving techniques stop being guesswork.
- Map hair growth zone by zone for shave efficiency
- Pair skin stretching with each small pass
- Let the razor’s weight work; don’t push
- Rinse the blade every few strokes to prevent clogging
Safety razor shaving best practices live in the details.
Adjusting Angle for Different Areas

Your face isn’t flat, and your razor can’t pretend it’s. The jawline, neck, and different growth patterns each need a small but deliberate shift in angle.
Here’s how to handle the spots that trip most beginners up.
Shaving Jawline and Chin
The jawline and chin are where most beginners bleed. Jawline techniques start simple: hold 30 degrees, follow the hair downward, use skin stretching to flatten curves.
For chin contours, tilt your head up slightly — it opens the surface. Shorten your strokes here. Keep your razor grip loose, move from the elbow, and never twist your wrist around curves.
Navigating The Neck and Difficult Spots
The neck is where shaving problems multiply fast. Neck shaving demands constant angle adjustment — the surface curves in every direction, so a fixed blade angle won’t cut it.
- Stretch skin upward with two fingers before each stroke
- Use 1–2 cm short passes around the Adam’s apple
- Rotate your wrist slightly as you follow neck curves
- Let razor weight do the work — zero extra pressure
Adapting for Hair Growth Direction
Hair mapping is your foundation here. Rub dry stubble in every direction — smooth means with the grain, prickly means against it. Mark a fogged mirror with arrows if it helps.
Cheeks usually run downward, but around your mouth and jaw, growth gets diagonal or circular. Those swirl areas need 1–2 cm strokes, a shallower blade angle, and zero extra pressure.
Follicle care starts with reading the direction first.
Common Shaving Angle Mistakes to Avoid

Even experienced shavers fall into the same traps — and bad habits with angle are usually the culprit behind burns, nicks, and that frustrating rough finish.
The good news is these mistakes are easy to spot once you know what to look for. Here are the three most common angle errors and how to fix them.
Using Too Steep or Shallow an Angle
Both extremes wreck shave quality. Too steep — past 45 degrees — and you’re scraping skin, not cutting hair. Blade exposure spikes, razor drag increases, and skin irritation follows fast.
Too shallow, and the blade rides over stubble without slicing it. With safety razors especially, angle control is everything. Stay near 30 degrees. That’s where razor sharpness actually works for you.
Applying Excessive Pressure
Pressure is the silent saboteur of good shaving technique. Most beginners think pressing harder gets a closer shave — it doesn’t. It damages skin, dulls your blade, and causes razor burn.
Pressing harder doesn’t sharpen your shave — it damages skin, dulls your blade, and invites razor burn
Understanding razor burn causes is key to preventing these issues. Let the blade angle do the work.
- Skin damage happens fast: heavy pressure strips your skin barrier, especially on the neck
- Razor wear accelerates — forced strokes bend the edge, killing razor sharpness early
- Ingrown hairs multiply when pressure pushes cut hairs below the follicle opening
- Razor burn intensifies on sensitive skin when friction and heat spike along each stroke
Ignoring Razor Feedback
Your razor talks. Most beginners just don’t listen. Every stroke gives you three channels of feedback — and ignoring them turns a fixable angle problem into razor burn fast.
| Feedback Type | What You Notice | What It Means |
|---|---|---|
| Audible Cues | Harsh scraping sound | Blade angle too steep |
| Tactile Feedback / Blade Drag | Tugging, jerky strokes | Skin signals a shallow angle |
| Visual Signs | Weepers, pink skin | Wrong blade angle, adjust now |
Shaving best practices for men — especially shaving for sensitive skin with safety razors — start with reading these signals early. Close shaving without razor burn is the reward.
Practicing and Perfecting Your Technique

Good technique isn’t built in a single shave — it’s earned through repetition. Every pass of the blade teaches your hand something new, and that knowledge stacks up fast when you know what to pay attention to.
Here’s what to focus on as you put in the reps.
Building Muscle Memory
Muscle memory is built through repetition, not speed. Stick to the same shave routine for your first 20 to 30 sessions — same safety razor, same blade angle, same order: cheeks, jaw, chin, neck.
Your practice sessions should be slow and deliberate. Trust sensory feedback: smooth glide means correct razor control.
That’s the foundation of shaving best practices for men with sensitive skin.
Monitoring Progress in The Mirror
The mirror isn’t decoration — it’s your feedback loop. Position your face 30 to 60 centimeters out and check mirror alignment every stroke. Visual feedback tells you everything: blanching skin means too much pressure, weepers signal a steep blade angle. Watch for stroke consistency — straight lines, no diagonal drift.
These shaving safety tips turn guesswork into real shaving comfort, session by session. Mastering the ideal shaving angle techniques is essential for a close shave.
Knowing When Your Angle is Correct
Once the mirror confirms your form, trust what your body tells you. Skin feedback doesn’t lie — the blade should glide, not grab. You’ll hear a soft, steady rasp: that’s correct angle control doing its job. No burn, no drag, clean lather strip.
With safety razors especially, good blade feel and consistent blade angle make shave quality obvious. These shaving tips click once your hands stop guessing.
Post-Shave Care for Sensitive Skin

The shave is done, but your skin still needs attention. Sensitive skin especially can flare up fast if you skip this last step.
Here’s what to do right after the razor comes off your face.
Rinsing and Cooling The Skin
After shaving, cool water is your first line of defense. Cold water benefits go beyond invigorating — it constricts blood vessels, cuts visible redness, and calms micro-irritation fast.
Here’s your post shave routine for cooling and rinsing:
- Splash lukewarm water (20–32°C) to clear lather and loose hairs
- Rinse 30–60 seconds until skin stops feeling slippery
- Follow with a 10–15°C cool rinse to reduce razor burn
- Press a cool damp cloth along the jawline for 30–60 seconds
- Pat dry gently — never rub
Skin cooling done right keeps post shave care simple and effective.
Applying Aftershave or Balm
Skin’s cooled down — now lock it in.
Pick your product by skin type. Dry skin needs a balm with glycerin or shea. Oily skin does better with a lightweight, non-comedogenic gel. Sensitive? Go alcohol-free, fragrance-free.
Pour 1–2ml of splash or a dime-sized balm into your palms. Pat — never rub — across cheeks, jaw, and neck.
| Skin Type | Best Choice | Key Ingredient |
|---|---|---|
| Dry / Mature | Balm | Glycerin, Shea Butter |
| Oily / Acne-Prone | Gel Aftershave | Non-comedogenic oils |
| Sensitive | Alcohol-free Toner | Aloe Vera, Allantoin |
| Normal | Aftershave Splash | Witch Hazel |
| Combination | Lightweight Balm | Panthenol, Hyaluronic Acid |
Aftershave benefits only hit when application is right.
Treating Nicks and Razor Burn
Even after the balm goes on, nicks and razor burn need direct attention.
- Rinse the nick with cool water for 20 seconds — wash away bacteria and residue
- Press a clean tissue firmly for 2–5 minutes for bleeding control
- Touch a styptic pencil to the cut for 10–20 seconds
- Apply aloe vera gel for skin soothing and razor burn relief
- Use thin antibiotic ointment for infection prevention
Top 7 Shaving Tools for Angle Control
The right tools make angle control a whole lot easier — and some are built specifically with precision in mind. Whether you’re just starting out or upgrading your kit, these seven picks cover every skill level and budget.
Here’s what’s worth having on your shelf.
1. Dovo 6/8 Black Straight Razor
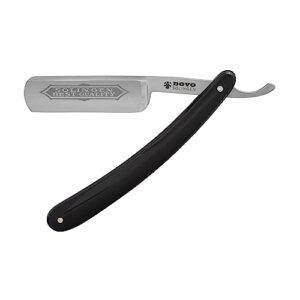
The Dovo 6/8 Black is a straight razor that practically teaches you the right angle. Its thick spine naturally creates a 20–30 degree contact point when you lay it lightly against your skin — no guesswork.
The 6/8 inch full hollow blade gives you clear visual feedback as you move across your jaw. Round tip means forgiving corners for beginners. Carbon steel holds an edge for weeks with regular stropping.
Built in Solingen, Germany, this razor is built to last decades.
| Best For | Men who want to master the classic straight razor shave — whether they’re just starting out or already know their way around a blade. |
|---|---|
| Material | Steel blade, plastic handle |
| Primary Use | Straight shaving |
| Skill Level | Beginner to advanced |
| Maintenance Required | Stropping and honing |
| Weight | 1.76 oz |
| Eco-Friendliness | Reusable razor |
| Additional Features |
|
- The 6/8 hollow blade and round tip make it genuinely beginner-friendly, giving you good feedback and a little forgiveness as you learn
- Carbon steel holds a sharp edge well, so with regular stropping you’re not constantly running it to a sharpener
- Solingen craftsmanship means this thing is built to last years, not months
- It may not come shave-ready out of the box, so you might need to strop or hone it before your first use
- Some users have reported the handle feeling a bit flimsy, which isn’t great for a razor at this price point
- It’s a bigger upfront investment than a cartridge razor, and it does need ongoing maintenance to stay sharp
2. DOVO Inox Straight Razor Olive Wood
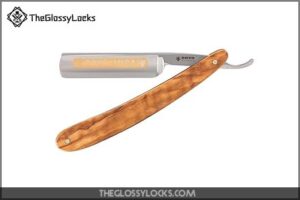
If the Dovo 6/8 Black is your entry into straight razor shaving, the DOVO Inox Olive Wood is your next step up. Same Solingen craftsmanship, but with stainless Inox steel — meaning rust and staining aren’t a constant worry while you’re still learning.
The 5/8 full hollow blade keeps angle feedback sharp and honest. Round tip stays forgiving around the jaw. That olive wood handle gives your fingers real grip, helping you hold a consistent 20–30 degree angle stroke after stroke.
| Best For | Shavers ready to step up from beginner razors who want a durable, classic straight razor without constantly worrying about rust. |
|---|---|
| Material | Stainless steel, olive wood |
| Primary Use | Straight shaving |
| Skill Level | Intermediate to advanced |
| Maintenance Required | Sharpening and care |
| Weight | 10g |
| Eco-Friendliness | Reusable razor |
| Additional Features |
|
- Stainless Inox steel means rust and staining are way less of a headache than with carbon steel
- Olive wood handle looks great and gives you a solid, natural grip
- Round tip is forgiving around tricky spots like the jaw, which saves you from nicks while you’re still finding your rhythm
- Not the best pick for total beginners — you’ll need to learn proper technique and pick up a strop or sharpening stone
- At only 10g, some guys may find it a little too light for their preference
- A few users have had complaints about the handle construction holding up over time
3. Norton Japanese Waterstone 4000 8000 Grit
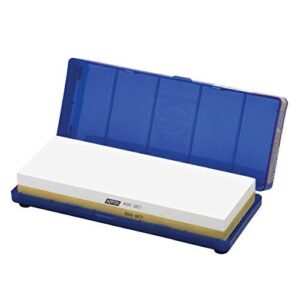
A dull razor kills your angle work before it starts. The Norton Japanese Waterstone 4000/8000 Grit keeps that from happening.
Start on the 4000 side — soak it 10 minutes, then work the bevel back to life. Flip to 8000 for polishing. That sequence takes a tired edge to near shave-ready.
The included case doubles as a stable base, so the stone won’t slide mid-stroke. Use water only — never oil. It’ll clog the pores and wreck the cut.
| Best For | Home cooks and serious hobbyists who want to keep kitchen knives, tools, and straight razors genuinely sharp without sending them out for professional sharpening. |
|---|---|
| Material | Corundum stone |
| Primary Use | Blade sharpening |
| Skill Level | Intermediate |
| Maintenance Required | Soaking and cleaning |
| Weight | 2.05 lbs |
| Eco-Friendliness | Reusable stone |
| Additional Features |
|
- The 4000/8000 dual-grit setup covers both refinishing and polishing in one stone — no need to buy two separate ones
- The included case doubles as a non-slip holder, so the stone stays put while you work
- Water-only maintenance keeps it simple and clean — just rinse and you’re done
- Needs a 15–20 minute soak before each session, so it’s not a grab-and-go option
- Corundum isn’t quite as fast-cutting as Japanese natural stones, so very damaged edges may need more work upfront
- Water-only use is a hard rule — oil will ruin it, which can trip up anyone used to oil stones
4. Fromm Razor Strop Blade Sharpener
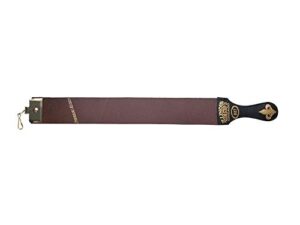
The Norton gets your edge sharp — the Fromm Razor Strop Blade Sharpener keeps it there.
This 23-inch strop gives you two working surfaces: canvas impregnated with zinc oxide on one side, smooth top grain cowhide on the other. Start on canvas to knock off microscopic burrs, finish on leather to polish the bevel. Do this before every shave.
The swivel hardware lets you flip without torquing the blade. A fresh edge holds your 30-degree angle instead of fighting it.
| Best For | Wet shavers and blade enthusiasts who want to keep a straight edge sharp between uses without buying new razors. |
|---|---|
| Material | Cowhide leather, canvas |
| Primary Use | Blade stropping |
| Skill Level | Intermediate |
| Maintenance Required | Occasional dressing |
| Weight | 6.4 oz |
| Eco-Friendliness | Reusable strop |
| Additional Features |
|
- Two-surface design (zinc oxide canvas cowhide leather) gives you a full sharpening and polishing routine in one tool
- Handcrafted in the USA from top grain cowhide — solid materials that hold up over time
- Works beyond razors too — knives, woodworking tools, and other fine blades all benefit
- Hardware feels a bit cheap compared to the leather quality
- New leather can be stiff out of the box and may need conditioning before it’s ready to use
- Takes some practice to get the angle and pressure right — not the most beginner-friendly tool
5. Porter Badger Shaving Brush
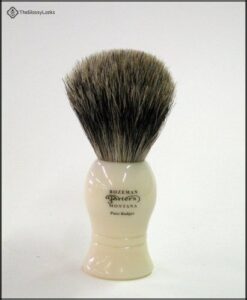
Most beginners obsess over the razor and forget the brush — that’s backwards. The Porter Badger Shaving Brush does real work before the blade even touches your face.
Pure badger hair lifts stubble upright and loads the skin with warm, hydrated lather, so your razor glides instead of drags. That cushion buys you forgiveness while your angle muscle memory is still developing.
At $35, it’s practical entry-level gear that manages creams, soaps, and croaps equally well.
| Best For | Beginners who want a solid, no-fuss shaving brush that builds good lather without spending a fortune. |
|---|---|
| Material | Badger hair, plastic |
| Primary Use | Lather application |
| Skill Level | Beginner to advanced |
| Maintenance Required | Rinse after use |
| Weight | 2 oz |
| Eco-Friendliness | Reusable brush |
| Additional Features |
|
- Pure badger hair holds heat and moisture well, giving you rich, hydrated lather every time
- Works with creams, soaps, and croaps — no need to switch brushes
- Helps lift stubble and cut down on razor burn and ingrown hairs
- The plastic handle feels lightweight and may show casting marks
- Bristles can shed over time with regular use
- Runs smaller than some buyers expect — worth checking the dimensions before you buy
6. Taylor Old Bond Street Sandalwood Shaving Cream
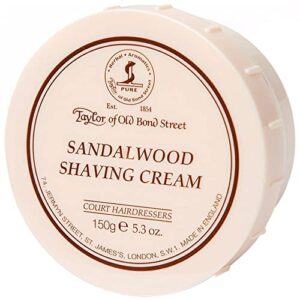
Good lather is half the shave — and Taylor of Old Bond Street Sandalwood Shaving Cream delivers exactly that. A pea-sized amount builds a dense, glycerin-rich foam that cushions the blade and reduces drag so angle mistakes hurt less.
That slickness lets you focus on technique instead of fighting friction. It’s paraben-free, works with hard or soft water, and pairs cleanly with a badger brush.
At $19.99 for 150g, it lasts months. Classic sandalwood scent is a bonus.
| Best For | Men with sensitive skin who want a premium daily shaving cream with a classic scent and a seriously close shave. |
|---|---|
| Material | Cream in bowl |
| Primary Use | Shave lubrication |
| Skill Level | Beginner to advanced |
| Maintenance Required | Reseal after use |
| Weight | 5.3 oz |
| Eco-Friendliness | Recyclable bowl |
| Additional Features |
|
- Builds a dense, cushioning lather that cuts down on razor drag and irritation
- Paraben-free formula works for all skin types and plays well with hard or soft water
- A little goes a long way — 150g lasts months, making the $19.99 price tag easier to swallow
- The sandalwood scent can be strong, so it’s not ideal if you prefer something subtle
- Pricier than most drugstore shaving creams sitting next to it on the shelf
- The bowl packaging isn’t the sturdiest — some users have received it damaged in transit
7. Facón Straight Razor Kit
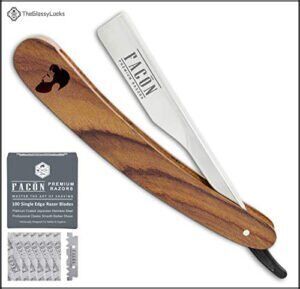
If the cream manages friction, the Facón Straight Razor Kit manages everything else. This shavette-style razor comes with 100 individually wrapped platinum blades — meaning you always have a sharp edge ready without touching a strop.
The stainless steel handle sits around 2.4 ounces, light enough for fine angle control but solid enough to feel intentional in your hand. Hold it at 20–30 degrees off the skin, let the weight do the work, and you’ll understand exactly why barbers reach for this one.
| Best For | Men and barbers who want a clean, precise shave with a steady supply of sharp blades and no stropping required. |
|---|---|
| Material | Stainless steel |
| Primary Use | Straight shaving |
| Skill Level | Beginner to advanced |
| Maintenance Required | Blade replacement |
| Weight | 2.4 oz |
| Eco-Friendliness | Replaceable blades |
| Additional Features |
|
- Comes with 100 platinum blades, so you’re set for a long time without hunting for replacements
- Stainless steel build feels solid and gives you real control at the right angle
- Works well for shaping beards, cleaning up sideburns, or going fully clean-shaven
- Takes practice to get comfortable with — nicks are likely until you find your rhythm
- Feels lightweight to some, which can throw off your confidence if you’re used to heavier razors
- The blade exposure might feel like a lot, especially if you have smaller hands
Frequently Asked Questions (FAQs)
Is it okay to shave testicle hair?
Yes, it’s safe — just go slow. Use a guarded trimmer first, stretch the skin flat, and apply a fragrance-free shave gel. Scrotal skin is thin, so sharp blades and light pressure are non-negotiable.
Can shaving angle affect beard growth over time?
Use it or lose it" doesn’t apply here. Shaving angle won’t change how fast or thick your beard grows — that’s genetics and hormones. It only affects comfort, skin health, and how stubble looks at the surface.
How does skin type influence the best angle?
Your skin type changes everything. Oily skin tolerates around 30 degrees well — natural sebum creates glide. Dry or sensitive skin needs 20 to 25 degrees to avoid scraping and irritation.
Should angle change as the razor blade dulls?
No. Keep your angle the same — change the blade. When a fresh blade tugs at your normal 30-degree zone, that’s the blade failing, not your technique.
How often should beginners reassess their shaving angle?
Early on, reassess your angle at the start of nearly every stroke. After 20 to 40 shaves, a few deliberate checks per session is enough to stay sharp.
Conclusion
Angle is the hinge everything else swings on. Get it right, and the razor glides—wrong, and you’re fighting your own face every morning.
Mastering the shaving angle for beginners isn’t about flawlessness on day one; it’s about building deliberate habits that compound into clean, confident results.
Stay consistent with your technique, listen to what the blade tells you, and trust the process. The mirror doesn’t lie—and eventually, neither will your shave.
- https://www.classicshaving.com/
- https://shavelibrary.com/w/Different_ways_to_hold_a_straight_razor
- https://www.aad.org/public/everyday-care/skin-care-basics/care/face-washing-101
- https://www.health.harvard.edu/blog/why-you-should-customize-your-skin-care-routine-by-season-2018091214806
- https://docs.google.com/forms/d/e/1FAIpQLSft2CcQT7O59GB6mBpFvAxcuYez30sIROpeaOIM3LqzTmbG5g/viewform?usp=pp_url&entry.1452073181=Website