This site is supported by our readers. We may earn a commission, at no cost to you, if you purchase through links.

Your electric shaver worked fine yesterday—now it won’t turn on, or it’s yanking hairs instead of cutting them. Before you toss it or spend money on a new one, the fix is usually something small: a clogged foil, a drained battery, or a travel lock you forgot you enabled.
Most shavers fail for the same handful of reasons, and nearly all of them are fixable in minutes. This electric shaver troubleshooting guide walks you through every common problem—from dead batteries and weak motors to irritated skin and dull blades—so you can get back to a clean shave fast.
Table Of Contents
- Key Takeaways
- Common Electric Shaver Problems
- Charging and Battery Fixes
- Blade and Foil Repairs
- Motor and Power Issues
- Skin Irritation and Missed Hairs
- Cleaning and Reassembly Steps
- Top 3 Electric Shavers
- Frequently Asked Questions (FAQs)
- What are the most common electric razor problems?
- Why does my electric razor turn on but not shave?
- Why does my electric shaver keep cutting out?
- How do you troubleshoot an electric shaver?
- Why is my electric shaver not working?
- How do I know if my electric shaver is good?
- How do you maintain an electric shaver?
- Should you use an electric shaver?
- Do electric shavers need maintenance?
- Why do electric shavers stop working?
- Conclusion
Key Takeaways
- Most electric shaver problems—dead batteries, clogged foils, and travel locks—can be fixed in minutes without spending money on a replacement.
- Keeping blades clean, lubricated, and replaced every 12–18 months is the single biggest thing you can do to prevent poor cuts and skin irritation.
- Overcharging past 100% and using non-original chargers quietly kills your battery over time, so keeping charge levels between 20–80% extends its life considerably.
- When repair costs exceed 50% of a new shaver’s price and problems keep coming back, replacing the shaver is almost always the smarter call.
Common Electric Shaver Problems

Electric shavers are reliable tools, but even the best ones hit a snag eventually. Most problems come down to a handful of familiar culprits that are easier to fix than you’d think.
Knowing those fixes gets you far, though it also helps to understand how electric and straight razors compare for skin sensitivity and ingrown hairs before settling on your routine.
Here’s what to look for.
Shaver Won’t Turn On
When your electric shaver won’t turn on, the fix is usually simpler than you’d think. Start with the basics: a Battery Voltage Drop or Charging Circuit Fault often means the battery just needs 10–15 minutes on the charger before it responds.
If that doesn’t work, try a soft reset by holding the power button for three seconds to clear any travel lock.
A blocked charging port can prevent the shaver from receiving power.
Shaver Turns on but Won’t Shave
Sometimes the shaver powers up but just sits there humming — that’s a different problem.
Blade dullness, clogged blades, or a blade alignment issue can all stall cutting action even when the motor runs.
Low Voltage Protection may also limit motor performance if the battery is weak.
Check shaver lubrication, reseat the head to fix any blade alignment, and rule out Motor Gear Wear or a Sensor Malfunction causing a Firmware Lockout.
Shaver Cuts Out Mid-use
A shaver that dies mid-stroke is more frustrating than one that won’t start at all.
Usually, it’s a Voltage Dip Detection response — the shaver senses a Motor Load Spike and cuts power to protect itself.
Battery Cell Imbalance from battery degradation, overheating, triggering a Thermal Sensor Fault, a loose connection, or a Software Power Cutoff can all cause this.
Clean the head and check your battery.
Loud Buzzing or Rattling Sounds
Buzzing that won’t quit usually points to one of these culprits:
- Motor Capacitor Buzz — a worn capacitor stresses motor performance and cranks up excessive noise
- Battery Swelling Buzz — battery swelling causes Housing Resonance as shifting cells create motor strain
- Loose Internal Screws — rattling chassis screws increase vibration during operation
- Foil Frame Vibration — a dislodged frame hits the motor housing, demanding immediate motor troubleshooting and noise reduction
Hair Pulling and Uneven Trimming
When your shaver starts pulling instead of cutting, blade dullness is almost always the first suspect. Dull cutting heads drag against hair rather than slicing cleanly, triggering Pulling Triggers that cause real Follicle Damage over time.
Clogged blades packed with hair and debris make it worse. Follow a consistent Trimming Schedule, clear those blockages regularly, and trim with Growth Direction Blending in mind to smooth out Texture Variation.
Charging and Battery Fixes

Battery problems are behind more dead shavers than most people realize.
Before you assume the worst, a few simple checks can get yours working again. Here’s what to look at first.
Dead or Weak Battery Symptoms
A dead battery doesn’t always announce itself — it usually creeps up slowly. Watch for these five warning signs before your shaver fails completely:
- A dim indicator light signals low voltage indicators early on.
- Sudden power loss mid-shave points to rapid voltage drop.
- Battery swelling signs mean immediate replacement.
- Frequent charging problems suggest declining battery life.
- Voltage below 12.4V confirms dead battery failure.
Loose Charging Cable or Adapter
A worn charging cable is easy to overlook, but loose connections are behind more charging problems than you’d think.
Watch for connector wear symptoms like frayed insulation or exposed copper — both signal poor cable flex life.
A cable with inadequate gauge power delivery will heat up unevenly.
Always use certified adapters; alignment compatibility issues and missing certification safety marks mean your charging adapter could be quietly failing you.
Blocked Charging Port Cleaning
Something as small as a lint ball can quietly kill your shaver’s charging ability. Port debris removal starts with an air-blast technique — short bursts of compressed air dislodge loose particles without touching internal pins.
For stubborn buildup, toothpick safety matters: use a dry wooden one only. Apply alcohol wipe caution near the port walls, and consider a dust flap prevention case to stop future blockages.
Overcharging Habits to Avoid
Leaving your continuous plugged-in charging after it hits 100% is one of the fastest ways to wear down your battery. Overnight full charge sessions and using a non-original charger both stress the cells unnecessarily. Avoid hot environment charging, and don’t ignore battery alerts.
Leaving your shaver plugged in past 100% is one of the fastest ways to kill your battery
Good charging etiquette — levels between 20 and 80 percent — makes overcharge prevention simple and extends battery life considerably.
Battery Replacement Warning Signs
Your battery is quietly giving you warning signs — you just need to know what to look for.
A swollen case, terminal corrosion, or leak odor means replacement is overdue.
Voltage sag under load and excessive heat during charging both signal degraded cells.
If battery life has nosedived and a dead battery keeps catching you off guard, don’t delay the battery replacement procedure.
Cleaning Charging Contacts Properly
Once your battery is sorted, don’t overlook dirty charging contact points — debris buildup here quietly kills a solid connection. Use non-conductive tools and an isopropyl alcohol swab for alcohol swab usage on stubborn grime, following simple cleaning procedure steps: power off, clear the port, dry for 60 seconds.
Repeat these port cleaning tips monthly — contact inspection techniques and consistent maintenance frequency to keep charging reliable.
Blade and Foil Repairs

Most shaving problems come down to one thing — the cutting parts are either worn out, clogged, or installed incorrectly.
Before you blame the motor or the battery, it’s worth taking a closer look at your blades and foil heads.
Here’s what to check and how to fix it.
Dull Blades Causing Poor Cutting
When blades lose their edge, shaving feels more like plucking than cutting. Edge Wear Effects, Micro‑Chipping Issues, and Coating Delamination all accelerate blade dullness — and coarser Hair Type Interaction worsens it faster.
Blade Corrosion Impact from trapped moisture speeds the decline too.
For blade sharpening, use a 600‑grit stone; otherwise, blade replacement every 12–18 months restores clean cuts.
Always prioritize cleaning the blades as part of regular shaver maintenance.
Clogged Foil or Cutter Head
Even clean-looking blades can hide a real problem. When hair clippings and skin oils pack into the foil apertures, you’ve got clogged cutting units — and the fix starts with Aperture Inspection and cleaning the blades thoroughly.
- Use cleaning brushes to clear debris
- Apply Anti‑Clog Lubricant for Oil Buildup Prevention
- Soak in soapy water, then try Ventilated Storage for Airflow Enhancement
Lubrication for shavers keeps everything flowing freely.
Checking Part Compatibility by Model
Once you’ve cleared out the clog, the next challenge is making sure the replacement shaver head you order actually fits your model — and that’s where a lot of people get tripped up.
The OEM Part Numbers printed on your shaver head are your first checkpoint. For example, the Panasonic ARC5 LV65 uses part number WES9032 for its blade and foil set, while the Philips Norelco 7200 Series uses the SH71 head refill. These aren’t interchangeable — Mechanical Dimensions, Connector Pin Match, and mounting tab geometry all differ between generations.
Always use the Manufacturer Cross-Reference tool on the brand’s official parts portal before buying replacement parts.
| What to Check | Why It Matters |
|---|---|
| OEM Part Numbers | Confirms exact model fit |
| Mechanical Dimensions | Ensures the head seats and locks correctly |
| Connector Pin Match | Prevents power or signal errors |
| Firmware Pairing | Avoids error codes on smart models |
Some newer shavers require Firmware Pairing after installing a genuine replacement part, so check your manual for any reset steps needed post-installation.
Reseating Blades and Foil Rings
Once the right part is in hand, proper reseating makes all the difference.
Start with Inner Ring Alignment — fit the tab into its notch before pressing down. Then focus on Outer Ring Seating, pressing evenly until all latches click.
Always do a Clearance Gap Check and confirm Part Compatibility Verification before finishing. Run a Post-Reseating Test to catch any grinding early.
When to Sharpen or Replace Heads
Knowing when to swap out shaving heads saves you from bad shaves and irritated skin. Watch for these Wear Threshold Indicators and Performance Drop Signs:
- Multiple passes needed for the same closeness
- Visible rounding or foil damage from blade dullness
- Increased skin irritation despite proper blade lubrication
- Rattling sounds during use
Material Longevity Factors matter too—stainless steel lasts longer than basic alloys. Sharpening Viability is limited for foil heads; Replacement Cost Analysis usually favors a new shaver head every 12–18 months.
Avoiding Low-quality Replacement Parts
Cheap replacement parts can quietly wreck a shaver that otherwise has years left in it. Before you buy, run through four checks to make sure you’re getting what you paid for.
| What to Check | Why It Matters |
|---|---|
| OEM Part Verification & Authenticity Markings Check | Confirms the part matches your model’s specs |
| Supplier Reputation Review & Warranty Return Policies | Protects you if the part fails early |
| Material Grade Comparison | Ensures blades match original stainless steel quality |
| Product warranty on replacement blade sets | Signals a trustworthy manufacturer stands behind their parts |
Motor and Power Issues

When your shaver loses power or the motor starts acting up, the fix is usually closer than you think. Most motor and power problems come down to a handful of causes — and once you know what to look for, you can sort it out fast.
Here’s what to check.
Weak Motor Performance
A sluggish shaver motor usually signals a deeper problem than you’d expect. Low battery voltage causes torque reduction, so the motor stalls more frequently under thick stubble — stall frequency climbs noticeably as current drain rises.
Heat buildup worsens the speed drop over longer sessions, triggering motor overheating. Recharge fully and avoid continuous use beyond 10–15 minutes to restore normal motor performance and power.
Hair or Debris Blocking The Motor
Hair clippings wrapped around the rotor, or lodged in the intake vent, are a surprisingly common cause of motor performance and power issue fixes going nowhere. Debris triggers bearing race obstruction and cooling fan blockage, forcing higher current draw and heat buildup.
After cleaning and maintenance of shaver heads, check for moisture short risks too — damp debris causes rotor hair wrap and silent stalling.
Overheating Shutdown Protection
Your shaver shutting off mid-shave isn’t a malfunction — it’s the built-in overheating shutdown protection doing its job. When thermal sensor calibration detects critical heat, the motor cuts to prevent damage.
Smart heat sink design and ventilation clearance help with heat dissipation, but blocked vents worsen shaver motor issues fast.
Let it cool for 10–15 minutes, then restart.
Faulty Switch or Internal Wiring
Sometimes the problem isn’t the motor — it’s the switch or wiring feeding it. Contact Resistance builds up when solder cracks open circuit paths or switch debris buildup blocks full engagement. Wire insulation damage and wire connection problems create circuit short indicators like scorch marks or burnt smells.
Run through these troubleshooting steps:
- Press the power button firmly — a stuck actuator may just need clearing
- Check for melted insulation or discolored internal components
- Test switch continuity with a multimeter (near-zero ohms = good)
- Look for corroded connector pins causing an electrical fault
Damaged Circuit Board Signs
When wiring checks out clean but your shaver still won’t cooperate, the circuit board itself may be the culprit.
Charred PCB marks, swollen capacitors, corroded traces, or discolored solder mask are all signs of hardware failure or power surge damage.
A burnt smell near the electrical components is a red flag for an electrical fault — diagnosing electrical faults this deep usually means professional repair or replacement.
When Repair is No Longer Practical
At some point, repair cost assessment tips the scale — and that point is usually when fixes cost more than 50% of a new shaver’s price.
Factor in hidden repair costs like shipping, labor, and repeat visits, and replacement often wins.
Reliability downtime, environmental impact, and financing replacement options all matter too.
When your device warranty is gone, and problems keep returning, it’s time to choose a new electric shaver.
Skin Irritation and Missed Hairs

Skin irritation and missed hairs usually aren’t shaver problems — they’re technique problems.
A few small adjustments to how you prep, shave, and wind down can make a real difference.
Here’s what to check and fix.
Pre-shave Cleansing and Softening Hair
Skin irritation often starts before the blade even touches your face. A solid preshave routine makes all the difference.
Start with Warm Water Softening and Mild Cleanser Application to clear hair residue buildup and surface oils.
Then follow these three steps:
- Apply Steam Towel Prep for 2–3 minutes
- Use Gentle Exfoliation to lift trapped hairs
- Begin wet shaving during the Short Hydration Wait window
Using Pre-shave Oil or Gel
Adding a pre-shave oil or gel before you shave creates a Protective Slip Layer that lets the cutting head glide without grabbing. Preshave oils — often made with jojoba or argan — deliver Moisture Barrier Benefits that prevent skin irritation.
A few drops are enough; Application Amount Guidance always favors thin coverage.
Pre-shave Gel Advantages include softening hair and reducing redness through solid lubrication and smart Ingredient Comfort Choices.
Light Pressure and Correct Stroke Direction
Pressing too hard is the fastest way to wreck your shaving technique.
Instead, use the Gentle Glide Technique — let Feather Light Contact do the work while Hair Growth Alignment guides each stroke.
Moving at a Consistent Stroke Speed of roughly 1–2 cm per second prevents tugging.
Watch for Pressure Feedback signals like redness; that’s your skin sensitivity warning; you should ease up immediately.
Fixing Razor Burn and Redness
Even after a careful shave, irritation and razor burn can sneak up on you.
Start with cool compress application — a clean, damp cloth pressed gently on the area reduces redness fast. Follow with aloe vera gel or a fragrance‑free moisturizer to rebuild the skin barrier.
For stubborn inflammation, hydrocortisone cream (0.5%–1%) helps calm swelling.
If irritation persists beyond a week, a medical evaluation is worth it.
Replacing Worn Heads to Reduce Friction
Worn shaving heads are a hidden cause of friction — and friction means irritation. As blades round off and foil fatigues, Friction Measurement shows drag rises noticeably. Alignment Accuracy suffers too, cuting them cleanly.
Replace heads every 12–18 months, choosing matched sets with quality Coating Technologies and smart Material Choices:
- Fresh heads restore blade-to-foil gap precision
- DLC or ceramic coatings lower heat and drag
- Reassembly and proper installation of shaving heads locks out lateral movement
- Lubrication with shaver oil after blade maintenance completes the fix
Post-shave Balm for Calmer Skin
A good post-shave balm is your skin’s last line of defense.
Look for Chamomile Soothing and Vitamin E Antioxidant ingredients to calm redness fast. Humectant Hydration from glycerin or hyaluronic acid restores moisture, while Skin Barrier Oils like jojoba and shea reduce friction damage.
Astringent Tone ingredients tighten pores, completing your shaving irritation prevention routine and preventing razor burn effectively.
Cleaning and Reassembly Steps
Most shaver problems trace back to one root cause — poor cleaning habits and rushed reassembly. A few consistent steps after each use can keep your shaver running like it’s fresh out of the box.
Here’s exactly what to do.
Rinsing Waterproof Shavers After Use

A quick rinse after every shave keeps residue from hardening into buildup. Hold your waterproof shaver under warm — not hot — water for 15 to 20 seconds for temperature‑safe rinsing and surface residue removal.
After rinsing, shake off excess water, then complete post‑rinse drying and a seal integrity check. Inspect components to confirm moisture protection stays intact.
Weekly Head Soaking and Drying

A quick rinse addresses surface residue, but deep cleaning calls for more.
Once a week, disassemble the shaving head and soak it in warm water — keep the water temperature between 38 and 43°C — for 5 to 10 minutes. That soak duration loosens embedded oils effectively.
Afterward, pat components dry with a microfiber towel for proper moisture removal, then air-dry fully before reassembly.
For wet use safety, never skip conditioning after drying.
Brushing Out Trapped Hair Clippings

Once the head is dry, hair clippings are your next target.
Use the Fine Toothpick Technique to lift debris from tight base areas, then weave a Rat Tail Comb between bristles to free stubborn clumps — that’s the Brush Rotation Method in action.
A Lint Roller Cleanup catches fine fibers afterward.
Finish with an Anti-Static Spray to discourage future cling around clogged blades.
Lubricating Blades and Foils

With the hair clippings cleared away, lubrication is your next move — and it’s one that most people skip. Drop a small amount of blade oil onto the center of each foil head, run the shaver for 5–10 seconds to spread it, then wipe away excess. That’s your full Excess Lubricant Removal step.
Keep these cleaning and maintenance tips in mind:
- Oil Application Frequency: Every 2–3 shaves, or each time you clean
- Compatible Lubricant Types: Light mineral or manufacturer-approved oil only
- Foil Coating Compatibility: Avoid abrasive or thick lubricating agents that peel foil coatings
- Lubricant Storage Tips: Store oil in a cool, dry spot to preserve its consistency
Cleaning The Charging Contacts

Once the blades are lubricated, don’t overlook the charging contacts — dirty pins are a surprisingly common reason your shaver won’t charge. Start with a Microfiber Contact Wipe to lift oils and dust. If residue stays, Alcohol Swab Cleaning works well for cleaning contact points, charging port blockages, and cleaning methods.
| Step | Tool | Key Tip |
|---|---|---|
| Microfiber wipe | Lint-free cloth | Removes oils without scratching |
| Alcohol Swab Cleaning | 70% isopropyl swab | Clean the port gently |
| Drying Time Assurance | Air dry fully | Prevents short circuits |
After cleaning, do a Pin Alignment Inspection — bent or missing pins mean it’s time for service. Use protective caps on the charging plug when stored to block dust buildup.
Reassembling Heads and Locks Correctly

Once the heads are clean and dry, proper reassembly makes all the difference. Line up the Head Alignment Guides with the housing grooves, then press firmly until the lock clicks.
Run a quick Lock Lever Test — it shouldn’t bind or wobble.
Apply Foil Seating Precision by checking the foil frame sits flush, and always confirm Part Number Verification before installing any replacement.
Travel Lock and Safety Lock Checks

Before you pack your shaver, check both the travel lock and safety lock — skipping this step is how shavers turn on inside your bag. TSA Compatibility means security can open your lock without breaking it. Always run a Tamper Indicator Inspection after flights.
- Confirm Safety Lock Activation before packing
- Hold power 3 seconds to engage travel lock
- Follow the Lock Reset Procedure if the code fails
- Check the padlock symbol on the display
- Inspect Travel Lock Durability and inbuilt safety mechanism for wear
The safety mechanisms for wet shaving and travel lock protect both your shaver and your skin.
Top 3 Electric Shavers
All that troubleshooting knowledge is most useful when you’re working with a shaver worth maintaining. These three models stand out for their reliability, build quality, and how well they hold up over time.
Here’s a closer look at each one.
1. Panasonic Swipe Right Travel Shaver
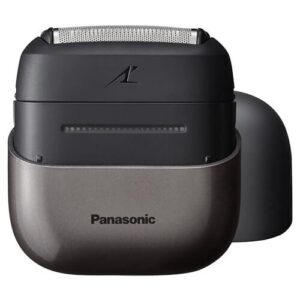
The Panasonic Swipe Right Travel Shaver is built for people who refuse to let a rushed morning ruin their routine.
Its three-blade hypoallergenic foil system paired with a smart beard sensor means the motor automatically adjusts to your hair thickness — no tugging, no guesswork.
You get about 60 minutes of cordless use from a single USB-C charge, and IPX7 waterproofing means cleaning is as easy as holding it under the tap.
| Best For | Frequent travelers and on-the-go guys who need a reliable, no-fuss shaver that fits in a bag and works anywhere. |
|---|---|
| Waterproof Rating | IPX7 (1m/30s) |
| Battery Life | ~60 minutes |
| Blade System | 3-blade foil |
| Cordless Operation | Yes |
| Travel-Friendly | Protective travel cover |
| Hypoallergenic Blades | Yes, stainless steel |
| Additional Features |
|
- The smart beard sensor adjusts motor power on the fly, so you get a smooth shave without the tugging or irritation
- USB-C charging means you can top it up from a laptop, power bank, or basically anything you already carry
- IPX7 waterproof rating lets you shave in the shower and clean it with a quick rinse — dead simple
- It won’t get you that razor-close shave if you’re used to a traditional wet blade
- One hour of battery life sounds fine until you forget to charge it between trips
- No auto-cleaning station, so maintenance is fully on you
2. Wahl Lifeproof Waterproof Foil Shaver
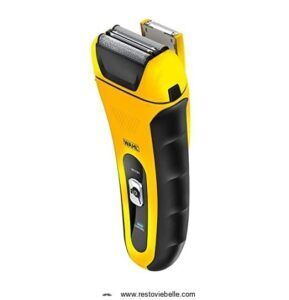
The Wahl Lifeproof Waterproof Foil Shaver punches well above its $59.90 price tag.
Its dual floating foil system flexes with your face, so you’re not fighting awkward angles on your jaw or cheekbone.
You get up to 90 minutes of runtime, a quick 5‑minute charge when you’re in a rush, and full waterproofing down to 1 meter.
The pop-up precision trimmer manages sideburns and edges without swapping attachments — a practical win for anyone who values a clean finish fast.
| Best For | Anyone who wants a reliable, travel-friendly shaver that works in the shower without breaking the bank. |
|---|---|
| Waterproof Rating | Up to 1m depth |
| Battery Life | 60 minutes |
| Blade System | Flexible foil cutters |
| Cordless Operation | Yes |
| Travel-Friendly | Travel-lock mechanism |
| Hypoallergenic Blades | Yes, flexible foil |
| Additional Features |
|
- Fully waterproof down to 1 meter, so wet or dry shaving is totally covered
- Quick 5-minute charge gets you through a single shave when you’re running late
- Built-in pop-up trimmer handles detail work without needing extra tools
- Foil head wears out faster than premium models and needs replacing every 6 months or so
- Plastic build feels a bit flimsy, and it won’t work while plugged in
- May struggle to get a close shave on the neck and trickier spots on your face
3. BaBylissPRO Baberology Double Foil Shaver
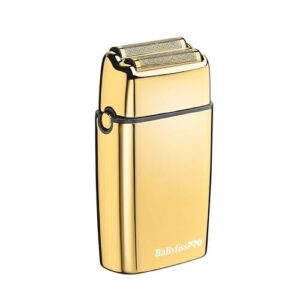
The BaBylissPRO Baberology Double Foil Shaver means business. Built for barbers and serious home groomers alike, its all-metal housing and 9,500 RPM motor deliver a close, clean finish around necklines and hairlines where precision actually matters.
Hypoallergenic dual foils keep skin calm, and three hours of cordless runtime mean you won’t run dry mid-session.
At around $170, it’s a premium buy — but the build quality and performance make it a tool you’ll reach for daily.
| Best For | Barbers and home groomers who want a durable, close-shave tool for necklines, edges, and detailed grooming work. |
|---|---|
| Waterproof Rating | Not specified |
| Battery Life | ~3 hours |
| Blade System | Double-foil system |
| Cordless Operation | Yes |
| Travel-Friendly | Storage pouch included |
| Hypoallergenic Blades | Yes, double-foil |
| Additional Features |
|
- All-metal build feels solid and lasts longer than plastic shavers
- Hypoallergenic dual foils give a close shave without wrecking sensitive skin
- Three hours of cordless runtime means no interruptions mid-groom
- At ~$170, it’s a tough sell if you’re watching your budget
- Heavier than most foil shavers, so long sessions can feel tiring
- It runs loud — not ideal if you share walls with light sleepers
Frequently Asked Questions (FAQs)
What are the most common electric razor problems?
One moment it’s running fine — the next, nothing. The most common electric shaver problems include failure to power on, poor cutting, mid-use shutdowns, loud rattling, and hair pulling.
Why does my electric razor turn on but not shave?
Your shaver powers on but barely touches the hair? Worn blades, a clogged foil, or a degraded battery can all kill cutting power while the motor still hums.
Why does my electric shaver keep cutting out?
If your shaver keeps cutting out mid-shave, a weak battery is usually the culprit. Clean the charging contacts, check for clogged blades, and make sure you’re not overcharging it.
How do you troubleshoot an electric shaver?
Start with the basics: check the power source, inspect the battery, and clear any hair clippings from the head.
From there, work through blades, contacts, and switches, one step at a time.
Why is my electric shaver not working?
Your electric shaver isn’t working likely due to a dead battery, clogged blades, or a faulty power switch. A quick check of each usually reveals the culprit fast.
How do I know if my electric shaver is good?
A good shaver speaks for itself — clean cuts, no pulling, and a charge that lasts at least 60 minutes. If it’s quiet, smooth, and consistent every session, you’ve got a keeper.
How do you maintain an electric shaver?
Rinse the head after every use, brush out clippings, and dry it completely before storage. Lubricate the blades regularly, keep charging contacts clean, and replace foils every 12 to 18 months.
Should you use an electric shaver?
Think of an electric shaver as your daily armor — it protects your skin from nicks, saves time, and adjusts to your routine.
If you want comfort and convenience, yes, it’s worth it.
Do electric shavers need maintenance?
Yes — like any tool you rely on daily, electric shavers need regular maintenance.
Cleaning, lubricating, and replacing worn parts keep blades sharp, extends battery life, and ensures every shave stays smooth and irritation-free.
Why do electric shavers stop working?
Electric shavers stop working due to dead batteries, clogged blades, debris‑jammed motors, dirty charging contacts, or worn‑out foils.
Each issue quietly builds until the shaver gives out at the worst possible moment.
Conclusion
Think of your shaver like a car engine—neglect the basics, and even the best machine breaks down. This electric shaver troubleshooting guide gives you the tools to diagnose problems before they become permanent, from a clogged foil to a failing battery.
Most fixes take minutes, not money. Keep the blades clean, the contacts charged, and the heads replaced on schedule, and your shaver will stay sharp longer than you expect.
- https://www.philips.com/parts-and-accessories
- https://www.youtube.com/watch?v=vx5kyDNshGc
- https://www.fredmeyer.com/p/schick-calming-and-soothing-post-shave-balm/0084105800348
- https://newenglandshaving.com/collections/after-shave-balm
- https://www.balmology.co.uk/product-page/triple-action-post-shave-balm