This site is supported by our readers. We may earn a commission, at no cost to you, if you purchase through links.

Most people learn to braid hair by fumbling through it on a patient friend’s head, getting halfway down and losing track of which strand goes where. That moment of confusion—hands frozen, sections splaying apart—is almost a rite of passage.
The good news is that braiding follows a predictable logic, and once your fingers understand the pattern, muscle memory takes over fast.
Whether you’re starting with a simple three-strand braid or ready to tackle a Dutch braid from crown to nape, the foundation is the same: clean sections, consistent tension, and hands that stay close to the scalp.
Get those three things right, and every other style falls into place.
Table Of Contents
- Key Takeaways
- Prepare Hair for Braiding
- Braid a Three-Strand Style
- Try French and Dutch Braids
- Top 5 Hair Braiding Tools
- Frequently Asked Questions (FAQs)
- How do you make a braid?
- How to make braids a good hairstyle?
- Can I Braid my own hair?
- How do you braid a hairline?
- What is a boxer braid?
- What is a cornrow braid?
- How do you do a reverse French braid?
- What is the easiest braid for beginners?
- Is it easier to braid wet or dry?
- How to do a simple 3 strand braid?
- Conclusion
Key Takeaways
- Prep work — detangling, choosing the right moisture level, and sectioning cleanly — matters more than technique when it comes to braids that actually hold.
- three-strand braid is built on just two moves (left over middle, right over middle), and once your hands lock in the rhythm, everything else follows naturally.
- French and Dutch braids use the same base pattern, but level it up by pulling in small sections of scalp hair before each cross, with Dutch braids crossing under instead of over to create that raised, rope-like look.
- affordable tools — a tail comb, clear elastics, and the right mirror setup — can cut your learning curve significantly and make self-braiding a lot less frustrating.
Prepare Hair for Braiding

Good braids start long before your fingers ever touch a strand. How prep your hair makes the difference between a braid that holds all day and one that falls apart by noon.
If you’re working with textured hair, these curly hair braiding techniques and prep tips can help you get a grip that actually lasts.
Here’s what to do before you begin.
Detangle Hair Completely
Before you touch a single section, detangle your hair completely — knots and braids don’t mix. Apply a conditioner slip or detangling spray, then finger detangle first to release the worst clusters.
Follow with a wide-tooth comb, working from ends upward for proper knot release technique. Use a brush last to smooth everything out and protect your scalp from unnecessary pulling.
Choose Damp or Dry Hair
Once your hair is detangled, decide whether to braid it damp or dry — and that choice matters more than you’d think.
Wet hair braiding gives you better Frizz Control and Curl Definition, but wet hair is weaker and snaps more easily. Dry hair braiding offers stronger Grip Hold and faster Styling Speed.
Braiding hair when it’s slightly damp hits the sweet spot for most hair types. For best results, try damp hair styling with flaxseed gel.
Set Up Mirrors and Tools
With your moisture level sorted, now set up your workspace. Good mirror setup for self-braiding makes all the difference — you can’t fix what you can’t see.
- Position a large wall mirror at Mirror Height Placement that shows your full head
- Use a two mirrors setup for back visibility
- Check Leveling and Alignment so reflections aren’t distorted
- Gather hair preparation and necessary tools: comb, elastics, clips
- Keep a handheld mirror within reach for angle checks
Check Hair Length and Texture
Now that your tools are ready, take a moment to check your length and texture — these two things shape everything that follows. Stretch a strand gently for accurate Length Measurement, since curly hair shrinks considerably during Shrinkage Evaluation.
Fine vs Coarse strands behave differently under tension.
Texture Identification and Growth Pattern Check guide your technique choice.
Minimum hair length for braiding sits around shoulder-length.
Section Hair for Better Control
Start at the nape using the Horizontal Parting Technique — place your rat tail comb’s fine tip on the scalp and glide it steadily across for Rat Tail Precision.
Section hair into three equal sections per row, keeping Section Size Consistency with half-inch to one-inch squares.
Apply the Offset Brick Layout row by row, then use the Clip Isolation Method to secure everything you’re not working with.
Braid a Three-Strand Style

The three-strand braid is where every braiding journey starts — simple in theory, satisfying once your hands get the rhythm.
You only need to master a few key moves, and the rest just click into place. Here’s exactly how to do it, step by step.
Divide Hair Into Three Sections
Split your hair into 3 equal sections before anything else — this is where clean braids are won or lost. Use a tail comb for precision along each part line. Section Size Balance matters: uneven sections cause the braid to twist.
A lightweight shower caddy for college dorms keeps your tail comb and sectioning clips within easy reach without adding bulk to your trek down the hall.
For fine or curly hair, make Hair Type Adjustments by working slightly damp.
A mirror-assisted sectioning setup helps you see every part clearly.
Learn Proper Hand Positioning
Hand positioning and grip technique makes or breaks every braid.
Use a Thumb Index Grip — hold each outer strand between your thumb and index finger, letting Middle Finger Control anchor the middle section.
Keep Hand Height close to your scalp for tighter results.
Move with good Finger Reach, advancing your whole hand smoothly.
A Mirror Setup confirms your Hand coordination stays centered.
Cross Left Over Middle
Cross the left strand over the middle — that single move is the heartbeat of every braid. Hold the left strand between your thumb and index finger, keeping your grip close to the roots for left strand positioning to keep it clean.
The moment you cross over, the left becomes your new middle anchor’s shift. Watch the visual alignment: your three sections should still look balanced.
Cross Right Over Middle
Now mirror that same move on the other side.
Take the right strand — your Right Strand Guidance here is simple: use your dominant hand to lift it cleanly over the middle, focusing on Middle Strand Alignment, so nothing overlaps messily.
That Cross Timing Technique, left then right, builds your Rhythm Consistency.
Keep Finger Placement Tips in mind: stay close, maintain even tension, and repeat.
Keep Even Braid Tension
Tension is everything — too tight and your scalp aches, too loose and the braid falls apart. Focus on Hand Pressure Consistency: keep your grip firm but never painful.
Tension is everything in braiding: grip firmly enough to hold, gently enough to not hurt
Section Size Matching helps maintain even pull from crown to tip.
Do quick Scalp Comfort Checks as you go, and use Mirror Tension Monitoring to spot lopsided areas before they become a problem.
Secure The End Neatly
Once you’ve braided down to the last inch or two, it’s time to tie off the loose end. Your Elastic Band Choice matters more than you’d think — a clear hair elastic or color-matched hair tie disappears cleanly.
For a flatter finish, try a Thread Tie-Off or simple Knot Technique.
Synthetic hair? Heat Sealed Ends hold beautifully.
Finish with Clean Tail Trimming for a polished look.
Loosen or Tighten for Shape
Now, shape is where your braid really becomes yours. Tightness Levels change everything — tighten the braid for Hold Strength and Shape Consistency that lasts all day, or ease up for Loose Styling with natural Volume Control.
Tension control is simple: firm hands for durability and hold, lighter pressure for soft movement. Maintaining even braid tension throughout keeps the finished look clean, not lumpy.
Try French and Dutch Braids
Once you’ve got the basic three-strand braid down, French and Dutch braids are the natural next step. They follow the same crossing pattern — just with a little extra hair added in as you go.
Here’s how to work through each one.
Start at The Crown

Think of crown as your braid’s anchor point — get it right, and everything that follows falls into place. For a crown braid or halo braid, part your hair straight down the center.
Crown Centering matters here: a balanced start gives you Crown Visibility and a clean Crown Angle.
Section hair into three parts just behind the hairline, keeping your hand placement close to the scalp.
Add Hair While Braiding

Once your anchor is set, the real magic starts — adding hair sections while braiding.
Your Extension Placement Strategy matters here: clip fuller wefts below the crown, smaller ones at the sides.
Pull up a small strand from each side before every cross, wrap it around the hair already in your hand, and keep checking Strand Balance Adjustments so no section gets heavier than the others.
French Braid Step by Step

Start your French braid by splitting your hair into 3 equal sections near the crown. Cross left over middle, then right over middle — that’s your Braiding Rhythm. Before each cross, pull a thin strip from the scalp to build Scalp Grip.
Keep the tension even, control Section Size for Volume Control, and finish with a clear elastic.
Dutch Braid Step by Step

Unlike a French braid, the Dutch braid flips the pattern — you cross each strand under the middle instead of over, using a scalp-tightening method that makes the braid pop up visibly.
- texture-boost spray for grip on slippery hair
- Cross right under center, then left under center
- Add small sections before each cross-under
- Secure with protective elastic types to prevent breakage
Finish With a Regular Braid

Once all the scalp hair is incorporated, drop into a regular three-strand pattern to close it out.
Elastic Type Selection matters here — grab a fabric-covered or clear elastic hair band, never a rubber one. Secure the last inch or two firmly.
Apply hairspray lightly, then use the Pancake Textured Finish method — gentle side-tugs — for volume.
Add shine serum and any accessories for finishing touches for salon-quality braid results.
Avoid Common Braiding Mistakes

Tight braids feel secure, but they’re one of the most common braiding mistakes to avoid — scalp pain is your warning sign. Ease up before your edges pay the price.
Edge Protection starts with not over-pulling the hairline. Skip heavy creams to prevent Product Buildup, which dulls the braid and invites Hair Breakage. A light texturizer addresses Flyaway Management without weighing strands down.
Style Braids for Everyday Wear

French and Dutch braids aren’t just for special occasions — they translate beautifully into everyday wear. Swap between Side Braid Variations for casual Fridays, or lean into Fishtail Braid Benefits when you want thin hair to look fuller.
Rope Braid Speed makes rushed mornings manageable.
Accessory Styling Ideas, like a small ribbon or clip to personalize any style without extra effort.
Top 5 Hair Braiding Tools
Having the right tools makes braiding so much easier — and honestly, more enjoyable. A few well-chosen products can save you time, reduce frustration, and help your braids look cleaner from start to finish.
Here are five tools worth keeping in your kit.
1. Women’s Hair Braiding Kit French Braiders
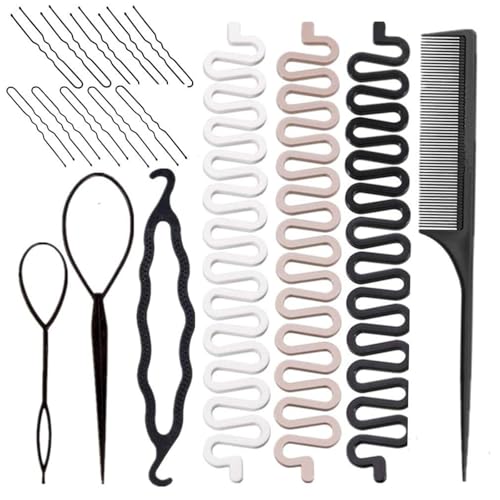
At just $4.99, this braiding kit packs a surprising amount into a small package. You get three French braider tools in white, beige, and black, plus topsy tail tools, a plastic bun maker, 10 U-shaped pins, and a comb — everything in one slim case.
It’s lightweight at under 2 oz, so it won’t weigh down your bag.
Perfect if you’re just starting out or want a portable option for touch-ups on the go. Keep in mind that plastic pins may bend under heavy use.
| Best For | Beginners and on-the-go stylists who want an affordable, all-in-one braiding kit without spending a lot. |
|---|---|
| Material | Plastic |
| Hair Types | All lengths and textures |
| Portability | Compact kit |
| Quantity | Multi-piece set |
| Occasion Use | Everyday and special occasions |
| Price Range | $4.99 |
| Additional Features |
|
- Great value at $4.99 — you get a full set of tools for less than a cup of coffee
- Covers a wide range of styles, from French braids to buns and twists
- Super lightweight and easy to toss in a bag for touch-ups anywhere
- Plastic components can bend or break with heavy use
- U-shaped pins may struggle with very fine or very thick hair
- At least one reviewer noted the tools didn’t work as expected, so quality can be hit or miss
2. AKOAK Fish Bone Braid DIY Tool
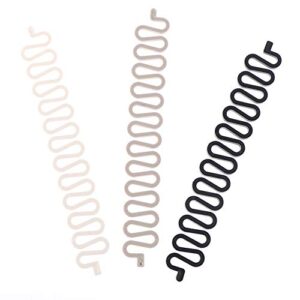
Want something a little more focused on fishtail and twist styles? The AKOAK Fish Bone Braid DIY Tool is built exactly for that.
It comes as a set of three nylon tools — black, gray, and white — each about 19.5 cm long and weighing roughly 12 grams.
The zigzag shape guides your hair sections into place as you cross them through, which helps beginners keep the pattern even.
Just note that thick or wavy hair can be a bit trickier to thread through the loops.
| Best For | Beginners who want to nail fishtail and twist braids without spending hours practicing the technique. |
|---|---|
| Material | Nylon/Plastic |
| Hair Types | Straight, curly, thick, thin |
| Portability | Travel-friendly |
| Quantity | 3 pieces |
| Occasion Use | Parties, weddings, everyday |
| Price Range | Budget-friendly |
| Additional Features |
|
- Comes in a set of three so you always have a backup (or can share with a friend)
- Super lightweight and compact — toss it in your bag and forget about it until you need it
- Works across a range of hair types, from straight to curly
- Thick or wavy hair can be a real pain to thread through the loops
- The loops sit pretty close together, so the finished braid might look tighter than you’d like
- Instructions are minimal, so expect a learning curve before it clicks
3. Quick Hair Beader Tool Set
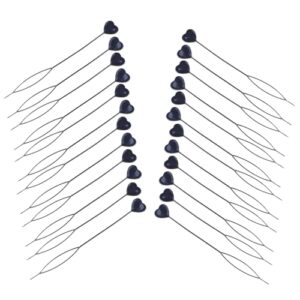
If you’re into adding beads to your braids, this tool set changes the whole process. The Quick Hair Beader Set comes with 24 flexible plastic loops — each about 7.87 inches long — small enough to tuck into your bag.
Load the beads onto the loop first, thread your hair through, then pull the tool back. The beads slide right into place without the usual wrestling match.
It’s designed for braids, ponytails, and everyday bead styling, even for beginners.
| Best For | Anyone who loves beaded braids but wants to skip the frustration — great for beginners and on-the-go styling. |
|---|---|
| Material | Plastic |
| Hair Types | All hair types |
| Portability | Handbag-sized |
| Quantity | 24 pieces |
| Occasion Use | Events and daily styling |
| Price Range | Budget-friendly |
| Additional Features |
|
- Comes with 24 tools, so you’ve got plenty to work with and share
- Compact enough to toss in a bag for travel or last-minute touch-ups
- Works for more than just hair — handy for jewelry beading and small craft projects too
- Can snap or warp under too much tension, especially on thick or dense hair
- The small loop size isn’t ideal if you’re going for big, voluminous braids
- Not heat-safe, so keep these away from hot tools and open flames
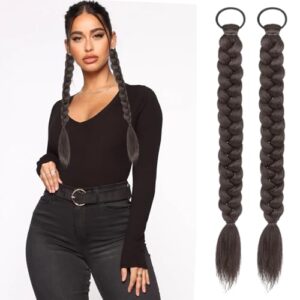
4. Braided Synthetic Black Ponytail Extension
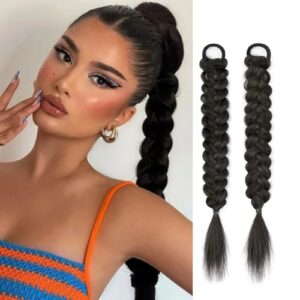
Sometimes the fastest upgrade isn’t a new technique — it’s grabbing the right extension.
This Braided Synthetic Black Ponytail Extension comes as a pair of 16-inch pieces, each with an elastic headband base that loops right onto your natural hair in seconds.
At under 3 ounces total, it won’t drag or feel heavy.
It’s best for straight, everyday looks rather than chunky styles, but for school, work, or a last-minute event, it genuinely delivers.
| Best For | Anyone with short or fine hair who wants a quick length boost for school, work, or a last-minute event without any permanent commitment. |
|---|---|
| Material | Synthetic Fiber |
| Hair Types | Short or fine hair |
| Portability | Lightweight |
| Quantity | 2 pieces |
| Occasion Use | School, work, parties, cosplay |
| Price Range | Mid-range |
| Additional Features |
|
- Super lightweight at under 3 oz — you’ll barely notice it’s there
- Clips on and off in seconds, no salon skills needed
- Comes as a pair, so you get two pieces to work with right out of the box
- The braid runs thin, so don’t expect a bold, chunky look
- Color may not match exactly what you see in the listing
- Synthetic fibers can tangle, and the elastic band may struggle with thicker hair
5. MEIYIFANG Synthetic Twist Braid Ponytail Hair Extensions
If you want something with a little more personality, the MEIYIFANG Synthetic Twist Braid Ponytail Hair Extensions are worth a look.
Each pack comes with two twist braids and snaps on with a rubber-band base — no bobby pins, no fuss. You can wear it as a ponytail, coil it into a bun, or loosen the fibers for extra volume.
At $8.99 for two pieces, it’s available in seven colors, including natural shades and fashion options like Sakura Pink and Haze Blue.
| Best For | Anyone who wants a quick, playful hairstyle without the commitment — especially great for girls or women with short or fine hair heading to a party, photoshoot, or just a fun day out. |
|---|---|
| Material | Synthetic Fiber |
| Hair Types | Short or difficult-to-manage hair |
| Portability | Quick attach/remove |
| Quantity | 2 pieces |
| Occasion Use | Parties, photoshoots, performances |
| Price Range | $8.99 |
| Additional Features |
|
- Snaps on in seconds with the rubber-band base — no pins, no hassle
- Super versatile: wear it as a ponytail, twist it into a bun, or fluff it out for volume
- Seven color options, including fun picks like Sakura Pink and Haze Blue, all for under $9
- The rubber band can wear out faster than you’d hope, so it may not hold up long-term
- Only low-heat styling works here — don’t reach for your hot tools
- The braids run short, so if you have long hair or need serious coverage, they might not cut it
Frequently Asked Questions (FAQs)
How do you make a braid?
Picture three strands dancing over each other, left over middle, right over middle, repeating until the end. That’s the whole secret. Keep tension steady, and you’ve got a braid.
How to make braids a good hairstyle?
Braids look great when you match the style to your face shape, use the right tension, and finish with a light hairspray to tame flyaways and lock the shape.
Can I Braid my own hair?
Yes, you can absolutely braid your own hair. It takes practice, but with two mirrors, clean sections, and steady hands, you’ll get the hang of it faster than you’d expect.
How do you braid a hairline?
Take a C-shaped section one inch back from your hairline, cross strands under in Dutch style, and follow the curve past your ear, adding small sections as you go.
What is a boxer braid?
boxer braid is a pair of Dutch braids split down a center part, crossing strands under instead of over.
This creates raised, rope-like ridge that sits tight against your scalp.
What is a cornrow braid?
cornrow braid is a three-strand braid woven tight against the scalp in a raised row. It follows the head’s shape and uses an underhand motion, picking up new hair as it moves.
How do you do a reverse French braid?
A reverse French braid, also called a Dutch braid, crosses each outer strand under the middle instead of over it.
That one switch makes the braid pop up raised and visible on top.
What is the easiest braid for beginners?
The three-strand braid is your best starting point. You split hair into three sections, cross left over middle, then right over middle — and just keep repeating.
Simple, satisfying, and quick to master.
Is it easier to braid wet or dry?
Damp hair is the sweet spot. It’s easier to handle than dry, without the fragility of soaking-wet strands. Aim for about 80% dry — manageable, grippy, and far less likely to snap.
How to do a simple 3 strand braid?
Divide your hair into three equal sections — left, middle, and right. Cross the left over the middle, then the right over the middle.
Repeat until you reach the ends, then secure with an elastic.
Conclusion
Ironically, mastering how to braid hair requires patience, not perfect execution.
As you practice, you’ll find that braiding becomes second nature, and you’ll be able to create intricate styles with ease, using the technique of how to braid hair to achieve stunning looks. With consistent practice, your fingers will learn to weave strands together seamlessly, resulting in beautiful, long-lasting braids.
- https://link.springer.com/10.1007/s11250-024-04007-w
- https://iopscience.iop.org/article/10.1088/1755-1315/788/1/012153
- https://un-ruly.com/alternatives-to-box-parts-for-braids/
- https://www.americansalon.com/step-by-steps/how-to-section-hair-precision-and-accuracy
- https://www.samvilla.com/blogs/hair-tutorials/how-to-section-hair-with-precision-and-accuracy