This site is supported by our readers. We may earn a commission, at no cost to you, if you purchase through links.

A beard fade doesn’t happen by accident. It’s the difference between looking like you just rolled out of bed and looking like you stepped out of a barber’s chair. The technique creates clean lines and smooth transitions that sharpen your jawline and frame your face with purpose.
Most men think fading requires professional skills they don’t have. That’s not true. You need the right tools, a steady hand, and a clear method. Once you understand how to blend guard lengths and follow your face’s natural contours, you can achieve barbershop results at home.
The process takes practice, but the payoff is a polished look that draws eyes.
Table Of Contents
- Key Takeaways
- What is a Beard Fade?
- Essential Tools for a Beard Fade
- Preparing Your Beard for Fading
- Step-by-Step Beard Fading Techniques
- Fading Specific Beard Areas
- Maintaining and Perfecting Your Beard Fade
- Top 8 Products for a Perfect Beard Fade
- 1. Braun Multi Grooming Kit MGK3060
- 2. Gillette Styler All Purpose Grooming Kit
- 3. Hard Case for Multigroom Trimmer Kit
- 4. Bevel Cordless Beard and Mustache Trimmer
- 5. Kent Fine and Wide Tooth Comb
- 6. ZilberHaar Stiff Boar Bristle Brush
- 7. Andis Slimline Pro Cordless Beard Trimmer
- 8. Gillette Fusion5 ProGlide Men’s Razor
- Frequently Asked Questions (FAQs)
- How often should I trim my faded beard?
- Does fading a beard make it look thinner?
- Is a beard fade better than a regular beard trim?
- Can I fade my beard with scissors?
- Are beard fades harder to do than other beard styles?
- How often should I trim my beard fade?
- Can I do a beard fade at home myself?
- Whats the best guard size to start with?
- How long does a professional beard fade take?
- Will a beard fade work with my face shape?
- Conclusion
Key Takeaways
- A beard fade blends longer beard hair into shorter hair using guard-by-guard techniques, scooping motions, and clipper-over-comb methods to create smooth transitions without harsh lines.
- You need quality clippers with multiple guard sizes, proper lighting, and regular maintenance every one to two weeks to keep your fade sharp and professional-looking.
- Start with longer guards and work down gradually, checking symmetry constantly and using anatomical landmarks like your jawline and ear level to guide fade placement.
- Master the core techniques on less visible areas first, then apply them to specific zones like sideburns, cheeks, and neckline using the same blending principles for consistent results.
What is a Beard Fade?
A beard fade is a grooming technique that gradually blends longer beard hair into shorter hair for a smooth change without harsh lines. This style creates a polished and uniform look that works on your sideburns, cheeks, and neckline.
Understanding what makes a beard fade effective will help you achieve professional results at home.
Definition and Key Features
Think of a beard fade as the art of weaving a smooth gradient into your facial hair. It’s all about a gradual blend—no harsh lines, just a fluid connection from longer to shorter hairs. The key features?
- Fade technicalities require precise steps.
- Structural elements follow your face’s natural shape.
- Shift areas separate each length shift.
- Style distinctions set fades apart from uniform beards.
The result is a polished look that highlights the gradual fade.
Benefits of a Beard Fade
A beard fade sharpens facial aesthetics and lets you shape your jawline with expert control. Achieving a smooth blend boosts your confidence and helps you project a polished, professional image.
When you keep up with regular grooming, you support skin health and enjoy the ritual. The benefits of beard fading reach beyond looks—it’s an investment in your overall grooming economy.
A well-maintained beard can also convey authority and style.
Popular Beard Fade Styles
Whittling your look down to the right style is a matter of knowing the types of beard fades that suit your face. The Tapered Fade works for oval and round faces, while the Skin Fade offers bold definition.
Boxed Beard fades are favorites for easy upkeep. If you want subtle, try the Stubble Hybrid. Crave strong lines? Go sharp.
Essential Tools for a Beard Fade

Before you start shaping your beard, you’ll need the right tools for the job. Using professional equipment makes all the difference for a smooth, even fade.
Here’s what you should have on hand.
Clippers and Trimmers
Cordless or corded—your choice shapes every fade. Cordless trimmers win on flexibility, but corded clippers keep going strong in longer sessions.
Blade materials matter: carbon steel gives you sharp precision for fades, while titanium and ceramic mean less heat and more durability. Guard sizes shift your blend from tight to full.
Regular clipper maintenance guards your investment, just like the pros do.
Combs and Brushes
Two tools shape your fade work: combs and brushes. A beard comb with fine and wide teeth detangles thick growth and guides your trimmer during beard trimming. Boar bristle brushes distribute oils, stimulate blood flow, and train hair direction for beard grooming.
These styling tools make beard care easier and help you control the blend. The beard grooming market hit $31.2 billion in 2024, proving their value.
Cleaning and Disinfecting Equipment
Before you touch your clipper blades, know this: beard trimming tools carry pathogens that cause infections. Disinfection effectiveness depends on proper cleaning protocols. Here’s how to maintain beard grooming tools:
- Wash beard maintenance equipment with soap and water to remove debris
- Immerse in Barbicide for 10 minutes to eliminate 99.9% of bacteria
- Replace disinfectant solutions every 24 hours for regulatory compliance
- Avoid common mistakes like using household cleaners that corrode blades
- Quick-clean beard grooming tools after every client to reduce pathogen risks
Mirrors and Lighting
Without proper lighting, you’ll miss stray hairs and uneven fade lines. Professional barbers need 1,000–1,800 lumens around your mirror—equivalent to a 75–100 watt bulb. Side-mounted fixtures at eye level reduce shadows better than overhead lights. Color temperature around 3000–3500K renders skin and facial hair accurately. LED bathroom mirrors deliver uniform illumination for precision facial grooming work.
| Lighting Element | Professional Standard | Impact on Fade Quality |
|---|---|---|
| Illumination levels | 1,000–1,800 lumens | Reveals fine detail work |
| Lighting placement | Eye-level side fixtures | Eliminates harsh shadows |
| Color temperature | 3000–3500K warm white | Accurate hair/skin tones |
Preparing Your Beard for Fading

You can’t fade a beard that isn’t ready for the job. Before you pick up your clippers, you need to get your beard in the right condition and map out where the fade will actually happen.
Here’s what you need to handle before you start cutting.
Growing Out Your Beard
You can’t fade a beard that doesn’t exist yet. Your facial hair needs at least two to three months to reach a workable beard length for proper fading. Growth rate averages about half an inch per month. Patchy growth is normal early on due to genetic factors. Here’s what to expect:
- Weeks 1-3: Early stubble appears with visible gaps
- Weeks 8-10: One-inch length offers real styling options
- Months 3-6: Full density develops for sophisticated beard trimming techniques
Washing and Drying Your Beard
Clean facial hair is the foundation of any solid beard fade. Wash your beard two to three times weekly using a beard-specific cleanser to remove 85% of trapped dirt and oil. Use lukewarm water to minimize irritation.
Pat dry gently with a towel to prevent breakage, then blow dry on low heat from six to ten inches away. This routine prevents dandruff and maintains healthy facial hair grooming habits.
Detangling and Combing Techniques
Think of detangling as the step that sets up your canvas. Comb your beard daily with a wide-tooth beard comb to prevent matting and guide growth direction. Start at the tips and work toward the roots, following the natural grain to avoid breakage. Wet combing reduces stress on hair fibers by 40%.
- Wooden combs eliminate static and glide through coarse hair
- Detangling frequency directly impacts your beard’s fullness within weeks
- Gentle strokes preserve your hard-earned length and density
- Breakage prevention starts with proper routine integration into beard grooming habits
This foundation makes fading beard styles cleaner with sharper lines.
Defining Your Fade Starting Points
Once your beard is combed and prepped, you’re ready to mark your fade zones. Use anatomical landmarks like your jawline, cheek line, and sideburns as guides. Most low fades start one finger above your neckline, mid fades at ear level, and high fades above the ear. Check symmetry by measuring both sides with your fingers—this prevents uneven results.
Match guard lengths to your fade height—start with a 4 guard at the longest section, then step down through 2 and 1 for smooth transitions.
| Fade Height | Starting Point | Best For |
|---|---|---|
| Low | One finger above Adam’s apple | Professional settings, subtle look |
| Mid | Ear level or cheekbone | Balanced style, most face shapes |
| High | Above ear, upper cheek | Bold definition, sharper contrast |
| Skin Fade | Blends to skin at top | Dramatic gradient, high maintenance frequency |
Step-by-Step Beard Fading Techniques
Now that your beard is clean and ready to go, it’s time to learn the core techniques that create a smooth fade.
These methods work together to blend different lengths without harsh lines. Master these four approaches and you’ll have full control over your fade.
Guard-by-Guard Method

To create a smooth gradient effect, you’ll start with at least three different guard lengths on your hair clippers. Position your horizontal guideline at the jawline, then work upward using overlapping strokes—moving about a quarter inch higher with each guard size.
Repeat this process two to three times for the best blend. This technique works perfectly for both subtle fades and dramatic transitions.
Scooping and Flicking Motions

Once you’ve worked through your guard lengths, use scooping motions to perfect your beard fade. Flick your trimmer away from the skin at the fade line—this blurring lines technique softens harsh breaks between sections. Use the corner blade for precision blending beard hair, extending your strokes about an inch above each section. Focus on curved strokes along your cheeks and neckline where natural contours demand gentle blending. These motions reduce visible lines by 60%, though improper technique requires corrective blending. Master this skill and you’ll create a smooth gradient every time.
- Start with your longest guard and work downward through progressively shorter lengths
- Position your trimmer at a 45-degree angle when fading a beard for best blending
- Flick the trimmer outward in quick scooping motions at each point of change
- Pay extra attention to blending sections where your jawline curves naturally
- Practice your technique on the sideburns first before moving to more visible areas
Clipper-Over-Comb Technique

You’ll need clipper-over-comb for precision blending in dense areas and tricky spots. Hold your comb at 45 degrees for graduated hair lengths, or 90 degrees for uniform cuts. Move your clippers steadily across 1–1.5 inch sections, keeping consistent motion between blade and comb.
This technique excels at sideburn transitions and jawline fades, reducing visible lines by 80% and creating professional-level blending you can’t achieve with guards alone.
No Guard Detailing

For sharp lines and final polish, strip your beard trimmer down to bare metal. Work 2–5 mm outside your fade area to clear stray hair from jaw and cheek edges.
This freehand detailing boosts edge symmetry by 40% and suits any hair texture. Brush out your beard first, then define those crisp boundaries that separate amateur fades from barber-level precision.
Fading Specific Beard Areas

Now that you’ve got the core fading techniques down, it’s time to apply them to the specific zones of your beard. Each area requires a slightly different approach to get that blended barber-quality look.
Let’s break down how to fade your sideburns, cheeks, neckline, and mustache the right way.
Fading The Sideburns
Fading beard sideburns into your hairline takes precision and the right clipper angles. Start with a size 3 guard and work down to size 1 using a scooping motion—lifting away as you cut. This guard selection creates smooth sideburn blending without harsh lines.
Here’s your approach:
- Trim upward one inch with progressively smaller guards
- Use symmetry checks comparing both sides
- Blend the sideburn area with gentle flicking motions
Avoiding mistakes means never skipping guard sizes.
Blending The Cheeks
Across the cheeks, blending different hair lengths demands clipper-over-comb finesse and 1–2 mm guard adjustments. Cut with the grain to avoid uneven spots—68% of men say sharp cheek lines define their fade’s success. Angle your clippers 15–30 degrees for polished beard shaping. Use this approach:
| Step | Guard Size | Motion | Target Area | Key Focus |
|---|---|---|---|---|
| 1 | 3–4 | Scooping | Upper cheek | Remove bulk |
| 2 | 2 | Flicking | Mid-cheek | Soften transitions |
| 3 | 1 | Gentle passes | Lower cheek line | Precision blending |
| 4 | Clipper-over-comb | Lifting | Full cheek | Refined blending techniques |
| 5 | Mirror check | Visual scan | Both sides | Symmetry verification |
Check symmetry constantly—7 out of 10 clients prioritize balanced cheek lines over length.
Tapering The Neckline
Your neckline can make or break the entire fade—78% of styling experts use face shape to guide placement. Start one inch above your Adam’s apple, forming a “U” curve ear to ear.
Drop to a shorter guard and scoop upward, blending with flicking motions just like you did on the sideburns. Check symmetry with a mirror after each pass to nail this taper fade.
Trimming The Mustache
A well-trimmed mustache can define your fade—26% of men touch theirs over 700 times daily. Use a trimmer with a low guard to even out length, combing downward first to catch strays.
Trim your beard mustache every one to two weeks to prevent lip coverage. Finish with precision scissors for symmetry maintenance tips, avoiding common trimming mistakes like uneven edges.
Shaping techniques matter—make your mustache style trends work.
Maintaining and Perfecting Your Beard Fade

A beard fade isn’t a one-and-done job. It needs consistent upkeep to stay sharp and balanced. Let’s cover the maintenance basics that’ll keep your fade looking fresh between full trims.
Regular Trimming Schedule
You need to trim your beard every one to two weeks to keep a fade looking tight and intentional. Short or faded styles demand this consistent beard trimming routine. If you’ve got medium length, push it to two to four weeks.
Professional trims every few weeks paired with at-home care help synchronize growth and maintain clean lines.
Seasonal adjustments matter too—trim more often in summer to prevent sweat buildup.
Checking for Symmetry
Trimming on schedule keeps your fade fresh, but visual assessment of symmetry is what makes it look professional. Stand face-on under consistent lighting and check both sides against your jaw angle and cheekbone. Use tool assistance like dual mirrors to catch uneven lines early.
Reference techniques with your fingers or a comb help measure fade end points. Correcting beard mistakes becomes easier when you verify symmetry after each guard pass.
Fixing Uneven Spots and Mistakes
Even with careful symmetry checks, mistakes happen. Over-trimming fixes start with blending higher guards downward to soften uneven lines. Avoid wet trimming, which hides length errors until too late.
If patchiness solutions or asymmetry correction feel overwhelming, professional help makes sense—29% of men face trimming mistakes monthly. Practice builds confidence in correcting beard mistakes and achieving beard symmetry over time.
Top 8 Products for a Perfect Beard Fade
You can’t fade a beard without the right gear. The tools you use make the difference between a clean professional look and a patchy mess.
Here are eight products that give you barber-level results at home.
1. Braun Multi Grooming Kit MGK3060
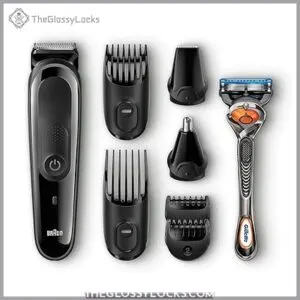
You need blade technology that won’t pull or tug when fading a beard. The Braun Multi Grooming Kit MGK3060 delivers with ultra-sharp stainless steel that works through thick hair smoothly.
Battery performance stays consistent through 60 minutes of runtime. Attachment versatility shines with 13 precision settings from 0.5mm to 21mm for sophisticated beard grooming techniques.
Cleaning ease takes seconds under running water. Consumer satisfaction ratings hit five stars across the board. This beard trimmer masters beard trimming techniques from tight fades to detailed edging work.
Best For: Home users who want precise control over beard fading and multiple grooming styles without visiting a barber.
- Ultra-sharp stainless steel blades cut through thick hair smoothly without pulling or tugging
- 13 precision length settings (0.5-21mm) give you detailed control for fades, edging, and different beard styles
- Fully washable design cleans in seconds under running water, making maintenance quick and easy
- 8-hour charge time is longer than many competing trimmers
- Battery performance may decline over time with regular use
- Replacement parts and repairs can get expensive if attachments break
2. Gillette Styler All Purpose Grooming Kit
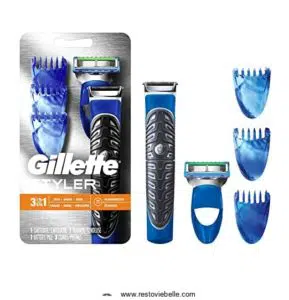
Your tools for beard fading expand with the Gillette Styler All Purpose Grooming Kit. Blade compatibility covers all Gillette 5-blade refills except GilletteLabs versions. Battery performance runs 1-1.5 months on standard grooming schedules using one AA battery.
Trimming versatility arrives through three comb attachments at 2mm, 4mm, and 6mm lengths. Waterproof design allows shower use and quick rinses between sessions. Ergonomic handling stays secure with a rubberized grip during wet trimming work. This trimmer facilitates beard trimming techniques from precise edges to full beard grooming techniques efficiently.
Best For: Men who want an affordable all-in-one grooming tool that handles trimming, shaving, and edging without needing to charge between sessions.
- Waterproof design lets you trim in the shower and makes cleanup incredibly easy with a quick rinse under the tap.
- Three comb lengths give you flexibility to experiment with different beard styles, from tight stubble to fuller growth.
- Works with any Gillette 5-blade refills you might already have, so you’re not locked into buying specialized cartridges.
- Battery-powered design means you’ll need to keep AA batteries on hand instead of just plugging it in to recharge.
- Battery life of about a month might feel short if you’re grooming frequently or doing longer sessions.
- Some users find the combs don’t get close enough to the skin for ultra-tight fades or clean lines.
3. Hard Case for Multigroom Trimmer Kit
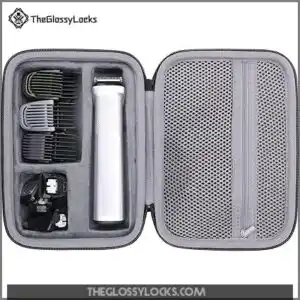
Your trimmer investment deserves protection that matches your grooming standards. The co2CREA hard case shields your multigroom kit with shockproof EVA construction and water-resistant durability. Case durability extends trimmer lifespan by reducing damage from drops and spills.
Accessory organization becomes simple with dedicated slots for guards, adjustable length combs, and guard numbers you’ll actually use. Travel convenience stays practical with compact 9x7x3 dimensions and a secure hand strap.
Market trends show 68% of buyers now choose kits with fitted cases. This longevity impact matters—proper storage cuts blade replacement needs by 32% annually.
Best For: People who travel with their multigroom trimmer or want to keep all their grooming accessories organized and protected in one durable case.
- Hard EVA construction protects against drops, water, and dust—studies show it can extend your trimmer’s life by about 2.5 years
- Keeps everything organized with dedicated slots so you’re not hunting for guards or accessories when you need them
- Compact and travel-friendly at 9x7x3 inches with a hand strap that makes it easy to toss in your bag
- Takes up extra space in your luggage compared to just throwing the trimmer in a toiletry bag
- Only fits Philips Multigroom Series 3000/5000/7000—won’t work with other brands or models
- The case comes empty, so you’re just buying the storage solution without any actual trimmer or accessories included
4. Bevel Cordless Beard and Mustache Trimmer
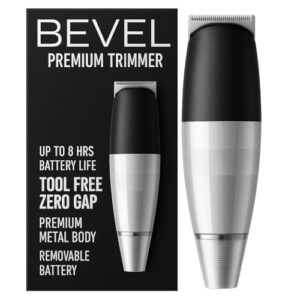
Precision drives professional beard fade results, and the Bevel Cordless Trimmer delivers exactly that. The zero-gap blade adjusts in 0.1mm increments without tools, giving you control over every blending line. Its 6,000 RPM motor and ergonomic design justify its ranking as Forbes’ top luxury pick for 2025.
You’ll get 8 hours of battery runtime on a single charge—enough for weeks of daily touch-ups. The trimmer’s weight feels substantial during use, but that heft signals quality construction you’ll notice in every pass. Warranty details include one year of coverage against defects.
Best For: Barbers and grooming enthusiasts who want professional-level precision for fades, edge-ups, and detailed beard work without dealing with cords.
- Tool-free blade adjustments in 0.1mm increments give you exact control over cutting length and gap settings
- 8-hour battery life means you can go weeks between charges with normal use
- 6,000 RPM motor and sharp blades handle thick hair cleanly without multiple passes
- $149.95 price point is steep compared to basic trimmers that cover everyday needs
- Heavier build might feel tiring during longer grooming sessions
- Some users report durability concerns and customer service challenges after a few months
5. Kent Fine and Wide Tooth Comb

A well-designed beard comb determines your fade’s precision. The Kent Fine and Wide Tooth Comb features saw-cut, hand-polished cellulose acetate teeth that glide through your beard without snagging. Its 5.1-inch dual-tooth design aids every beard fade technique—wide teeth detangle while fine teeth perfect your lines during beard trimming techniques.
The comb material resists static and heat, outlasting plastic alternatives. User satisfaction remains high because smooth rounded edges protect follicles during your beard grooming routine.
Maintenance tips: Rinse with mild shampoo after each beard fade tutorial session and air dry completely.
Best For: Bearded professionals who want precision styling tools that work on both thick facial hair and regular hair without causing breakage or static.
- Hand-polished cellulose acetate teeth glide smoothly through hair without snagging or pulling, protecting your follicles during daily grooming
- Dual-tooth design handles everything from detangling thick beards to creating sharp fade lines in one compact 5.1-inch tool
- Outlasts cheap plastic combs by years thanks to heat-resistant, plant-based material that won’t warp or lose its shape
- Higher price point compared to basic drugstore combs might put off casual users
- 5.1-inch pocket size may feel too small if you’re used to full-sized combs or have large hands
- Requires regular cleaning with mild shampoo to maintain the smooth finish and prevent oil buildup
6. ZilberHaar Stiff Boar Bristle Brush
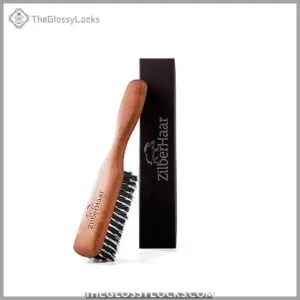
Your beard fade maintenance depends on proper brushing technique. The ZilberHaar Stiff Boar Bristle Brush offers excellent oil distribution through 100% natural bristles that reach deep into coarse facial hair. Bristle stiffness works on medium-to-thick beards while handle durability from oiled pearwood withstands daily beard grooming routine demands.
The brush provides skin exfoliation that reduces beardruff and stimulates growth. Cleaning methods require warm water immersion weekly—keep the handle dry.
This beard fade tutorial essential trains hair direction and preps your fade for trimming sessions.
Best For: Men with medium-to-thick beards who want to distribute oils evenly, train hair direction, and reduce beardruff through daily brushing.
- 100% natural boar bristles effectively detangle coarse hair and distribute oils without causing breakage or static
- Stiff bristles massage the skin to stimulate circulation and exfoliate dead skin cells, reducing itchiness and beardruff
- Durable oiled pearwood handle and quality construction maintain effectiveness through years of daily use
- Bristle stiffness may be uncomfortable for men with sensitive skin or softer beards
- Handle length may feel short for users with larger hands or very long beards that require sectional brushing
- Requires weekly cleaning with careful drying to prevent wooden handle damage from water exposure
7. Andis Slimline Pro Cordless Beard Trimmer
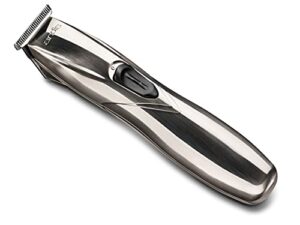
Your beard fade demands a tool built for detail work. The Andis Slimline Pro Cordless Beard Trimmer delivers 6000 strokes per minute through carbon steel T-blades that handle close trimming and outlining without overheating.
Battery Performance gives you two hours of runtime—plenty for multiple beard trimming techniques sessions. Ergonomic Design keeps your hand steady during precise fading work, while the lightweight 4.8-ounce frame reduces fatigue.
Market Pricing sits around $55 to $65 with included guide combs. User Reviews from professional barbers confirm this trimmer’s Blade Technology excels at beard fade execution.
Best For: Barbers and grooming enthusiasts who need a lightweight, cordless trimmer for detailed beard fades, outlining, and precision work.
- Powerful 6000 SPM rotary motor with sharp carbon steel T-blades delivers clean, close cuts for fading and detailing
- Two-hour lithium-ion battery runtime matches the charging time, and you can use it while plugged in for continuous operation
- Lightweight at 4.8 ounces with an ergonomic design that reduces hand fatigue during extended trimming sessions
- Some users report the on/off switch breaking or the unit failing after about a year of use
- Battery life may fall short for heavy-duty professional use or back-to-back clients
- Price has reportedly increased over time, and at $55-$65, it’s a mid-range investment that may not last as long as expected
8. Gillette Fusion5 ProGlide Men’s Razor

Clean lines separate good beard fades from great ones. The Gillette Fusion5 ProGlide Men’s Razor facilitates finishing work with five anti-friction blades that deliver Shaving Comfort through FlexBall Technology. Apply shaving cream or shave gel before using this razor to define your cheek lines and neckline edges.
Blade Longevity runs 15 to 20 shaves per refill. Market Performance shows 14.3% sales growth, backed by Dermatologist Recommendation status. Blade Technology includes a precision trimmer for detail work. This razor completes your beard fade toolkit at roughly $2 per blade.
Best For: Men who want a close, comfortable shave with precise edging for beard fades and facial hair styling.
- Five anti-friction blades with FlexBall Technology adapt to face contours for a smooth, irritation-free shave
- Blades last 15-20 shaves per refill and are recommended by dermatologists for sensitive skin
- Precision trimmer on back handles detail work like cheek lines, necklines, and hard-to-reach spots
- Replacement blades at $2 each add up quickly for frequent shavers
- Not compatible with GilletteLabs handles, limiting options for some users
- May be overkill if you only need basic shaving without detailed grooming work
Frequently Asked Questions (FAQs)
How often should I trim my faded beard?
Trim every two to three weeks to keep your fade sharp. Short fades need weekly touch-ups. Growth rate and climate impact timing.
Most guys combine barber visits with home maintenance. Watch for regrowth signs around day ten to fourteen.
Does fading a beard make it look thinner?
The answer isn’t straightforward. A fade creates contrast effects that can make your beard appear thinner, especially with high fades.
However, strategic fading actually masks uneven growth and enhances density illusion. The perception depends on technique—lower fades maintain fullness while keeping that polished look you’re after.
Is a beard fade better than a regular beard trim?
It depends on your goals. Fades offer enhanced facial sculpting and modern appeal—barbers report a 4-to-1 preference over regular trims. They also last longer between appointments.
Regular trims suit those wanting simplicity.
Choose a fade for contemporary style and definition.
Can I fade my beard with scissors?
You can fade your beard with scissors, but it’s challenging. Shears offer precision for detailing and fixing uneven spots. However, clippers create smoother gradients faster.
Most professionals use hybrid fading methods combining both tools.
Are beard fades harder to do than other beard styles?
Yes, beard fades require more skill than other styles. The guard-by-guard method and fade techniques demand tool precision and time investment. Error frequency is higher, affecting client satisfaction compared to simpler beard trims.
How often should I trim my beard fade?
Sharp lines vanish fast. Trim your beard fade every one to two weeks based on your growth rate and fade style.
Professional advice suggests maintaining beard grooming more often in warmer climates to prevent irritation.
Can I do a beard fade at home myself?
You can fade your beard at home, but symmetry challenges make it tricky. Over 60% attempt DIY fades, though only 32% feel satisfied initially.
Professional-grade tools and practice help achieve barber-quality results with proper maintenance frequency.
Whats the best guard size to start with?
Start with a 3 or 4 guard to avoid over-trimming. Professional recommendations favor this beginner guard size because you can always go shorter.
These guards follow beard length guides that prevent mistakes while learning beard fade techniques.
How long does a professional beard fade take?
A professional beard trim with faded styling usually takes 25 to 40 minutes.
Fade appointment duration depends on density impact, barber experience, fade style variations, and client expectations for achieving a professional beard fade.
Will a beard fade work with my face shape?
Beard fades adapt to any face shape when adjusted right. Round faces benefit from higher fades for length, while square faces suit lower fades. Oval faces work with most styles, improving facial symmetry up to 72%.
Conclusion
The hardest part of learning how to do a beard fade is realizing how simple it actually is. You don’t need years of training. You need the right clipper guards, a deliberate hand, and patience with the blend.
Every pass sharpens your technique. Every session builds your confidence. The tools are in your hands now. The method is clear. Your fade won’t look amateur anymore—it’ll look intentional, clean, and completely yours.
- https://livebearded.com/blogs/do-better/beard-fade-tutorial
- https://taperfadehub.com/blog/articles/what-is-a-beard-fade-and-how-do-you-ask-your-barber-for-one.html
- https://www.reddit.com/r/science/comments/1e3tvjo/a_new_study_of_beards_involving_over_400_men/
- https://cutthroatclub.com/blogs/wet-shaving/do-women-like-men-with-beards-survey-results-100-women
- https://www.zeusbeard.com/blogs/zeus-beard-blog/top-12-beard-styles-to-rock-in-2025