This site is supported by our readers. We may earn a commission, at no cost to you, if you purchase through links.

Your curls are gorgeous, but sometimes you want to switch things up and rock a sleek, straight look without causing a frizzy disaster. The challenge with curly hair is that those beautiful spirals come with a unique structure that reacts differently to heat than straight hair, which means you can’t just grab any flat iron and expect salon-worthy results.
Curly strands have higher porosity and uneven moisture distribution along each coil, making them more vulnerable to heat damage, breakage, and that dreaded puffiness that shows up halfway through the day.
Understanding how to prep your curls properly, select the right temperature settings, and use protective products will transform your straightening routine from a hair-frying gamble into a damage-minimizing process that gives you smooth, lasting results.
Table Of Contents
- Key Takeaways
- Essential Prep Before Straightening Curly Hair
- Step-by-Step Guide to Straightening Curly Hair
- Top 3 Tools and Products for Curly Hair Straightening
- Tips for Protecting Curly Hair From Heat Damage
- Maintaining Straightened Curly Hair
- Frequently Asked Questions (FAQs)
- How often should you touch up your straightened hair?
- Can you straighten your hair if it’s wet?
- How long does it typically take to straighten curly hair?
- Can I straighten damp or wet curly hair?
- How long does straightened curly hair typically last?
- What causes hair to revert back to curly?
- Are there permanent straightening options for curly hair?
- Conclusion
Key Takeaways
- Curly hair’s high porosity and uneven moisture distribution make it more vulnerable to heat damage than straight hair, so you need sulfate-free cleansers, wide-toothed combs, and microfiber towels before applying any heat to protect your strands from breakage and frizz.
- The straightening process demands methodical sectioning (1-2 inch sections), temperature control based on hair texture (300-350°F for fine hair, 370-450°F for coarse), and the Chase Method—pairing your flat iron with a comb that glides ahead of the plates to reduce repeat passes and thermal stress.
- Heat protectant isn’t a one-time application—you must reapply every two to three passes or every 15-30 minutes during extended sessions because curly hair’s porosity quickly absorbs products, leaving strands exposed to cumulative damage that builds with each straightening session.
- Maintaining straightened curly hair requires weekly deep conditioning treatments with protein repair formulas, sleeping on silk pillowcases to reduce friction-induced frizz, and scheduling trims every six to eight weeks to prevent split ends from climbing up the shaft and undoing your styling work.
Essential Prep Before Straightening Curly Hair
You can’t just grab a flat iron and hope for the best—curly hair demands prep work if you want smooth, damage-free results. The right foundation protects your strands from heat while setting you up for a sleek finish that actually lasts.
Here’s what you need to do before any heat touches your hair.
Choosing The Right Shampoo and Conditioner
The foundation of any successful straightening session starts with a sulfate-free shampoo and moisturizing conditioner that respect your curl pattern and hair pH. Stripping natural oils will sabotage your efforts before you even pick up a flat iron. Choosing formulas designed for porosity care and moisture balance—whether you need a hydrating shampoo or keratin shampoo—ensures your curly hair can withstand the heat transformation ahead.
- Sulfate Free formulas prevent excessive drying and frizz
- Moisture Balance maintains elasticity during heat styling
- Porosity Care determines product absorption efficiency
- Hair pH around 4.5–5.5 seals cuticles naturally
- Curl Pattern alignment guides ingredient selection
Detangling With a Wide-toothed Comb
After you’ve selected the right cleanser, you need to detangle your curly hair with a wide-toothed comb before heat touches a single strand. Comb Tooth Design spacing between 6–9 mm distributes tension evenly across hair sections, preventing snapping and split ends that plague tighter curl patterns.
Start at your ends and work upward in small segments, holding each section taut but not stretched—this Gentle Detangling approach paired with a leave-in conditioner reduces breakage by up to 40% compared to fine-toothed tools, protecting Hair Fiber Care integrity before you apply any heat protectant or begin the straightening process.
Using a Microfiber Towel to Dry Hair
Once you’ve detangled, swap your cotton towel for a microfiber one. Its polyester-polyamide blend delivers Hair Absorbency that cuts drying time by up to 50% while slashing friction-induced frizz.
Gently squeeze sections from ends to roots instead of rubbing, preserving cuticle integrity and Frizz Reduction before you apply heat protectant. You’ll set the stage for smoother hair straightening with fewer heat-related consequences down the line.
Step-by-Step Guide to Straightening Curly Hair
Now that your hair is prepped and protected, you’re ready to transform those curls into sleek, straight strands. The key to success lies in working methodically through each step, using the right heat settings, and maintaining consistent technique from root to tip.
Follow these four essential steps to achieve salon-quality straightening results at home while keeping your curls healthy and damage-free.
Sectioning Hair for Even Straightening

When straightening curly hair, divide your hair into 4 to 8 manageable sections using sturdy clips to control each part during the heat application process. This sectioning strategy ensures even heating across every strand and prevents you from re-straightening already processed areas, which can lead to unnecessary damage.
Here’s how to master clip management and section size:
- Start at the nape and work upward to minimize tangling
- Keep each section 1 to 2 inches thick for consistent heat contact
- Secure unworked sections with clips to maintain dry, defined boundaries
Blow-drying Techniques for Curly Textures

Set your blowdryer to a low or medium heat setting—ideally between 300–350°F—and attach a concentrator nozzle to direct airflow downward along the hair shaft, which minimizes frizz and preserves moisture management during the drying process.
Work through each section with a paddle or round brush, using steady tension to smooth curl patterns, and reapply heat protectant between sections to maintain a protective barrier that aids effective heat optimization.
Using a Flat Iron With Temperature Control

Precision counts when choosing your heat setting—fine and wavy hair responds best between 300–350°F, while coarse textures need 370–450°F for effective straightening. You’ll want a flat iron with digital temperature control to prevent overshooting and causing cuticle damage.
Always use a heat protectant with silicone or polymer film formers before each pass to reduce moisture loss and shield strands from thermal stress.
The Chase Method for Sleek Results

The Chase Method pairs your flat iron with a fine-toothed comb or brush that glides just ahead of the plates, guiding each section smooth before heat locks it in—this coordinated motion cuts down repeat passes and improves heat distribution along every strand. Work at a steady pace from roots to ends, keeping the comb or brush pressed firmly so your styling tools stay in sync.
- Select ceramic or tourmaline plates that deliver even heat across the barrel for uniform styling.
- Apply heat protectant liberally before starting each section to shield against thermal stress.
- Use small, uniform sections no wider than your flat iron to guarantee full contact with your hair straightener.
- Move continuously without pausing mid-strand; hesitation concentrates heat and risks cuticle damage on curly hair.
Top 3 Tools and Products for Curly Hair Straightening
You can’t achieve sleek, straight results without the right arsenal of tools and products designed specifically for textured hair. The quality of your straightening brush, shampoo, and heat-styling tools directly impacts how smooth your finish looks and how well your hair withstands the process.
Here are three professional-grade essentials that will transform your curly straightening routine from frustrating to impeccable.
1. Blondme Rich Shampoo For Blonde Hair

You might assume blonde shampoo has no place in a straightening routine, but Blondme Rich Shampoo delivers sulfate-free benefits that matter for any hair color before you reach for your heat protectant and hair straightener.
This moisturizing powerhouse nourishes curly hair while maintaining blonde hair care and color-enhancing tones, preparing your strands for the heat ahead.
The 3D Bond Creation Technology minimizes breakage during hair straightening, and its conditioning formula aids hair color preservation while building a resilient, smooth foundation for sleek results.
| Best For | Anyone with blonde hair—whether natural, highlighted, or fully lightened—who wants to keep their color vibrant while strengthening strands and preventing breakage, especially before heat styling. |
|---|---|
| Brand | BlondMe |
| Hair Type | Coarse/Blonde |
| Material | Liquid Formula |
| Key Benefit | Nourishes & Repairs |
| Suitable For | Daily Use |
| Price Range | Premium |
| Additional Features |
|
- Sulfate-free formula gently cleanses without stripping color or moisture, making it safe for daily use on treated blonde hair
- 3D Bond Creation Technology actively repairs damage and builds new bonds to reduce breakage during styling or heat treatments
- Nourishes and smooths hair while neutralizing brassiness, leaving blonde tones cool and glossy
- Strong citrus scent might be overwhelming for people sensitive to fragrances
- Some users report dryness or brittleness after use, so it may not work for all hair types
- Results can vary depending on your specific blonde shade and hair condition, so you might need to experiment
2. Denman Curly Hair Brush
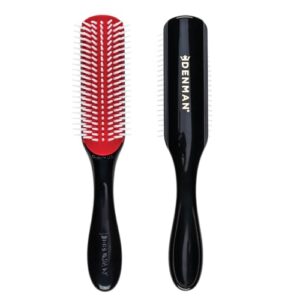
You’ll need a tool that respects your curls before you straighten them, and the Denman brush delivers curl definition with seven rows of nylon pins that glide through damp hair without yanking or snapping strands.
This rectangular workhorse offers brush durability at $16.76, reshaping ringlets during blow-drying while reducing breakage when you apply heat protectant and prep for straightening.
Brush maintenance stays simple—pull trapped hairs after each session, rinse with mild shampoo, and dry bristles-down to preserve that anti-static rubber pad for every hair texture from 2C coils to 4C kinks.
| Best For | People with 2C to 4C curls who want to detangle and define their hair before straightening, especially if they’re working with fine to medium textures and need a durable brush that won’t snag during blow-drying. |
|---|---|
| Brand | Denman |
| Hair Type | Curly/Wavy |
| Material | Nylon/Rubber |
| Key Benefit | Detangles & Defines |
| Suitable For | 2C-4C Curls |
| Price Range | $16.76 |
| Additional Features |
|
- Seven rows of smooth nylon pins glide through damp curls without catching or breaking hair when you use a gentle hand
- Anti-static rubber pad and staggered pin pattern grip each section for better tension control during heat styling
- Simple maintenance routine keeps the brush working for years—just remove hair buildup, rinse with mild shampoo, and dry bristles-down
- Thick or long hair might need you to remove a few rows of pins to avoid pulling, which makes the rubber pad tricky to reinstall
- Won’t tackle severely tangled or knotted hair on its own—you’ll need to detangle first with fingers or a wide-tooth comb
- $16.76 feels steep compared to basic brushes, though the durability usually justifies the cost over time
3. Denman Thermoceramic Hair Straightening Brush
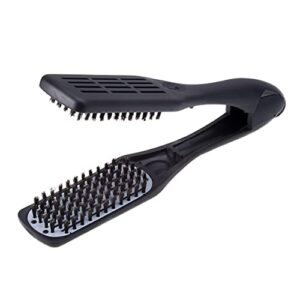
You can skip the flat iron with this ceramic-plated straightening brush, which combines Denman’s signature detangling bristles with adjustable heat settings ranging from 300°F for fine strands to 370°F for coarse curly hair. The natural boar bristles glide through six-by-six-by-eight-inch sections, smoothing frizz while the ceramic coating distributes heat evenly across each pass.
To protect your investment, clean product buildup from the bristles after every session, then store the tool away from direct sunlight to prevent moisture damage to the electrical components.
| Best For | People with wavy to curly hair who want to straighten and smooth their hair without the hassle of a traditional flat iron. |
|---|---|
| Brand | Denman |
| Hair Type | Wavy/Curly/Coily |
| Material | Ceramic/Boar Bristle |
| Key Benefit | Smooths & Shines |
| Suitable For | Wide/Wavy Hair |
| Price Range | Mid-Range |
| Additional Features |
|
- Adjustable heat settings (300°F to 370°F) let you match the temperature to your hair type, so fine hair isn’t fried and thick curls get enough heat to actually straighten.
- Natural boar bristles detangle while you style, cutting down on prep time and adding shine without extra products.
- Ceramic coating spreads heat evenly across the brush, which means fewer hot spots and less chance of damage compared to cheaper straightening tools.
- Doesn’t work well on very kinky or tightly coiled hair—you’ll likely need multiple passes or end up reaching for a flat iron anyway.
- Some users find the bristles too soft to grip thick or coarse hair effectively, making the straightening process slower and less efficient.
- Requires regular maintenance like cleaning product buildup and storing it away from heat and moisture, or the electrical parts can wear out faster.
Tips for Protecting Curly Hair From Heat Damage

Straightening curly hair doesn’t have to come at the cost of your hair’s health, but it requires you to be strategic about how you apply heat and protect your strands from damage. The key is understanding that heat damage is cumulative, meaning every straightening session adds up over time, so you need to implement protective measures consistently to keep your curls resilient and strong.
Straightening curly hair demands strategic heat protection because thermal damage accumulates with every session, threatening your curls’ long-term resilience
Here are four essential tips that will help you minimize heat damage while achieving the sleek, straight look you want.
Setting The Right Heat Temperature
Temperature control separates smooth, sleek hair from fried, damaged strands, so you need to dial in the right heat settings before you touch that flat iron to your curls.
Start at 300°F (149°C) for fine or damaged hair, move to 350°F (177°C) for medium textures, and reserve 370–410°F (188–210°C) for thick, coarse hair—because thermal protection begins with heat limits that respect your hair’s unique structure.
Working in Small Sections
Sectioning techniques matter just as much as temperature—dividing your curls into one-inch bundles delivers better heat distribution and styling efficiency than wrestling with thick chunks.
Small section benefits multiply fast: you’ll see damage reduction from fewer flat-iron passes, smoother strands from uniform contact, and complete straightening without re-heating the same fibers, so clip away unused hair and work methodically through each piece.
To achieve the best results, consider using a heat protectant spray before styling.
Reapplying Heat Protectant as Needed
Your heat protectant doesn’t last forever—reapply it every two to three passes to maintain thermal damage prevention, especially when curly hair’s high porosity soaks up formulas quickly.
Most protectant formulations require fresh layers every 15 to 30 minutes during extended heat styling sessions, so keep that bottle handy and focus reapplication timing strategies on your ends where moisture loss hits hardest for complete hair protection.
Limiting Frequency of Straightening
Even with heat protectant layered on, you can’t outsmart cumulative heat exposure—each straightening session adds to the damage bank. Hair breakage reduction demands spacing out your styling to once every one to two weeks, giving your curly hair’s natural moisture barriers time to rebuild between high-heat transformations.
Keeping straightening frequency low ensures that hair health maintenance stays ahead of thermal stress.
Maintaining Straightened Curly Hair

You’ve put in the work to straighten your curls, and now it’s time to make that smooth look last as long as possible without compromising your hair’s health.
Keeping straightened curly hair sleek requires a few strategic aftercare steps that protect your strands from reverting too quickly and prevent unnecessary damage.
Here’s how you can extend your style and maintain the integrity of your hair between straightening sessions.
Post-straightening Moisturizing Treatments
Your hair’s just been through the wringer with heat, so moisture restoration is non-negotiable. Apply a deep conditioning treatment with protein repair formulas once weekly, then seal with a humectant balance hair serum containing glycerin or panthenol to lock in hydration.
Leave-in conditioners boost hair health by attracting ambient moisture, while lightweight oils reduce water loss—essential hair straightening tips that transform dry, damaged strands into manageable, moisturized hair.
Sleeping on a Silk Pillowcase
While you’re catching your Z’s, friction from cotton pillowcases undoes your straightening work and triggers hair frizz reduction nightmares. Pillowcase materials matter—fabric softness importance can’t be overstated when you’re protecting your heat-styled investment.
Swap to silk fabric benefits that let straightened curly hair glide smoothly, preserving your sleek hair texture through sleep hair care strategies. Silk is essential for anyone serious about hair straightening tips that actually work.
Scheduling Regular Trims for Hair Health
Every six to eight weeks, you need to book a trim to keep hair health on track and prevent split ends from climbing up the shaft. Regular trim frequency promotes hair growth by removing damaged ends, improves scalp health through easier root assessment, and delivers breakage reduction that makes your hair care routine more effective. Smart hair maintenance means cutting away yesterday’s hair damage before it spreads.
Frequently Asked Questions (FAQs)
How often should you touch up your straightened hair?
You should touch up straightened curly hair every two to three days, balancing heat damage prevention with maintaining sleek results.
Humidity levels, hair regrowth patterns, and styling product impact strongly influence your straightening intervals.
Can you straighten your hair if it’s wet?
Haste makes waste,” and nowhere is this truer than straightening wet hair—you’re inviting serious heat damage risk because water-saturated strands steam internally, causing breakage, especially in curly or porous hair; always dry first.
How long does it typically take to straighten curly hair?
Straightening sessions for curly hair usually range from 30 to 90 minutes, depending on your hair’s length, thickness, and curl pattern.
Finer textures require less heat styling duration than densely coiled strands.
Can I straighten damp or wet curly hair?
You shouldn’t straighten soaking wet curly hair—it risks serious heat damage from steam and protein loss.
Towel-blot or air-dry until your hair’s 70-80% dry before applying your flat iron with heat protectant.
How long does straightened curly hair typically last?
Your straightening duration usually lasts one to three days, depending on curl type, humidity levels, and product use—tighter coils revert faster while effective frizz control methods and low moisture extend wear time considerably.
What causes hair to revert back to curly?
When heat leaves your hair, cuticle shrinkage and elastic recoil kick in, pulling strands back toward their natural curl pattern.
Humidity and moisture distribution work together to restore your hair’s original texture.
Are there permanent straightening options for curly hair?
Yes, several permanent straightening options exist for curly hair, including chemical treatments like hair relaxers that permanently alter curl patterns, thermal reconditioning (Japanese straightening) lasting six to twelve months, and keratin smoothing treatments providing two to six months of results.
Conclusion
Yes, straightening takes effort, but mastering how to straighten curly hair doesn’t mean abandoning your natural texture forever—it means owning the versatility to transform your look whenever the mood strikes.
With proper prep, heat protectant, and technique, you’re not sacrificing your curls’ health for sleekness; you’re simply unlocking another dimension of your hair’s potential.
Take control, protect those strands, and enjoy the smooth, lasting results you’ve been chasing.
- https://medium.com/black-women/it-took-me-too-long-to-fall-in-love-with-my-hair-8ee8c90c14cb
- https://www.instagram.com/edgybgirl/
- https://www.colorwowhair.com/us/blog/why-is-my-hair-so-dry-curly-hair-tips-how-to-moisturize-hair
- https://onlinepubs.trb.org/onlinepubs/nchrp/cd-22/manual/v1appendixb.pdf
- https://x.com/godofprompt/status/1990526288063324577