This site is supported by our readers. We may earn a commission, at no cost to you, if you purchase through links.

Most haircuts don’t go wrong during the cut—they go wrong during the blend. That moment when you switch guards and the clipper leaves a hard shelf of hair sitting right above the fade, you know the next ten minutes will be damage control.
Clipper lines form fast, and they form from small mistakes: a blade held at the wrong angle, a guard change that skips too far, a movement rushed through a curved section near the ear or crown.
Learning how to use hair clippers without lines means understanding exactly where those mistakes happen—and building the habits that stop them before they start.
Table Of Contents
Key Takeaways
- Most clipper lines happen during guard changes, not the cut itself — slow down at every transition and overlap each pass to feather the boundary instead of locking in a hard shelf.
- Your angle, pressure, and wrist movement matter as much as your guard number — hold the clipper like a marker, let the weight do the work, and keep passes light and consistent.
- Blending tools like the taper lever, flick-out motions, and C-strokes aren’t optional polish — they’re how you erase the lines that even a clean cut leaves behind.
- Prep and maintenance are half the job — dry, detangled hair and well-oiled blades give every pass a clean, predictable surface to work with.
What Causes Clipper Lines

Clipper lines don’t appear out of nowhere — they’re always caused by something specific you did or didn’t do. Most of the time, it comes down to a handful of technique mistakes that are easy to fix once you know what to look for. Here’s what’s actually behind those lines.
Once you spot the pattern, fixing those lines gets a lot easier — especially with guidance from a hair clipper technique guide for men that walks through the most common mistakes.
Uneven Guard Changes
Switching guards mid-cut is where most lines are born. Every time you move from a Guard 2 to a Guard 3, you’re jumping 1/8 inch in length — and that step shows immediately if the boundary isn’t blended gradually across both lengths. Rushing this shift, or failing to overlap the guard change zone, locks that height difference right into the hair.
Poor Clipper Angle
Guard changes create lines — but the way you hold the clipper makes them worse. Blade angle basics matter here: tilt too steep, and the blades scrape instead of shear. Too flat, and they glide right over hair without cutting it. That narrow sweet spot is where clean work happens.
Keep your wrist roll control steady throughout each pass. Using a proper marker grip helps maintain stability and control.
Hard Transition Points
Angle alone won’t save you if you stop cutting at the wrong spot. Hard shift points form when you switch guards at curved areas — the crown, behind the ears — without feathering beyond the edge.
The Crown Swirl Blend demands extra attention because hair direction shifts mid-whorl, making the same pass cut uneven lengths across the boundary.
Missed Overlapping Passes
Even a perfect guard and angle can still leave lines if your passes don’t overlap enough. Missed overlap happens when each new stroke runs beside the previous one instead of slightly into it, leaving a narrow band of uncut hair between them.
Move at a consistent pace, keep a steady hand, and make sure every pass tracks back into the last one.
Cutting Against Growth Incorrectly
Cutting hair against its natural growth pattern is one of the sneakiest causes of visible lines. When your clippers move against growth direction, they lift hairs unevenly, catching strands at different lengths in a single stroke — especially around the crown.
- Lifted hairs reflect light differently, making gradient lines more visible
- Curly or wavy hair springs back after reverse cutting, sharpening the blend boundary
- Crown areas are most vulnerable due to shifting growth directions
- Skipping a final pass with growth leaves lifted ends that settle into a hard edge
- Aggressive reverse strokes over-process shorter hairs, creating blotchy texture
Always finish with a clean pass following the hair’s natural direction.
Tools Needed for Line-Free Cutting

Getting clean, line-free results starts before you ever turn the clippers on. Having the right tools in your corner makes the difference between a sharp blend and a choppy mess. Here’s what you actually need to make it work.
Quality Hair Clippers
Your clippers are only as good as their motor. A high-torque rotary motor running at 8,000–9,000 RPM cuts through thick hair without stalling — critical for a clean fade haircut.
Pair that with ceramic or stainless steel blades for cooler, sharper performance. Good ergonomic design and a durable build mean you’ll work with precision, not fight your tool.
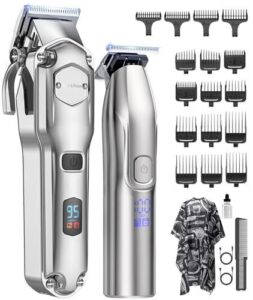
Multiple Clipper Guards
Every guard size in your set plays a specific role. Guard numbers run from 0 to 8 — lower numbers cut shorter, higher numbers leave more length. Skipping sizes creates hard lines instead of smooth transitions.
Guard compatibility matters too. Not all guards fit every clipper. A mismatched guard attachment causes uneven cuts and blade strain, so always verify your guard system matches your model.
Adjustable Taper Lever
The taper lever is your secret weapon for micro length control between guards. Flipping it adjusts the blade gap settings by 0.5 to 1.0 mm, giving you fine blending without swapping guards.
It sits right where your thumb naturally rests, so ergonomic thumb access keeps your grip steady. Keep the pivot clean and lightly oiled for smooth, reliable lever adjustment range.
Barber Comb and Brush
A good comb and brush aren’t accessories — they’re precision tools.
Use a dual-sided carbon fiber comb for both sectioning and guiding your clippers during the clipper-over-comb technique. Its anti-static properties keep hair flat and predictable.
A detangling brush clears debris between passes, so every guard-length adjustment stays clean and your tapering and blending stays accurate.
Handheld Mirror Setup
Without a handheld mirror, you’re flying blind on the back and sides.
Position it at a slight downward tilt with light aimed directly at the work area — between 300 and 500 lux removes shadows that hide uneven blends. Rotate the mirror by zone, not your body, so your clipper motion stays steady and your lines stay honest.
Top 5 Clippers for Blending
The right clipper makes blending so much easier — and the wrong one makes it nearly impossible. These five models are built for clean fades and smooth transitions without the frustration. Start here, and you’ll have a much clearer idea of what to look for.
1. Novah Professional Cordless Hair Clipper Set
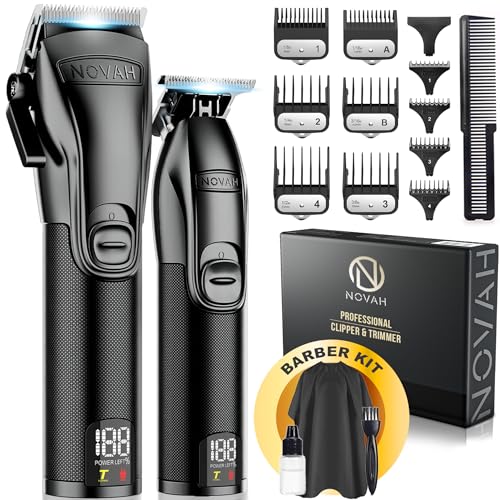
The Novah Professional Cordless Hair Clipper Set is built for barbers who need reliable performance without the cord getting in the way. Its all-metal unibody construction gives you a solid grip during fades, and the dual turbo speed settings handle thick or coarse hair without stalling.
The LED display keeps battery and speed visible at a glance. Six clipper guards and an adjustable taper lever mean you have everything needed to blend clean, line-free cuts from start to finish.
| Best For | Barbers and home users who want professional-grade cordless clipping with enough power to handle thick or coarse hair. |
|---|---|
| Battery Type | Lithium Fast Charge |
| Operation Mode | Cordless Only |
| Blade Type | Premium Blades |
| Noise Level | Quiet Motor |
| Included Guards | 6 Clipper + 4 Trimmer |
| Grooming Areas | Hair, Beard, Neck |
| Additional Features |
|
- All-metal build feels solid in hand — no plastic flex during long cuts
- Dual turbo speeds make it easy to switch between fine detail work and bulkier sections
- Quiet motor means kids won’t flinch when it’s their turn in the chair
- No guard size 7, so longer length cuts aren’t an option
- Blades need regular oiling or you’ll start to feel it pulling
- No carrying case included, which is a miss for anyone taking it on the go
2. Novah Professional Cordless Barber Clipper Set
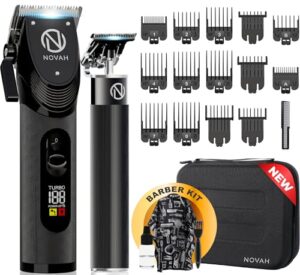
If the previous set works on everyday fades well, this one steps things up for full barber-kit performance. The all-metal unibody gives you real grip and control during extended sessions, and the self-sharpening blades with two-speed turbo mode keep cuts clean on thick or coarse hair without slowing down.
The 23-piece kit covers guards, a cape, and a storage case, so you’re ready to work right out of the box. The built-in LED display tracks battery level the whole time.
| Best For | Anyone who wants a full barber-kit setup at home, especially if you’re working with thick or coarse hair and need pro-level fading tools. |
|---|---|
| Battery Type | Lithium Fast Charge |
| Operation Mode | Cordless Only |
| Blade Type | Self-Sharpening |
| Noise Level | Quiet Operation |
| Included Guards | 10 Clipper + 4 Trimmer |
| Grooming Areas | Hair, Beard |
| Additional Features |
|
- All-metal unibody feels solid and reduces hand fatigue during longer cuts
- Self-sharpening blades with turbo mode power through thick or coarse hair without skipping
- Comes with everything you need out of the box — guards, cape, storage case, and more
- On the heavier side compared to most home clippers, which can wear on your wrist over time
- The trimmer’s power button sits on the bottom, which takes some getting used to
- The cape has a fixed neck size, so it won’t fit everyone comfortably
3. Professional Rechargeable Electric Hair Trimmer Set
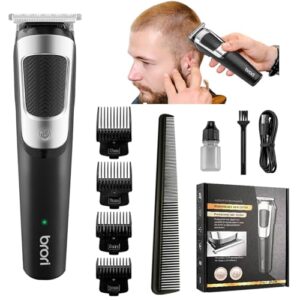
Not every kit needs to go heavy-duty. The Professional Rechargeable Electric Hair Trimmer Set covers the basics well — five interchangeable heads, stainless steel blades, and 120 minutes of runtime on a full charge. That’s more than enough for a full cut without scrambling for the cord.
The adjustable taper lever lets you blend between guard sizes smoothly, and the low-noise motor keeps passes comfortable. Guards run 3mm to 12mm, giving you solid length control across most standard fades.
| Best For | Anyone who wants a reliable all-in-one trimmer for hair, beard, nose, and ears — whether you’re grooming at home or working in a salon. |
|---|---|
| Battery Type | Lithium-Ion |
| Operation Mode | Corded & Cordless |
| Blade Type | Stainless Steel |
| Noise Level | Low-Irritation Design |
| Included Guards | 4 Sizes (3–12mm) |
| Grooming Areas | Hair, Beard, Nose, Ears |
| Additional Features |
|
- 120-minute runtime gives you plenty of juice for a full cut without needing to plug in
- Five interchangeable heads make it genuinely versatile — one kit handles most grooming jobs
- Stainless steel blunt-edge blades are designed to cut cleanly without pulling or irritating skin
- Some users may run into battery or charging reliability issues over time
- Self-haircutting takes practice — not the most beginner-proof option if you’re new to cutting your own hair
- Guard range tops out at 12mm, so it’s limited if you need longer length control
4. TCMKY Cordless and Corded Hair Clippers
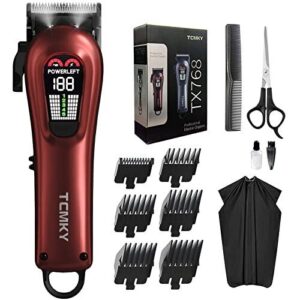
The TX768 from TCMKY steps things up with dual corded and cordless operation, so you’re never stuck mid-cut with a dead battery. With up to 200 minutes of runtime and five adjustable power gears, it cuts through thick hair and locs without stalling.
The integrated LED display shows your power level and lubrication status at a glance. It’s a solid home-use option when you want flexibility and control without paying professional prices.
| Best For | Anyone who wants flexible, reliable home haircuts for thick hair or locs without spending salon prices. |
|---|---|
| Battery Type | Lithium |
| Operation Mode | Corded & Cordless |
| Blade Type | Sharp Steel |
| Noise Level | Low-Noise Motor |
| Included Guards | Not Specified |
| Grooming Areas | Hair, Locs |
| Additional Features |
|
- Runs corded or cordless, so a dying battery won’t cut your cut short
- Up to 200 minutes of runtime with five power gears that handle thick hair easily
- LED display shows battery and lubrication status right when you need it
- Charges via barrel connector instead of USB-C, which feels a bit outdated
- Not really built for heavy professional salon use
- The included scissors are just okay — don’t expect much from them
5. Jack and Rose Cordless Hair Clipper Set
The Jack and Rose Cordless Set pairs a large clipper with a zero-gap T-blade trimmer — giving you bulk cutting and precise detailing in one kit. The clipper runs up to 240 minutes per charge, and the trimmer holds 180, so both outlast most home sessions easily.
Carbon blades resist snagging on thick or curly hair, and the 14 included guide combs cover 1/8 inch through 1 inch — everything you need for clean, line-free blending.
| Best For | Families and beginners who want to handle haircuts at home without spending money at the barbershop every few weeks. |
|---|---|
| Battery Type | Lithium |
| Operation Mode | Cordless Only |
| Blade Type | Carbon Blades |
| Noise Level | Standard Motor |
| Included Guards | 14 Guide Combs |
| Grooming Areas | Hair, Beard, Body |
| Additional Features |
|
- The clipper and trimmer together cover everything — bulk cutting, edges, and detail work — so you’re not buying two separate tools
- Four hours of battery life on the clipper means you can get through multiple cuts before needing to plug in again
- Carbon blades handle thick and curly hair without snagging, and 14 guide combs give you plenty of length options
- The motor noise might be rough for kids who are sensitive to loud sounds
- The storage pouch is just one open bag — accessories get jumbled together fast
- A few users have run into issues with individual pieces not charging reliably
Choose The Right Guard Sizes

Getting the guard size right is what separates a clean fade from a choppy mess. Each number tells the clippers exactly how much hair to leave behind, so knowing what you’re working with before you start saves you a lot of fixing later. Here’s a breakdown of the five guards you’ll use most.
Guard 1: 1/8 Inch
Guard 1 leaves 1/8 inch of hair — just 3mm above the scalp. That’s extremely short, so blade sharpness and guard fit both matter here. A loose guard shifts mid-pass and leaves uneven spots instantly.
Keep lubrication routine consistent, maintain steady hair contact, and use smooth overlapping strokes. Precision blending at this length rewards patience and punishes rushed technique.
Guard 2: 1/4 Inch
A quarter inch of hair sits right in that comfortable middle ground — short enough to look clean, long enough to work with. At 6 millimeters, Guard 2 accommodates mid-length cuts well and blends smoothly between Guard 1 and Guard 3.
- Delivers consistent 6mm cutting height across most standard clippers
- Ideal for precision blending at transitions
- Compatible with most detachable clipper heads
- Snap-on lock keeps the guard stable mid-pass
- Clean after each use to prevent uneven results
Guard 3: 3/8 Inch
At 3/8 inch, Guard 3 sits right in the sweet spot for a medium blend — long enough to avoid skin exposure, short enough to keep things sharp. This guard performs precision trimming around ears and necklines cleanly, and it fits most universal clipper systems without fuss.
Blade alignment matters here; a loose guard tips and leaves ridges.
Guard 4: 1/2 Inch
Half an inch gives you real coverage without bulk. Guard 4 works best on the sides and top when you want a clean, even base before blending shorter sections underneath.
Snap it on tight — a loose guard shifts mid-stroke and leaves ridges. Keep light, overlapping passes going, and maintain a consistent angle throughout each section.
Guard 8: 1 Inch
The 1 inch guard is your longest standard option — Guard 8 sits at the top of most basic clipper guard sets. Use it to build a solid long base cut before stepping down through smaller guard numbers.
- Sets the top of your fade ladder
- Pairs with shorter guards for smooth blends
- Snap-on design keeps length consistent
- Too bulky near delicate hairlines
- Best for larger sections, not edges
Prepare Hair Before Clipping

Most clipper mistakes start before you even turn the machine on. How your hair looks going into the cut shapes everything that comes out of it. Here’s what to do before the first pass.
Wash and Fully Dry
Start with clean hair. Shampoo thoroughly to strip oils and product residue that cause uneven clipper contact.
Then dry completely — towel drying traps moisture near the scalp, so finish with a blow dryer. Damp hair clumps, stretches under pressure, and throws off your guard length. Dry hair stays consistent, giving your hair cutting tools a predictable surface to work across.
Detangle Before Cutting
Clean, dry hair still isn’t ready if it’s knotted.
Apply a detangler first, then work through small sections — don’t grab the whole head at once. Start from the ends, work upward, and use your fingers before any comb.
This removes snags that would otherwise catch your blade guard mid-pass and pull uneven lines into the cut.
Check Growth Direction
Once the hair is detangled, run your fingers slowly across the scalp in all directions — this is the Finger Glide Test. Hair that feels smooth slides with the grain; hair that lifts or ruffles means you’re moving against it.
Map every zone separately, especially Crown Swirl Patterns, where growth fans outward unpredictably. Skipping this step is what turns clean passes into visible lines.
Set Bright Lighting
Now that you’ve mapped growth patterns, light is your next tool. Position your task lamp between 300 and 500 lux, angled toward the cutting area — not behind the head. Overhead lighting alone creates shadows that hide uneven passes. Use cool, diffused light to sharpen hair-to-scalp contrast, and keep brightness consistent throughout so every clipper pass gets judged the same way.
| Lighting Factor | Why It Matters |
|---|---|
| Angle (front/side) | Reduces flat shadows on the scalp |
| Cool vs. warm tone | Cool light reveals missed blending spots |
Inspect Crown Patterns
The crown is where most clipper lines hide. Inspect the crown swirl by viewing from above and rotating your perspective left to right.
Keep hair dry, brush out tangles first, then part sections to see where roots actually split. Hair growing upward near the whorl center catches blades differently — check that before you cut.
Cut Without Creating Lines
Getting a clean cut without lines comes down to how you move the clippers, not just which guard you use. A few small habits make the difference between a sharp, smooth result and a choppy mess. Here’s what to focus on as you work through each section.
Start With Longer Guard

Always start with a longer guard — a Guard 4 or Guard 3 is a solid first choice.
That extra length creates a base layer you can fine-tune, not a final result you’re locked into. It keeps the blade from cutting too close too fast, which prevents those stubborn blade marks from forming before you’ve even mapped your shape.
Work Upward Slowly

Once you’ve set your starting guard, move the clippers upward in slow, deliberate strokes — never rush this step. The Gradual Lift Technique works by increasing guard height in small increments, letting each pass blend into the last. Overlap every stroke to close any gaps.
A final Surface Finishing Pass ties it all together, erasing edge contrast without cutting deeper.
Use Light Pressure

Pressure is the part most beginners get wrong. With hair clippers, let the weight do the work — don’t push the blade into the scalp. Heavy pressure causes track marks and forces the guard to cut shorter than intended.
Let the clippers do the work — pressing harder only makes cuts shorter and mistakes permanent
For fine hair especially, light, controlled contact keeps results clean. If you feel resistance, ease off and take another gentle pass.
Overlap Each Clipper Pass

Think of each clipper pass like a paint roller — one stroke alone won’t give you even coverage. Overlap each pass by moving slightly into the previous stroke’s path, so no hair gets skipped. This pass overlap ratio fills in the gaps that a single clean swipe always leaves behind.
Work section by section, keeping your track path aligned and your speed steady throughout.
Avoid Rushing Transitions

Rushing a shift is how a clean cut becomes a patchy mess. Change guards gradually — dropping too quickly from one length to the next leaves a sharp edge your blades can’t blend out.
Slow your stroke speed, keep pressure even, and pause to feather the border before moving on. That boundary zone deserves its own focused passes, not a quick swipe through.
Blend Lines With Clipper Techniques

Even a clean cut can leave faint lines if you don’t blend them out. The good news is a few simple clipper techniques take care of that fast. Here’s what works.
Use The Taper Lever
The taper lever is your shortcut to guard-free blending. Instead of swapping guards constantly, slide the lever to fine-tune your hair length settings mid-pass.
- Open lever for longer length
- Mid-position for gradual transitions
- Closed for tightest cut
This gives you precision blade control across the fade without hard stops between lengths.
Try Flick-out Motions
The flick-out motion is where soft fades actually happen. As your clipper reaches the blend zone edge, ease pressure slightly, then lift the clipper away with a quick upward tilt — don’t drag it sideways. That exit angle matters: a flat, hard exit cuts a sharp line; a clean upward flick feathers the hair naturally.
Repeat overlapping passes, flicking at slightly different points each time.
| Mistake | Fix |
|---|---|
| Flicking too early | Leaves blend untouched |
| Flicking too late | Reinforces the line |
Use C-motion Strokes
C-motion strokes take the flick-out concept further by curving your clipper path through the changeover zone instead of moving in a straight line. That curved arc — shaped like the letter C — spreads cutting contact gradually, so hair fades instead of stepping.
Keep light, consistent pressure through the entire curve, slowing slightly at the midpoint where blending matters most.
Blend Clipper-over-comb
Clipper-over-comb gives you smooth blends where guards alone leave gaps.
Hold the comb at your desired angle, then glide the clipper horizontally along the comb’s spine — the hair enters the back of the comb and gets cut clean. Work panel by panel, starting with wide teeth, then polish with the finer end for a gradual, line-free result.
Soften Visible Weight Lines
A visible weight line means the guard system left a ledge. Use your taper lever for half-step fades to chip that ledge down gradually — no full guard swap needed. Then check under proper lighting and blend the crown area with light angle pressure control. Here’s what keeps lines from coming back:
- Move through transitions slowly, overlapping each pass
- Use C-motion strokes at the boundary
- Keep angle pressure consistent across the blend zone
- Re-detangle any clumped sections before your final pass
Fix Mistakes and Maintain Clippers

Even the cleanest cut needs a little cleanup before you call it done. Knowing how to fix a patchy spot or a crooked neckline is just as important as the cut itself — and keeping your blades in good shape means every future cut starts strong.
Here’s what to do when things need correcting and how to care for your clippers after the job.
Correct Patchy Areas
Patches happen — even to experienced barbers. When you spot one, don’t just clip the center and move on. Blend outward first, using your guard system to feather the surrounding hair. A spot reclip without edge softening leaves a hard line that’s worse than the original patch.
Use the taper lever to create half-step lengths, smoothing the shift gradually with the clipper-over-comb technique if needed.
Recheck The Neckline
The neckline is where most mistakes hide.
Do a Neckline Boundary Check first — confirm where your hairline naturally curves before touching the clipper guard again. Then do a Growth Direction Verify, brushing the area up and outward to spot any inconsistencies. Finally, check Overlap Coverage and Blend Edge Softness under strong lighting so no hard line survives.
Brush Blades After Use
Every haircut leaves debris behind — and that buildup costs you a clean cut next time. Immediate Blade Wipe is step one: use a dry cloth to knock off loose hair before it hardens between the teeth.
- Brush teeth in blade direction to lift hair without bending edges
- Clear the blade gap for consistent tooth-to-tooth contact
- Keep your brush clean to avoid transferring old residue back
- Allow blades to cool before Hair Debris Removal begins
Dry Blade Storage matters too — wet metal corrodes fast.
Oil Blades Regularly
Dry blades wear out fast — oiling is what keeps them cutting clean. Apply 2–3 drops of clipper oil along the center blade rail after every use, then run your hair clippers for 10 seconds to spread it evenly.
| Maintenance Step | Why It Matters |
|---|---|
| Oil after each use | Reduces friction and heat |
| Run blades after oiling | Ensures even distribution |
Regular blade lubrication protects against rust, prevents snagging, and extends blade life — keeping your hair cutting precision exactly where it needs to be.
Disinfect Blades Safely
Clean blades protect the next person in your chair.
After brushing out hair debris, wet the blades with 70% isopropyl alcohol using a lint-free cloth, wiping the edges, pivot points, and guard rails carefully. Skip the motor vents and plastic housing entirely.
Let them air-dry completely before reassembling — moisture trapped between blade parts causes rust fast.
Frequently Asked Questions (FAQs)
Can you cut hair clippers on wet hair?
You can, but you shouldn’t. Wet hair risks include uneven cuts, moisture blade corrosion, and real electrical hazard wet conditions. Always towel dry first for clean, consistent results.
How often should clipper blades be replaced?
Replace clipper blades every 6–12 months for home use. Heavy use may require replacement every 3 months. If blades snag, drag, or run hot after oiling, it’s time to swap them out.
Does hair thickness affect clipper motor performance?
Yes, hair thickness directly affects motor performance. Dense hair increases torque demand, causes battery drain, and raises heat. Dull blades make it worse, so keep them sharp, oiled, and clean.
How do you hold clippers for beginners?
Think of the clipper as an oversized marker. Hold it firmly but relaxed, thumb resting on the side, index finger guiding direction. Keep your wrist loose, pressure light, and let smooth strokes do the work.
What lighting conditions work best for haircuts?
Aim for neutral to cool light around 4000K–5000K. That range shows hair texture clearly without distortion. Keep brightness between 300 and 500 lux, and diffuse the source to eliminate shadows that hide uneven patches.
Conclusion
The cleanest cuts come from slowing down, not speeding up. Once you know how to use hair clippers without lines, you realize most mistakes were never about the clippers at all—they were about the hands holding them.
Rushing a blend creates the problem. Patience removes it.
Guard size, lever position, overlapping passes—these aren’t extra steps; they’re the whole game. Master those habits, and the lines stop appearing before they ever get the chance.
- https://www.stylecraze.com/authors/khamis-maiouf/
- https://www.thequalityedit.com/articles/tangle-teezer-review
- https://www.aad.org/
- https://www.gauthmath.com/solution/1804158606626821/Identify-a-true-statement-about-the-clipper-over-comb-technique-Select-the-corre
- https://linkinghub.elsevier.com/retrieve/pii/S0306261914009222