This site is supported by our readers. We may earn a commission, at no cost to you, if you purchase through links. This content is for general informational and educational purposes only and is not a substitute for professional medical, dermatological, or nutritional advice.

A razor blade doesn’t give you much room for sloppy habits. One rushed swap, one damp countertop, one distracted second, and a routine shave turns into a cut, a ruined edge, or a full-on bathroom nightmare.
In the shop, I’ve seen the difference that good blade discipline makes. Clean hands, dry air, a steady grip, and a check for rust or tugging can keep a sharp tool working for you instead of against you. The smart ways to handle a razor blade start long before the blade touches skin, and they don’t stop until it’s cleaned, stored, and out of reach.
Table Of Contents
- Key Takeaways
- Inspect and Prepare Razor Blades Safely
- Handle, Install, and Remove Blades Safely
- Clean and Maintain Razor Blades
- Store and Organize Razor Blades
- Dispose of Blades and Treat Cuts
- Frequently Asked Questions (FAQs)
- How to safely handle razor blades?
- What is the razor blade strategy?
- How is the razor blade trick done?
- What is the correct way to handle hair removal razors?
- What is the razor and blade strategy?
- How to improve safety razor technique?
- How often should I replace my razor blade?
- Can I use the same blade for different body parts?
- Are electric razors safer than manual razor blades?
- How can I prevent razor burn when using blades?
- Conclusion
Key Takeaways
- Always inspect blades for rust, damage, and sharpness, and set up a dry, well-lit workspace before you start shaving.
- Handle blades with the pinch technique on the flat sides, keep fingers behind the cutting edge, and move slowly during swaps to avoid slips.
- Clean blades after every shave by rinsing, drying thoroughly, and sanitizing with alcohol or peroxide to prevent rust and bacteria buildup.
- Store used blades in labeled, child-resistant containers away from new ones, and always dispose of them in a sealed blade bank rather than tossing them loose.
Inspect and Prepare Razor Blades Safely

Every good shave starts before the blade ever touches your skin. You wouldn’t skip checking your clippers before a fade, so don’t skip this step either. Here’s exactly what you need to inspect and prep first.
If you need a quick walkthrough, this step-by-step guide to shaving the sides of your head covers the setup basics.
Inspect for Rust and Damage
Before a blade touches your skin, give it a real once-over. Look for brown or orange spots, that’s early rust talking. Pitting or flaking metal means corrosion’s already winning.
Check the coating for cracks or peeling, run a fingertip along the edge for nicks, and confirm the steel’s what you think it is.
Check Sharpness Before Each Shave
Rust checks only tell half the story, so run a quick tug test before you touch skin. Try these:
- Glide the edge over arm hair, watch for a clean cut
- Feel for drag or catching
- Check for even cuts, no skipped patches
- Confirm consistency across the blade
- Look for a smooth, chip-free edge line
Proper blade handling also depends on maintaining the correct razor blade angle, which helps make clean, consistent strokes during every shave.
Prepare a Dry Workspace
A sharp blade still fails you on a damp counter. Moisture control starts with your surface, stainless steel or sealed wood, never bare laminate. Keep humidity below 50%, run a fan for air circulation, and light the station well, 4000-5000K bulbs show water spots instantly. Set gloves and your blade bank nearby before you start.
Keep Hands Clean and Dry
Once the station is dry, your hands matter just as much. Wash with soap for 20 seconds, rinse well, then dry with a clean towel or air dryer. Damp skin turns a change into a nick-filled nightmare and invites grime.
- Keep palms dry
- Skip wet cuffs
- Use clean towels
- Wear cut-resistant gloves if slippery
- Touch blades only with clean fingers
Choose Blade-compatible Handling Tools
Pick tools that fit the razor, not your luck. Use ergonomic grips with a non-slip surface, soft sleeves, and a 1.25 to 2 inch diameter, so your blade grip stays steady and your wrist stays straight.
| Tool | Why |
|---|---|
| Magnetic holder | Safer pickup |
| Insertion guide | Cleaner alignment |
Keep storage pouches dry, labeled, and blade-compatible for travel and razor blade storage too.
For extra protection, these straight razor care and storage techniques also help prevent rust during long trips.
Handle, Install, and Remove Blades Safely
This is the part where steady hands matter most, because a small slip can turn a routine blade change into a mess fast. Keep your setup calm, your movements controlled, and your attention on the razor in front of you. These next tips will show you how to handle each step safely and with confidence.
Pinch Blades by Safe Edges

Think of the blade like a tiny straight razor, respect it. Use the Pinch Technique with fingers on the flat sides for Safe edge contact, keep Finger placement control above the edge line, and dial in Grip pressure adjustment so your blade grip stays.
Add Blade handling barriers or cut resistant gloves for razor blade safety and safe handling techniques.
Install and Remove Blades Slowly
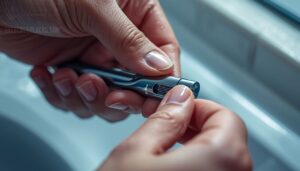
When swapping blades, rushing is how nightmares happen. Align the blade tabs, then rotate the handle slowly, one turn every two seconds, until you feel resistance.
- Steady hand position keeps the blade horizontal
- Gradual blade removal takes about 3 seconds
- Gentle securing pressure stops at a soft click
Slow down, and the pinch technique does the rest.
Keep Fingers Behind Cutting Edges

Where do your fingers actually sit during a blade swap? Behind the edge, always, with the pinch technique gripping only safe zones.
Point the cutting edge away from your body. Keep fingertips clear of the cutting path, working one blade at a time in good light.
That’s safe finger distance, and it’s what separates confident barbers from bandaged ones.
Use Cut-resistant Gloves When Needed

Slippery clippers or a shaky grip? That’s your cue for cut-resistant gloves. Check material protection levels (Kevlar or Dyneema handle blade safety well) and confirm proper glove fit, snug, not loose.
Run a quick glove inspection routine before every use, ditch torn pairs. Grip enhancement features on textured gloves keep proper grip techniques solid, even with damp hands.
Avoid Distractions While Handling Blades

A wandering mind is how nicks happen. Keep a clear workspace, phone down, chatter aside, before you touch a blade.
Single tasking wins here: pinch technique, controlled movements, cut away from your body, nothing else competing for attention. Focused blade handling means one job at a time, no reaching for a comb mid-swap.
Good razor hygiene starts with a steady head and clean tool organization, not distraction.
Clean and Maintain Razor Blades

A clean blade isn’t just about looking sharp—it’s about staying safe every time you shave. Skip the maintenance, and you’re inviting rust, bacteria, and a dull edge that drags instead of glides. Here’s exactly how to keep your blades in fighting shape, step by step.
Rinse Away Hair and Residue
When hair and lather cling to your blades, drag and irritation follow fast. Rinse after every stroke, water flowing back to front through the gaps. Keep it warm, 95-105°F loosens residue without stripping oils. Every 2-3 strokes is your rule of thumb. Skip standing water, running water flushes debris cleaner every time.
Dry Blades and Razors Thoroughly
Once rinsed clean, your blade’s still wet, and wet means trouble. Blot, don’t rub, with a dry towel. Follow with a hair dryer, low heat, 10 seconds tops. This fights blade corrosion before it starts. Fancy dryers use vacuum control and humidity sensors to stop oxidation cold. Moisture’s the enemy here.
Sanitize Without Damaging Blade Coatings
Dry’s not the same as sterile. Grab 70% rubbing alcohol, wipe coated edges 5-10 minutes, and you’re bacteria-free without stripping PTFE or platinum finishes.
Prefer peroxide? A 3% solution works too, breaking down clean with zero residue. Got a UV sanitizer? Even better, no chemicals, no coating damage, just steady blade corrosion resistance shave after shave.
Recognize Dull Blade Warning Signs
Clean blades still go dull. Check for rounded, shiny edges or nicks, then run a thumbnail sharpness test, if it glides without catching, it’s done.
Watch for tugging, extra cutting effort, or uneven results during shave prep. Blue tint near the tip means heat discoloration, retire that blade immediately, don’t push a worn edge another round.
Replace, Hone, or Strop Safely
Once a blade fails the test, don’t baby it, swap it out. Daily shavers need fresh blades every 3-5 shaves, occasional users can stretch to 5-7.
Want to hone instead? Use a 4,000-8,000 grit stone at a 20-degree angle, 20 passes per side. Strop 15-25 times before shaving. Safe blade rotation between two razors keeps edges drying and lasting longer.
Store and Organize Razor Blades

Once your blades are clean and sharp, where you keep them matters just as much. Toss them in a drawer or leave them exposed, and you’re asking for rust, dull edges, or a nasty surprise. Here’s how to set up storage that keeps every blade safe, organized, and ready to go.
Use Dry, Ventilated Storage
Rust is a blade’s worst enemy, and moisture is what feeds it. Keep your blade storage area below 15% humidity, between 50-70°F, using sensors or HVAC instead of guesswork.
Shelving beats floor placement for airflow. Skip airtight containers, opt for moistureproof cases that still breathe. Clean regularly, since sanitation and ventilation work as a team against corrosion.
Separate New and Used Blades
When sharp meets dull in the same bin, you’re asking for trouble. Run Segregated Storage Systems with separate containers for new and used blades, using Clear Labeling Protocols and Approved Disposal Containers.
- Prevents accidental reuse
- Cuts contamination risk
- Speeds up blade inspection
- Protects your hands
- Keeps blade hygiene tight
Separate Handling Workflows matter too. Clean hands for fresh blades, gloves for used ones.
Choose Child-resistant Blade Containers
Got kids or grandkids running around your shop or bathroom? Pick a child-resistant container with a two-part locking lid, push-then-turn designs work great.
Check for a tamper seal, verify it’s intact before trusting it.
Look for overfill prevention and impact-resistant materials built to real compliance standards.
Your blade case shouldn’t just organize, it should protect little hands from disaster.
Protect Blades During Travel
Airport security doesn’t care how good your edge is, it cares whether it’s packed right. Loose blades stay out of carry-ons, period, TSA sends those to checked luggage only.
- Wrap loose blades in cardboard and tape before packing
- Choose a case with separated blade pockets
- Confirm your case controls impact and moisture
A snap-lock case with reinforced zippers keeps everything secure in transit.
Track Blade Age and Usage
How many shaves has that blade actually seen? Guessing gets you nicked. Keep a shave count tracking note and a date fitted log for each blade.
Run a simple blade rotation system with orientation notes if you flip blades. Usage pattern analysis catches problems fast, matching blade replacement frequency to real performance, not just habit.
Dispose of Blades and Treat Cuts

Every shave ends the same way: a used blade that needs a safe exit. Getting rid of it the right way protects your hands, your trash bags, and anyone else who touches that bin. Here’s how to close the loop from disposal to treating any nicks along the way.
Collect Blades in Blade Banks
Every used blade needs a home, and that home is a blade bank. Never toss loose blades in the trash, that’s a nightmare waiting to happen for whoever controls the bag next.
Drop each blade in through the slot using proper grip techniques, pinching safe edges only. A sturdy sharps container, tin-plated steel or thick plastic, keeps fingers protected until it’s full.
Seal and Label Full Containers
Once that blade bank hits its fill line, stop adding blades and seal it. Full container identification means no more room without risking a shift near the top.
- Close it fully, don’t reopen once sealed
- Label clearly: "used razor blades," visible when upright
- Watch for warning colors like red or orange
Proper grip techniques still apply while sealing that sharps container shut.
Use Approved Blade Recycling Programs
Sealed and labeled? Now find that blade a real home.
Mail back options like Gillette’s TerraCycle envelope handle metal recovery properly, or drop your container at a recycling center accepting stainless steel. Check acceptance rules first, some charge fees. Verified programs confirm your blade recycling actually reduces energy waste versus new production.
That’s proper blade safety, start to finish.
Never Discard Loose Razor Blades
That’s the whole recycling game, but it means nothing if blades sit loose beforehand.
No surface placement, ever. Straight from your fingers into punctureproof disposal. A blade left on the counter is a nightmare waiting to slice the next hand that touches it. Use hands-free handling tools or slide the original sleeve back on for protective sleeve reuse during transport to your blade bank.
Never leave a razor blade loose on the counter unless you want the next hand cut open
Treat Cuts and Seek Help
Nicks happen even to steady hands, so know your response cold.
Stop bleeding first with firm, direct pressure. Then clean the wound under running water, apply antiseptic ointment, and cover with a bandage.
- Pressure stops bleeding fast
- Rinse thoroughly before covering
- Ibuprofen eases pain, skip aspirin for kids
- Seek medical help for deep cuts or numbness
Wearing safety glasses and practicing solid cut prevention keeps these moments rare.
Frequently Asked Questions (FAQs)
How to safely handle razor blades?
Grip blades dry, by their safe edges only, with steady, controlled movements. Inspect for rust or dullness first. Keep fingers behind the cutting edge, wear cut-resistant gloves when needed, and store or dispose of blades properly.
What is the razor blade strategy?
Think of it like selling the coffee maker cheap so you keep buying pods. The razor pricing model sells low, then profits through the blade subscription cycle, a classic central product subsidy built on consumable profit margin and platform lock-in effect.
How is the razor blade trick done?
Start with a hot towel to soften hair, then rock to a 30-degree blade angle. Use short, overlapping strokes with the grain, adding the guillotine stroke for tricky spots once you’ve built confidence.
What is the correct way to handle hair removal razors?
One slip and that smooth shave turns into a nightmare. Keep hands dry, use controlled movements, and maintain edge awareness every time. Proper razor grip with fingers behind the blade keeps cuts from happening.
What is the razor and blade strategy?
Gillette basically invented this playbook: sell the handle cheap, then profit on recurring blade purchases. It’s a classic consumer lock-in move, low upfront cost, steady repeat revenue from consumables priced for margin, not the razor itself.
How to improve safety razor technique?
Good technique isn’t magic, it’s muscle memory. Keep your shaving angle near 30 degrees, light grip pressure, short strokes with the grain. Taut skin plus sharp blades means smoother glide and fewer nicks.
How often should I replace my razor blade?
Swap blades every 5 to 7 shaves, sooner if you feel tugging or irritation. Your shaving habits and hair type affect blade longevity, so trust performance over a strict calendar count.
Can I use the same blade for different body parts?
Don’t cross blades between zones. Facial bacteria can migrate to sensitive skin and cause irritation or infection. Keep one blade per body area, disinfect with alcohol between uses, and protect yourself from unwanted skin reactions.
Are electric razors safer than manual razor blades?
Think of a shield versus a sword. Electric shavers guard your skin behind an enclosed head, cutting injury risk and irritation. Manual blades cut closer but expose the edge, demanding sharper handling and inspection.
How can I prevent razor burn when using blades?
Soften hair with warm water first, then shave with a sharp blade at a 30-degree angle. Use light short strokes following hair direction, skip heavy pressure, and moisturize after to protect skin.
Conclusion
Sharp steel demands steady respect. The smart ways to handle razor blades aren’t complicated, but they do require consistency: every shave, every cleanup, every storage decision matters.
Inspect before you cut, clean before you store, and dispose before a loose blade becomes someone’s bad day.
Master this routine and your kit stays sharp, your hands stay safe, and your shave stays a ritual, not a risk.
That’s the trade, done right.