This site is supported by our readers. We may earn a commission, at no cost to you, if you purchase through links. This content is for general informational and educational purposes only and is not a substitute for professional medical, dermatological, or nutritional advice.

Something went wrong in the bathroom, and now you’re staring at hair that’s orange, green, or three shades darker than the box promised. It happens to almost everyone who colors at home. The good news? Most mistakes are fixable.
Hair color correction isn’t guesswork. It follows the same logic colorists use in the salon: assess what you’re working with, understand which pigments you’re fighting, and move in the right direction one step at a time. Skipping that process is how a bad dye job becomes a disaster.
The fixes exist. Knowing where to start makes all the difference.
Table Of Contents
- Key Takeaways
- Hair Color Correction: Assess The Problem First
- Choose The Right Correction Using Color Theory
- How to Fix Common Hair Color Mistakes
- At-Home Vs. Salon Hair Color Correction
- Protect Hair During and After Correction
- Frequently Asked Questions (FAQs)
- What is the best hair color corrector?
- How much does a full color correction cost?
- How can I correct hair color mistakes?
- How long does a color correction last?
- How long does a color correction take?
- What products should I use for a color correction?
- How often should I get a color correction?
- Are there any natural alternatives to color correction?
- What is the best way to maintain a color correction?
- How often should I schedule color correction touch-ups?
- Conclusion
Key Takeaways
- Before reaching for any product, assess your hair’s porosity, damage level, and current tone — skipping this step turns a fixable mistake into a bigger mess.
- Color correction runs on opposing pigments: purple cancels yellow, blue kills orange, and red neutralizes green, so matching the right neutralizer to your specific problem is everything.
- Most at-home corrections fail not from bad products but bad timing — rushing between sessions and layering color before strands stabilize is where things go sideways.
- Between sessions, alternate protein and moisture masks, switch to sulfate-free shampoo, and use purple shampoo weekly to keep brassiness from creeping back in.
Hair Color Correction: Assess The Problem First

Before you touch a single product, you need an honest look at what’s actually going on with your hair. Color correction works best when you understand your starting point, not just your goal. Walk through these steps first, and every decision after this gets a lot clearer.
If you’re still weighing your options, exploring non-permanent hair coloring alternatives can help you test the waters before committing to anything that’s hard to undo.
How Corrective Coloring Works
Corrective coloring works in stages. You neutralize unwanted tones first, using the color wheel as your guide, then build toward your target shade.
Think of it like priming a wall before you paint. Toning hair experiences neutralizing brassiness before any final color goes on. Skip that sequence and most hair color correction attempts collapse before they even get started.
Assess Color, Porosity, and Damage
Before any hair color correction begins, read what you’re working with. Check your base color level (scale of 1–12), note whether the undertone runs cool or warm, and test strand porosity by sliding your fingers from tip to root. High-porosity hair lifts fast and fades faster. Stretch a wet strand — no spring means hair damage repair comes before color.
Identify Starting and Target Shades
Once porosity is checked, your color assessment has two anchor points. Your starting shade is your current hair level and tone before correction. Your target is where you want to land.
- Check your current hair level (1–12) in natural light.
- Note your existing hair tone: warm, cool, or neutral.
- Pick a realistic target shade within reachable lift range.
Perform Strand and Patch Tests
Once your target is clear, testing is next. A hair strand test on a hidden section shows how the formula lifts and tones before you commit. Your color assessment isn’t done without it.
Run a hair dye allergy test (the patch test) on your inner arm and wait at least 48 hours before any color correction at home. Irritation means switch formulas.
Know When Hair Needs Recovery
When strands snap rather than stretch, stop and do a hair damage assessment first. Hair health comes before any color goal.
When strands snap instead of stretch, hair health must come before any color goal
Check for gumminess or mushy wet texture. Both signal the cuticle is compromised. Start a hair repair regimen focused on breakage prevention before continuing. Pushing color on unstable hair worsens damage and delays your hair recovery.
Choose The Right Correction Using Color Theory
Color theory is your most reliable tool when a dye job goes sideways. Every unwanted tone has an opposite on the color wheel that can cancel it out, and knowing which one to reach for makes the difference between a fix and a bigger mess.
Here’s how each correction method works so you can match the right approach to your specific problem.
Purple Cancels Yellow Tones

Yellow tones after lightening aren’t a flaw — they’re chemistry. On the color wheel, yellow and purple and yellow sit directly opposite each other**, which means purple cancels yellow optically.
That’s why a quality purple toning shampoo for bleached hair works so well — it uses this same opposing-color principle to neutralize brassiness wash after wash.
A toner containing purple pigment deposits cool color into the shaft, neutralizing brassiness without adding warmth. Purple shampoo works the same way but more gradually, making it ideal for undertone correction between sessions.
Blue Neutralizes Orange Brassiness
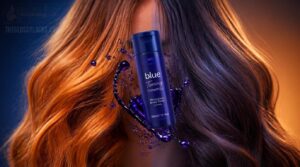
When hair lifts to a level 6 or 7, orange brassiness takes over. Color theory is straightforward: blue sits directly opposite orange on the wheel, neutralizing it by absorbing warm wavelengths.
Blue shampoo controls gradual undertone correction between appointments. For heavier brassiness, a blue toner deposits more pigment, but basic pigments and porosity determine how much correction actually lands.
Red Corrects Green Undertones
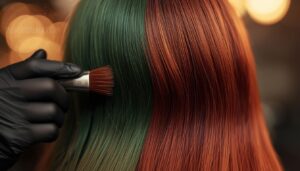
Green cast doesn’t budge with blue or purple. Red pigment is its direct opponent on the color wheel, and red or pink neutralizers work by absorbing those green wavelengths.
A copper or burgundy toner is your best tool. Keep processing time short, though. If green is heavy, too much red creates unwanted magenta. Strand test to read your porosity first.
Pre-Pigment Before Going Darker
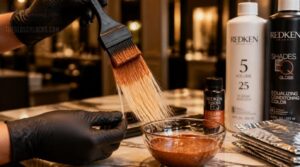
Going darker after a color remover or bleach session without prepigmentation is like painting a bare wall. The color won’t hold evenly. Gaps in the cuticle cause uneven hair porosity and patchy color deposition.
Fill those gaps first. Apply a warm filler using low peroxide volume before your target shade. This builds a base that holds pigment where it matters.
Choose Toners, Glosses, or Removers

Not every color mistake calls for a color remover. Match your tool to the problem and you’ll avoid unnecessary damage along the way.
- A color remover strips artificial pigment before deeper correction begins.
- Semipermanent toner controls color neutralization with minimal commitment.
- Glosses perfect the toning sequence while adding natural shine.
- Understand pigment behavior so you choose the right step first.
How to Fix Common Hair Color Mistakes

Most color mishaps fall into a handful of predictable categories, and each one has a clear fix. Whether you’re dealing with overly dark dye, patchy bleach, or stubborn red buildup, the approach depends on understanding what went wrong. Here’s how to handle the most common situations.
Lighten Overly Dark Dye Safely
When dark dye won’t budge, reach for a color remover before you touch any bleaching product. It strips artificial pigment without lifting your natural base, which makes it a safer first step.
Your hair porosity controls how fast lift happens, so always run a strand test first.
Once lifted evenly, a toning sequence neutralizes warmth and locks in the result.
Repair Patchy Bleach and Banding
Patchy lift usually signals uneven hair porosity. Spotty bleached hair shows color banding when damaged sections absorb developer faster, leaving lighter and darker stripes throughout the length.
Section your hair tightly and apply bleach to the darkest areas first, letting resistant patches catch up. A bondbuilding treatment between sessions protects integrity, and toning for brassiness levels out the final result.
Correct Highlights, Balayage, and Ombre
Highlights, balayage, and ombre each need a slightly different color correction approach. With highlights, targeted toning after lightening cancels brassy tones without dulling the contrast you worked to build.
Balayage repair usually means re-lightening only the hand-painted sections before glazing the whole piece together. For ombre, focus toner from mid-lengths to ends, since that’s where brassiness usually settles.
Remove Red or Purple Buildup
Red and purple pigment buildup don’t clear the same way. Red pigments tend to migrate into a brick or burgundy cast on bleached hair. A color removal product like Color Oops targets those tones directly without bleaching.
For purple, you can avoid color fading by using a chelating clarifying shampoo instead, which gradually lifts violet over several washes.
Transition Dark Hair to Blonde
How long does it actually take to go from dark to blonde? The hair lightening process usually requires multiple lifts spaced weeks apart to prevent serious hair damage.
Your hair porosity determines how quickly color correction moves. Dense, resistant strands need more sessions. Between lifts, toning controls brassiness while your hair rebuilds the strength it needs to go lighter safely.
At-Home Vs. Salon Hair Color Correction

Not every color fix needs a salon chair. Knowing what you can handle at home versus when a colorist should step in saves you time, money, and potentially your hair. Here’s how to sort out your options before making a move.
Try Low-Risk Fixes First
Before reaching for bleach, start with low-commitment options that protect hair integrity.
| Fix | Risk Level | Best For |
|---|---|---|
| Strand test first | None | All correction types |
| Semi-permanent toners and glosses | Low | Brass, tone refresh |
| Color-depositing shampoo | Low | Fading, warmth |
| Temporary color-depositing correction | Low-Medium | Uneven pigment |
| Protective barrier cream | None | Scalp protection |
Color theory guides every safe correction. Always work staged, not rushed.
Use Purple Shampoo Correctly
Because purple shampoo sits opposite yellow on the color wheel, it neutralizes brassiness through basic color theory. Apply to damp, towel-dried hair so root pigments absorb the violet deposit evenly.
| Situation | Leave-In Time |
|---|---|
| Light brassiness | 3–5 minutes |
| Moderate yellowing | 10–15 minutes |
| High porosity hair | 3 minutes max |
| Weekly maintenance | 5 minutes |
Follow up with toning conditioners to seal in results without over-drying.
Apply Toners and Color Removers
Think of toners as fine-tuning knobs: they deposit pigment to neutralize unwanted brassiness without lifting your base shade. Color removers go deeper, shrinking oxidized dye molecules so strands release old buildup.
| Product | Best For | Timing |
|---|---|---|
| Toner | Yellow or orange tones | 20–30 min |
| Color remover | Heavy dye buildup | 20–45 min |
| Gloss | Shine and subtle shift | 15 min |
Always strand test first. Porosity changes everything.
Know When to Call Colorists
Some unwanted color results signal that hair color correction at home has hit its limit.
| Warning Sign | What to Do |
|---|---|
| Breakage during color correction process | Stop; see a professional colorist |
| Multiple lifts required | Schedule a salon consultation |
| Scalp irritation or burns | Seek professional help immediately |
| Severe porosity issues | Salon-grade treatment needed |
| Worsening hair color correction risks | Book a colorist assessment |
Compare Time, Sessions, and Cost
Hair color correction at home costs less upfront. Session count depends on the hair color correction techniques you use.
| Approach | What to Expect |
|---|---|
| At-home toner/gloss | 1–3 sessions, 1–2 weeks |
| Salon correction | 2–5 sessions, 1–3 weeks apart |
| Full timeline | 2–12 weeks |
A strand test before each session drives color fading prevention and keeps the color correction process on track.
Protect Hair During and After Correction

Color correction is hard work, and the last thing you want is to undo that progress by skipping the aftercare steps. Protecting your hair during and after correction is just as important as the process itself. Here’s what to keep in mind as you move through each stage.
Avoid Bleach Overprocessing
Once the lightener hits your scalp, the clock starts. Bleach overprocessing happens fast, so check strands every ten minutes. The longer it sits, the greater your risk of hair breakage and hair dryness. Pull product the moment you reach your target lift.
After rinsing, reach for bond building treatments or deep conditioning masks to restore what the bleach compromised.
Space Out Multiple Correction Sessions
Rushing back too soon is exactly where most color correction process attempts fall apart. Each session deposits pigment that needs time to oxidize and fully stabilize before you layer anything new on top.
Spaced out sessions also give you a clearer read on strand test results section by section. Build two to four weeks into your treatment plan between rounds.
Alternate Protein and Moisture Masks
While your sessions recover, those in-between weeks are when real hair repair happens. Alternating protein masks and a moisturizing mask keeps hair porosity balanced without stiffness.
- Apply protein masks to mid-lengths and ends on wash day one
- Use deep conditioning the following wash instead
- Never stack both treatments in the same session
Use Sulfate-Free Color-Safe Products
Those masks rebuild what’s lost, but sulfate-free washing is what keeps that progress from unraveling. Without the right shampoo, color-treated hair bleeds pigment faster than any mask can restore it.
| Product | Purpose | How Often |
|---|---|---|
| Sulfate-free shampoo | Preserves pigment | Every wash |
| Color-depositing shampoo | Refreshes tone | Weekly |
| Color glazing | Seals the cuticle | Monthly |
Build your haircare routine maintenance around all three consistently.
Prevent Brassiness, Fading, and Damage
Brassiness creeps back gradually, but you don’t have to let it take over. Use purple shampoo weekly to neutralize yellow and orange tones before they settle in. When color buildup dulls your shade, a deep cleansing shampoo resets the slate without stripping pigment.
Space out chemical services and fold bond-building treatments into your routine to keep strands strong and color-true.
Frequently Asked Questions (FAQs)
What is the best hair color corrector?
No single product wins every color correction. A violet-based hair toner targets brassy yellow tones, a blue toner fights orange, and permanent color removal experiences stubborn deeper pigment buildup. Always do a strand test first.
How much does a full color correction cost?
A full color correction usually runs $150 to $500, but severe cases can reach $600 to $1,200. Complex corrections often require two to four sessions, so factor that into your total budget before you book.
How can I correct hair color mistakes?
Correcting color mistakes starts with proper diagnosis. Assess your hair’s current tone, porosity, and damage level before reaching for any product. Then use toners and glosses, color removal, or targeted recoloring to fix the issue.
How long does a color correction last?
Nothing dyes forever. Color correction usually lasts 4–8 weeks, depending on your hair’s porosity and overall damage level. Repeated recoloring shortens that window, so spacing out your sessions helps protect your hair color balance long-term.
How long does a color correction take?
Most sessions run two to five hours, depending on your damage level and correction complexity. Major transformations, like the hair lightening process, often require multiple visits spaced weeks apart to fully protect your hair integrity.
What products should I use for a color correction?
Think of it like a recipe: skip one key ingredient and the whole dish falls apart. You’ll need a color remover, the right toner and developer strength, plus bond builders and protein treatments to repair.
How often should I get a color correction?
Most color corrections are one-time fixes. How often you need another depends on how fast your color fades, turns brassy, or gets uneven. Watch how your hair behaves after each wash, because that’s your cue.
Are there any natural alternatives to color correction?
Natural options exist, but they’re quite limited. Chamomile tea can gently brighten blonde hair, while coffee rinses deepen darker tones. These surface-level deposits won’t correct real mismatches, but they support a natural, balanced look overall.
If you’d like a bolder shift than tea or coffee can give, beetroot is another kitchen option, and this step-by-step guide to dyeing hair burgundy with beetroot shows how to try it.
What is the best way to maintain a color correction?
Use sulfate-free, color-safe shampoo and a UV protectant spray daily. Schedule toning refreshes every four to six weeks. Alternate protein and moisture masks to keep your hair balanced and your corrected shade looking vibrant longer.
How often should I schedule color correction touch-ups?
Most clients schedule touch-ups every 6–8 weeks to stay ahead of roots, brassiness, and fading. Your growth rate, the salon color service received, and daily shampooing habits all influence how quickly that maintenance clock moves.
Conclusion
A thousand things can go wrong when you color at home, but every single one has a fix.
Hair color correction isn’t about reversing mistakes. It’s really about understanding your hair and moving strategically toward your goal.
Start with an honest assessment. Respect your hair’s current limits, and always give it real time between sessions.
The colorist mindset isn’t reserved for professionals. Once you understand pigment, porosity, and patience, you’re already more than halfway there.