This site is supported by our readers. We may earn a commission, at no cost to you, if you purchase through links.

When applied correctly, gel creates a protective cast that locks in moisture, eliminates frizz, and gives your curls the structure they need to show off their natural pattern. The secret lies in technique: from choosing the right formula for your curl type to mastering the scrunch-out-the-crunch method.
Once you understand how gel works with your hair’s unique texture, you’ll wonder why you ever struggled through styling without it.
Table Of Contents
- Key Takeaways
- Why Use Gel for Curly Hair?
- Preparing Curly Hair for Gel Application
- Choosing The Right Gel for Your Curls
- How to Apply Gel for Defined Curls
- Achieving a Gel Cast for Maximum Hold
- Drying Curly Hair After Applying Gel
- Breaking The Gel Cast for Soft, Defined Curls
- Troubleshooting Gel Application Issues
- Maintaining Healthy Curls With Gel Styling
- Top Product Recommendations for Curly Hair
- Frequently Asked Questions (FAQs)
- How can I avoid white flaking after using gel?
- What is the best gel to use for a gel cast?
- How do I prevent frizz after breaking the gel cast?
- Does gel work better on damp or dry hair?
- How often should you wash curly hair when using gel?
- Can you use gel on dry curls for touch-ups?
- What causes white flakes when using curl gel?
- How do you remove gel buildup from curly hair?
- Can you mix different gel brands or types together?
- Conclusion
Key Takeaways
- Gel creates a protective cast that locks in moisture, eliminates frizz, and enhances your curls’ natural pattern when you apply it to soaking wet hair and use techniques like scrunching and the praying hands method.
- The key to soft, defined curls is forming a complete gel cast while your hair dries untouched, then gently scrunching out the crunch once hair is bone-dry to break the stiffness without creating frizz.
- Choose water-based, sulfate-free gels with botanical ingredients like aloe or flaxseed to match your specific curl type, and clarify monthly to prevent product buildup that causes flaking and weighs down your curls.
- Protect your styled curls overnight with silk pillowcases or the pineappling method, then refresh second-day hair by misting with water and reapplying a small amount of gel rather than washing from scratch.
Why Use Gel for Curly Hair?
Curly hair comes with its own set of unique challenges, but the right gel can make styling so much easier. It’s not just about holding shape—gel helps bring out the best in your curls. Here’s what you can expect when you add gel to your routine.
Key Benefits of Curl Gel
When you reach for a good curl gel, you’re giving your hair a real chance to shine—literally and figuratively—thanks to benefits that go way beyond basic hold.
Curl gel delivers a hydration boost, creates style longevity, and makes defining curls a breeze. It encourages healthy curl clumping, frizz reduction, and shine enhancement, truly transforming your daily hair styling experience.
Gel Vs. Curl Cream
Think of hair gel and curl cream as your toolkit for mastering hold longevity, moisture retention, and volume impact. Gel keeps curls defined for days with a firm grip, reigning in frizz with impressive efficiency. Curl cream, in contrast, offers rich hydration and softness, best for those craving touchable curls.
Ingredient distinctions matter—gel brings polymers, cream leans into nourishing oils. Many find that curl cream enhances curls and adds shine.
Enhancing Bounce and Shine
If you love curls that catch the light and seem to spring with every step, getting that bounce and shine starts with what you layer onto your hair right after washing.
Curl defining gel, packed with shine ingredients and lightweight formulas, brings hydration benefits that boost curl elasticity.
By applying hair gel properly, you create volume boosting, bouncy curls and lock in a healthy, luminous finish.
Frizz Control and Definition
Once you’re set on bounce and shine, let’s tackle the frizz and bring out the crisp, defined shape in every curl. Here’s why a quality hair gel is your best friend:
- Boosts Humidity Resistance and frizz control.
- Encourages curl clumping for even, defined waves.
- Locks in long-term definition regardless of porosity levels.
- Guarantees product compatibility in your hair styling routine.
Preparing Curly Hair for Gel Application
Great results with gel always start with the right prep. Before you even reach for your styling products, set your curls up for success with a solid foundation.
Here’s what to focus on first.
Washing and Conditioning Tips
Ever notice how a great hair day starts in the shower with the right shampoo and conditioner? Cleanse scalp gently with sulfate-free shampoos, nourish strands deeply, and condition every wash. Hydration matters most for curly hair.
| Sulfate-Free Shampoos | Deep Conditioning | Scalp Health |
|---|---|---|
| Gentle cleansing | Weekly treatment | Massage for growth |
| No harsh stripping | Locks in moisture | Boosts circulation |
| Protect curl shape | Prevents dryness | Removes buildup |
| Shine retention | Softens curl texture | Clean foundation |
Using Low-Poo Shampoos and Co-Washes
On days when your curls crave a cleanse without all the lather, reaching for a low-poo or co-wash can make all the difference. Sulfate alternatives protect your curly hair’s hydration balance, while cleansing conditioners lift away product buildup.
You get the scalp health benefits without stripping curls, setting a soft, fresh base for hair gel and other curly hair products.
Towel Drying With Microfibre or T-Shirt
After rinsing out your conditioner, reaching for a soft microfibre towel or an old, trusty t-shirt is like giving your curls a gentle hug—helping you dodge frizz before styling even begins.
Microfibre benefits include faster water absorption and reduced friction. The T-shirt alternative also works wonders, minimizing roughness that standard towels cause.
Both help maintain curl shape while drying curly hair.
Importance of Moisture Retention
Think of moisture as the secret sauce that keeps your curls lively and defined. Hydration benefits go beyond simple shine—locking in moisture means you avoid brittle strands and frizz.
When applying curl gel for best results, trap that hair moisture. It’s not just about style; it’s about long-term health, balanced moisture, and preventing dryness.
Choosing The Right Gel for Your Curls
Choosing a gel can feel overwhelming when every bottle claims to be the secret to great curls. You’re not alone—everyone’s curls need something a little different.
Here are the key things to think about when picking the best gel for you.
Water-Based Vs. Alcohol-Based Gels
Choosing between water-based and alcohol-based gels is a bit like picking your perfect cup of coffee—one brings a revitalizing, soft finish while the other provides a strong hold that gets you out the door in a hurry.
Water-based gels are great for daily styling, thanks to their lightweight feel and quick rinsing, while alcohol-based gels dry faster but may compromise curl health if overused.
Botanical and Sulfate-Free Options
If your curls crave a gentler touch, botanical and sulfate-free gels deliver plant-powered care that keeps every strand happy and healthy. Botanical benefits like natural hydration and gentle cleansing leave curls bouncy, never brittle.
Eco-friendly gels give you sulfate alternatives without weighing down textured hair, making them a top pick for those prioritizing curl definition and mindful hair styling techniques.
Matching Gel to Curl Type
Picking the best hair gel really comes down to understanding your curl type and personal styling goals. Fine hair often thrives with light-hold options for bounce, while coily textures demand heavier gels and a careful humectant balance for frizz control.
Achieving defined curls often requires proper gel application. Chasing the right hold strength is key—better curl definition and lasting user satisfaction are within reach when gel matches your unique hair type.
How to Apply Gel for Defined Curls
Getting perfect curl definition is all about when and how you use your gel.
The next steps walk you through the little things that make a big difference. Here’s exactly what you need to know.
Working With Wet Vs. Damp Hair
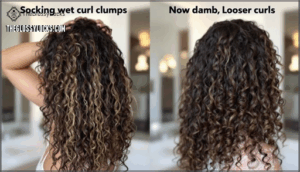
While some days you’re in a rush and settle for damp hair, knowing when to work with soaking wet strands versus just towel-dried can make all the difference in how your curls turn out.
- Wet hair benefits: better product absorption for smoother styling curly hair.
- Damp hair styling: quick, lighter hold.
- Curl pattern impact: tighter with wet hair, looser with damp.
- Drying time: damp starts faster.
Even Distribution Techniques
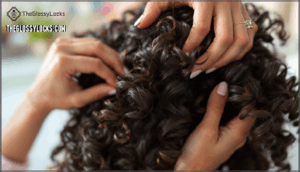
Once you’ve figured out how wet your hair should be, the real magic comes from spreading that gel evenly so no curl gets left behind. Sectioning hair boosts control, while palm distribution or the “praying hands” method smooths product on top. Use the rake and shake for root-to-tip coverage. Careful product quantity prevents overloading—a must for perfect hair care product application.
Glazing and Scrunching Methods
Sweep your hands over your curls, glazing benefits every strand, sealing in product absorption and frizz reduction.
Next, cup the ends and scrunch toward your scalp—don’t be shy. This is where volume boosting happens.
Play with scrunching variations: gentle “pulses” or a firmer scrunch to help applying gel settle in, ensuring hair styling with gel locks curls into a defined gel cast.
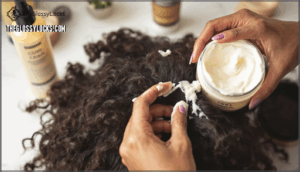
Layering With Curl Cream or Leave-In
For extra softness and lasting hydration, you’ll want to slip a layer of curl cream or leave-in conditioner beneath your favorite gel. Layering Techniques matter—don’t overload, and focus on Product Compatibility.
This Cream Application boosts Moisture Balance and maximizes Leave-In Benefits. It helps your curly hair avoid crunch, while allowing hair gel to seal in curl cream’s smooth definition.
Achieving a Gel Cast for Maximum Hold
Getting that perfect gel cast can make all the difference for long-lasting, frizz-free curls.
It’s not complicated once you know what to expect and how to spot common mistakes.
Here’s what you need to know before you begin.
What is a Gel Cast?
Have you ever noticed your curls feeling a little crunchy after styling, almost like they’re wearing their own protective armor? That’s the magic of a gel cast—a temporary shell created by hair gel that locks in definition, holds your curl pattern, and seals out frizz.
A gel cast is your curl’s protective armor—a temporary shell that locks in definition, holds your pattern, and seals out frizz
The Defining Gel Cast protects curls, setting the stage for soft, bouncy hair after breaking the gel cast.
Forming The Cast Step-by-Step
Let’s walk through how you can coax your curls into forming the perfect gel cast, one simple step at a time. Start with damp hair—rake a nickel-sized amount of gel through each section, focusing on even coverage and proper application amount.
Scrunch gently to clump curls, then avoid touching your hair while it dries: that’s how you lock in bounce and defined curls.
Common Mistakes to Avoid
Mistakes with hair gel sneak up like a rain cloud on picture day—one wrong move, and you’re just not getting that gel cast you dreamed of. Watch out for these:
- Applying gel to hair with Inadequate Wetness
- Incorrect Amount—either too much or too little
- Porosity Mismatch: choosing the wrong formula
- Uneven Distribution or Insufficient Cleansing before styling
Drying Curly Hair After Applying Gel
Once you’ve applied your gel, how you dry your curls can make all the difference. The next step is choosing the right method to keep your curls looking their best.
Here’s what you should know before you decide.
Air Drying Vs. Diffusing
Choosing between letting your curls air dry and grabbing the diffuser can make all the difference in how your hair looks and feels by the end of the day. Air drying is gentle—no heat damage—but takes more drying time and often brings less volume.
Diffusing boosts defined curls and volume fast, though you’ll want to watch the frizz factor.
Timing and Patience Tips
Waiting for your curls to dry is a real test of patience—but rushing through this step can make or break your final results. To get the most from your gel cast and styling techniques, focus on:
- Letting product absorption take its time for lasting hold
- Avoiding fidgeting to protect curl clumps
- Mindfully tracking drying duration for consistent, revitalizing curls and long-term results
Preventing Frizz During Drying
The way you treat your hair while it dries makes all the difference in keeping frizz at bay and letting those curls shine.
Try shortening plopping duration to reduce over-drying, stick to a gentle diffuser technique with a microfiber material, and consider product cocktailing for extra slip.
A hooded dryer on low also works—always leave that gel cast alone until your hair’s bone dry.
Breaking The Gel Cast for Soft, Defined Curls
Once your curls are dry, you’ll notice a firm, crunchy layer from the gel. Breaking that cast is the secret to soft, touchable definition.
Here’s what to focus on next for your best results.
When and How to Scrunch Out The Crunch
Once your curls have dried and that gel cast feels a bit crunchy, it’s time for the satisfying step—scrunching out the crunch to reveal those soft, defined waves beneath. Here’s how to nail it:
- Wait for complete dryness (Crunch timing)
- Use open palms, not fingers (Technique variations)
- Flip your head for Volume boost
- Scrunch gently for Frizz control
- Assess Product compatibility while you go
Adding Oil or Serum for Softness
When your hands finish scrunching out the crunch, reaching for a touch of oil or serum is all it takes to turn defined curls into pillowy softness. Oils bring shine and extend softness longevity, while serums help tame frizz.
Dab a drop between your palms, glaze over the curls—don’t rake—to pair hydration with hold. Think of it as sealing in your styling work.
Fluffing Roots for Volume
With your curls now soft and shiny, you can coax a little extra life into your hair by gently lifting the roots for volume that lasts all day.
Try root clipping or picking roots with a wide-tooth comb for a volume boost. Volume powders or texture sprays work wonders—far less damage than teasing.
This easy styling technique helps in achieving bouncy curls.
Troubleshooting Gel Application Issues
Even the best gel routine can hit a few snags along the way. Sometimes your curls resist forming a cast or you notice unwelcome flakes.
Let’s walk through some common hiccups and how to get things back on track.
Difficulty Forming a Cast
Struggling to get that signature gel cast is like chasing sunlight on a cloudy day—it can feel just out of reach, but a few tweaks can get those curls exactly where you want them.
- Check for Gel Incompatibility with your routine.
- Adjust Product Amount—less isn’t always more.
- Watch for Application Errors.
- Factor in Hair Porosity.
- Notice Environmental Factors.
Product Buildup or Flakes
If you’ve noticed gel flaking or greasy buildup, you’re likely dealing with product incompatibility, overuse, or insufficient cleansing. Gel flaking occurs when styling products clash, when you layer too much, or when residue from old applications clings to strands. Buildup causes include silicones, waxes, and other hair product ingredients that coat hair over time, suffocating scalp health and preventing moisture from penetrating.
Using clarifying shampoos once or twice a month strips away hair buildup, while buildup prevention starts with choosing water-based, sulfate-free hair gel and rinsing thoroughly after each wash.
| Issue | Quick Fix |
|---|---|
| White flakes after scrunching | Use less gel; make certain hands are clean |
| Greasy roots or dull hair | Clarify with a deep-cleansing shampoo |
| Persistent hair flakes | Switch to lighter, water-based formulas |
Overly Stiff or Crunchy Curls
If your curls feel more like crunchy ramen noodles than soft spirals, you’ve either used too much gel or skipped the essential step of scrunching out the cast.
The fix is simple: once your hair is completely dry, gently scrunch sections with your palms to break the stiffness. This scrunch technique releases the gel cast while preserving defined curls.
If they’re still too stiff, you applied too much product—next time, start with less hair gel and focus on proper product layering for balanced hydration.
Re-wetting for Second-Day Styling
Second-day curls looking flat, frizzy, or lifeless don’t mean you need to start from scratch—re-wetting strategically can bring back definition without a full wash.
Use these Refresh Techniques for a Hydration Boost:
- Spray bottle with water: Lightly mist sections to reactivate the gel and restore Cast Reformation
- Product Cocktails: Mix leave-in conditioner with water for added hydration and frizz control
- Scrunch and reshape: Work product through dampened curls, then air dry for Volume Revival
This approach saves time in your hair care routine while maintaining your curly hair styling techniques.
Maintaining Healthy Curls With Gel Styling
Gel styling can keep your curls healthy and gorgeous, but only if you protect them properly.
The right maintenance routine prevents damage, locks in moisture, and keeps your curls bouncing day after day.
Here’s how to care for your gel-styled curls between wash days.
Avoiding Damage and Build-Up
Regular gel use doesn’t have to mean damaged curls, but you need a game plan. Short-chain alcohols strip moisture in up to 61% of daily users, while silicone-heavy formulas can reduce natural sebum by 23%.
Choose alcohol-free gels with botanical ingredients like aloe or flaxseed to cut breakage incidents by 27%.
Watch for scalp irritation, product layering, and protein overload—signs your routine needs adjustment. Clarifying shampoos every 4–
Nighttime Care (Silk Pillowcases, Pineappling)
Your curls work hard all day—don’t let cotton pillowcases undo everything while you sleep. Silk benefits are real: friction drops by 43%, keeping your hair gel styling intact and frizz at bay.
Try the pineappling method—gather curls loosely on top of your head. A satin bonnet offers bonnet protection too, locking in product absorption overnight for healthier curly hair and easier curl reviving tomorrow.
Refreshing Curls Between Washes
After protecting your curls overnight, morning often brings a flat crown or frizzy ends—but you don’t need another full wash to bring them back to life.
Spritz second-day styling hair with water mixed with a drop of curl defining gel for instant curl revitalization. This moisture boost tames frizz, restores definition, and refreshes your hair gel without product buildup.
Smart frizz reduction for healthier curls, day after day.
Top Product Recommendations for Curly Hair
Now that you’ve mastered the techniques, it’s time to talk products. Not all gels work the same way for every curl pattern, and choosing the right one can make or break your results.
Here’s a breakdown of standout options that actually deliver on their promises.
Best Gels for Different Curl Types
Not all gels treat your curls the same—loose waves need something different than tight coils, and using the wrong formula can leave you with limp strands or a frizzy mess. Fine hair craves lightweight, water-based hair gel that won’t weigh down your waves, while thick hair and coily hair thrive with rich botanical formulas that lock in moisture.
Mixed textures? Layer products strategically—use curl cream first, then seal with hair gel for curls that hold their shape all day.
Curly Girl Method Approved Options
Sticking to sulfate-free, silicone-free formulas means saying goodbye to buildup and hello to curls that actually bounce back—look for gels with clean ingredient lists and a proven track record in the curly community.
The Curly Girl Method prioritizes CG-friendly ingredients like aloe and flaxseed, which deliver botanical benefits without weighing hair down.
Choose gels with balanced protein to strengthen strands, and you’ll see why curl-defining gel application transforms your routine into achieving defined curls that last.
Frequently Asked Questions (FAQs)
How can I avoid white flaking after using gel?
White flakes showing up in your curls? Proper rinsing methods and product layering techniques make all the difference. Flaking happens when you use too much hair gel or layer incompatible products.
Start with damp—not soaking—hair, apply less gel than you think you need, and make sure your hair product application is even. Also, check gel ingredient compatibility with your leave-in conditioner to avoid buildup that causes flaking.
What is the best gel to use for a gel cast?
The best hair gel for curls depends on your curl type and climate. Water-based gels work well for lightweight hold, while alcohol-based options offer stronger hold. Botanical gels with aloe or flaxseed suit tight curls needing moisture retention when creating a gel cast.
How do I prevent frizz after breaking the gel cast?
To prevent frizz after breaking the gel cast, apply a lightweight oil or serum to your palms, rub them together, then gently scrunch your curls.
This technique refinement seals the hair cuticle while maintaining definition, especially helpful when environmental factors like humidity threaten your styling technique.
Does gel work better on damp or dry hair?
Over 65% of people have wavy or curly hair, yet many still apply gel at the wrong stage.
Gel works best on wet hair, not damp or dry. When your curls are soaking wet, gel absorbs quickly and locks in moisture for better curl definition and hold.
How often should you wash curly hair when using gel?
Most curl experts suggest washing every 3-5 days to balance scalp health and prevent gel buildup.
Hair porosity matters—low porosity hair may need more frequent washing, while high porosity curls tolerate longer gaps between washes.
Can you use gel on dry curls for touch-ups?
Applying gel to bone-dry curls rarely delivers the results you’re hoping for.
Gel works best for touch-ups when you lightly dampen hair first—mist sections with water, then scrunch in a tiny amount of product. This reactivates product already in your hair, refreshes frizz-prone areas, and helps restore definition without stiffness or flaking.
What causes white flakes when using curl gel?
Flakes usually
How do you remove gel buildup from curly hair?
Think of gel buildup like layers of invisible armor—eventually, your curls can’t breathe. Clarifying shampoos strip away accumulated hair gel residue and restore scalp health without harsh scrubbing.
Use one weekly to prevent buildup while maintaining your curly hair care routine and keeping hair products from weighing down your strands.
Can you mix different gel brands or types together?
Mixing hair gel brands or types together is possible, but ingredient interactions can affect performance changes like hold, shine, and frizz control.
Test small mixing ratios first to check for scalp sensitivity or unexpected results before applying to all your curly hair.
Conclusion
Think of gel as your curl’s best training partner—it teaches them their shape, then lets them shine. Once you master how to style curly hair with gel, you’re not just taming frizz; you’re unlocking your hair’s natural architecture.
The cast forms, you scrunch it out, and suddenly those spirals have memory, bounce, and confidence. No more second-guessing your routine.
With the right technique and a little patience, you’ll transform gel from a sticky mystery into your most reliable styling ally.
- https://datahorizzonresearch.com/curly-hair-care-and-styling-products-market-45635
- https://www.mordorintelligence.com/industry-reports/hair-gel-market
- https://www.factmr.com/report/444/hair-styling-products-market
- https://www.blackcurlmagic.com/blog/3-reasons-why-we-use-botanical-gels-for-tight-curly-and-natural-hair
- https://www.forhers.com/guides/curly-hair-routine


