
This site is supported by our readers. We may earn a commission, at no cost to you, if you purchase through links. This content is for general informational and educational purposes only and is not a substitute for professional medical, dermatological, or nutritional advice.

Your shaver touches your face every morning, yet the blades hide a film of oil, dead skin, and mineral residue that a quick rinse never reaches. That buildup sits against freshly shaved skin, where it can trigger irritation and even folliculitis.
Deep cleaning your electric shaver for hygiene takes only 5 to 10 minutes a week, and it keeps the cutting surface sharp, smooth, and safe. You don’t need special skills or expensive gear. A soft brush, mild soap, and 70% isopropyl alcohol handle most of the job.
Here’s how to do it right, from the first twist of the head to the final drop of oil.
Table Of Contents
Key Takeaways
- Rinse your shaver for 10 to 15 seconds after every shave, then set aside 5 to 10 minutes each week for a deep clean that clears the oil, dead skin, and mineral film water alone can’t reach.
- Check your shaver’s waterproof rating before soaking anything, and take the head apart only as far as your manual allows, keeping rotary cutter-comb pairs matched and handling thin foils gently.
- Disinfect blades with 70% isopropyl alcohol (or 3% hydrogen peroxide for aluminum or coated parts), then rinse and let everything air dry completely so bacteria and moisture don’t linger.
- Add only the manufacturer-recommended oil after drying, store the shaver somewhere cool and ventilated, and replace the cutting heads every 12 to 24 months, or sooner if you notice pulling or irritation.
Daily Cleaning Versus Weekly Deep Cleaning
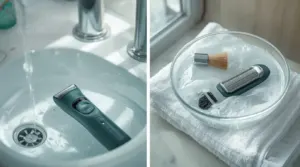
Why does a quick rinse after every shave still leave your shaver less than clean? Because each routine does a different job. A daily rinse takes 10 to 15 seconds and flushes out loose whiskers before they pack down overnight and turn stubborn.
For a weekly deep clean that goes beyond the daily rinse, these electric razor tips for men show how to keep the foils and blades in top shape.
A weekly deep clean goes further. It takes 5 to 10 minutes and clears the sebum, skin cells, and mineral film that hide inside the blade assembly, where water alone can’t reach. Skipping it undermines shaver hygiene and can lead to irritation and folliculitis. For best results, soak removable foils and cutters in warm soapy water for 3 to 5 minutes if your manual allows, keeping the motor and electronic housings dry.
Watch for a louder motor, extra heat, or visible residue around the blades. Those signs mean buildup is straining the motor and dulling the cutters, so use your cleaning brush promptly.
Check Washability and Prepare Cleaning Supplies

That soak only works if your shaver can handle water, so check before you fill the sink. Look for an IPX7 or IPX8 rating, or a manual that says wet/dry or rinsable under running water. If a label says dry only, never submerge it. Clean that model with a brush alone.
Unplug the shaver and switch it off before any water touches it. Remove a detachable cord or batteries too.
Set up your station with a towel and your manual. You’ll need mild soap or a dedicated shaver cleaner, a soft-bristle brush such as camel hair or an old toothbrush, and a lint-free cloth. Tap out loose hair, and disassemble the shaver head only where the manual permits.
Deep Clean Rotary and Foil Shavers
Once you’ve confirmed your shaver’s washability and gathered your supplies, it’s time for the weekly deep clean.
For a step-by-step walkthrough of the soapy-water method, this guide on how to clean razor blades with soap shows exactly how to keep edges sharp.
The steps differ depending on whether you own a rotary or a foil model, so follow the one that matches your shaver type.
Each set of instructions below walks you through taking the head apart, cleaning it, and putting it back together safely.
Rotary Shaver Disassembly and Cleaning

Say your shaver’s been pulling hair lately. Trapped debris is usually the culprit, so disassemble the shaver head for a proper deep clean.
- Twist each head counterclockwise and lift it off.
- Remove cutters and combs from every head.
- Dislodge debris with a cleaning brush.
- Soak parts in warm water and soap.
- Keep cutter-comb pairs matched.
Rotary shaver maintenance stays easy.
If you’re still choosing a model, this guide to the best rotary shavers highlights waterproof designs that make weekly deep cleaning and drying even simpler.
Foil Shaver Disassembly and Cleaning
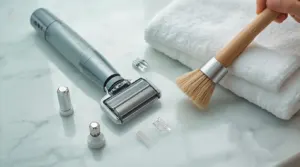
Foil shavers need a gentler touch, since the thin foil dents easily. Power off and unplug the shaver, then release the foil head using your model’s button or clip.
Tap the head lightly on a hard surface, never the foil itself. Sweep out clippings with the cleaning brush, using soft strokes around the cutter block. Let everything air dry completely before reassembly.
Disinfect Electric Shaver Parts Safely

Why does disinfecting the blades matter after a deep clean? Cleaning removes debris, but only a disinfectant reaches the bacteria still clinging to cutting surfaces.
Washing clears away the grime, but only disinfecting can finish off the germs that cling to your blades
Start with 70% isopropyl alcohol for most metal blades and foils. If your shaver has aluminum or coated parts, choose 3% hydrogen peroxide instead, and skip Barbicide, which can corrode them.
Follow this routine:
- Check your shaver’s waterproof rating before submerging anything.
- Soak disassembled blades and foils for 5-10 minutes in alcohol, or 10-15 minutes in peroxide.
- Rinse everything with water to remove residue that could irritate your skin.
For parts that can’t get wet, wipe with a cloth dampened with sanitizing solution. Keep undiluted alcohol off plastic, since it can turn brittle.
Dry, Lubricate, and Store Your Shaver

Why rush the final steps when they protect everything you just cleaned? Pat each part dry with a clean towel, then leave them out for 10 to 15 minutes of air drying components so moisture can’t linger.
Next, lubricate the blades using only the lubricating oil your manufacturer recommends. Heavy household oils attract dust and slow the cut.
| Shaver type | Oil amount |
|---|---|
| Foil | One or two drops per foil and trimmer |
| Rotary | A couple of drops on blades and rings |
Run the shaver for 5 to 10 seconds, then wipe off excess oil.
Store it somewhere cool, dry, and ventilated, never in a sealed bag. Good blade maintenance also means oiling after each cleaning or every few uses.
Frequently Asked Questions (FAQs)
Does cleaning my shaver really reduce skin irritation?
Yes, it does. Consistent daily cleaning paired with weekly deep maintenance lowers the risk of skin irritation by up to 40% compared to irregular upkeep, because clean blades glide instead of tugging.
How often should I replace my shavers cutting heads?
Most shavers need new heads every 12 to 24 months. Daily shavers should swap them yearly, while occasional users can stretch to two years. Replace sooner if you notice pulling or irritation.
Can I use an ultrasonic cleaner on my shaver?
Yes, you can. An ultrasonic cleaner lifts hair, skin cells, and residue from shaver heads and blades. Use water with a drop of dish soap, run 3 to 6 minutes, then rinse, dry, and lubricate.
How can I tell my shaver needs replacing?
Ever notice your shave taking twice as long? That’s often a sign of blade dulling. If cleaning doesn’t restore cutting performance, or you’re getting nicks, irritation, or dents in the foil, it’s time for replacement.
How long can bacteria survive on an uncleaned shaver?
Bacteria can survive on an uncleaned shaver for days, and longer when moisture and skin debris stay trapped inside. That’s why bacteria buildup keeps growing between uses, raising your risk of infections with every shave.
Conclusion
Clean, calm skin starts with clean blades. Think of deep cleaning electric shaver for hygiene as a weekly reset: open the head, brush away debris, wash or wipe the parts, disinfect with alcohol, dry completely, and add a drop of oil.
It takes minutes, and it pays off every morning. Your shaver glides smoother, lasts longer, and leaves fewer bumps behind.
Pick a day, set a reminder, and stick to the routine. Your skin notices.