This site is supported by our readers. We may earn a commission, at no cost to you, if you purchase through links.

Ear hair doesn’t warn you before it becomes a problem. One day you’re fine, the next you’re catching glimpses in the mirror wondering when that happened.
Testosterone quietly activates dormant follicles after 30, and genetics decides how thick things get from there—neither factor asks permission.
Most people grab whatever trimmer is nearby and start cutting, which is exactly how skin gets red, irritated, and angry. Knowing how to trim ear hair without irritation means understanding what causes the problem before you pick up a single tool.
Table Of Contents
- Key Takeaways
- Why Ear Hair Irritation Happens
- Choose The Right Method
- Prepare Your Ears Safely
- Set Up Your Trimming Area
- Trim Outer Ear Hair Carefully
- Avoid These Trimming Mistakes
- Keep Skin Calm After Trimming
- Compare Trimmers and Wax Kits
- Top 5 Ear Hair Removers
- When to See a Professional
- Frequently Asked Questions (FAQs)
- Is it a good idea to trim ear hair?
- How do Turkish barbers remove ear hair?
- Does ear hair mean low testosterone?
- What is the best thing to trim ear hair with?
- Can ear hair grow back thicker after trimming?
- How often should you trim ear hair?
- Is ear hair removal safe for older adults?
- Does ear hair serve any protective purpose?
- Can trimming ear hair affect your hearing?
- Conclusion
Key Takeaways
- Trapped debris and dull blades cause more ear irritation than the hair itself, so clean your tools and dry your skin before every trim.
- Keep your trimmer on the outer ear only — the canal is off-limits, no exceptions.
- Waxing lasts weeks, trimming lasts days — pick your method based on how much upkeep you’re willing to do.
- If you see redness spreading, yellow discharge, or notice any hearing changes, stop grooming and see a doctor.
Why Ear Hair Irritation Happens

Ear hair irritation doesn’t just happen randomly — your body is usually behind it. A few key factors work together to make things worse over time. Here’s what’s actually driving it.
The same way split ends spiral into bigger damage without attention, ignoring ear hair irritation lets small irritants compound into real discomfort.
Hormones, Age, and Genetics
As you age, testosterone and other androgens signal dormant follicles to wake up — that’s why ear hair often thickens after 30. Hormonal hair growth, androgen sensitivity, and genetic hair patterns all shape your hair growth cycle.
If coarsening runs in your family, you’re more likely to notice it too. Understanding these hormonal factors influencing ear hair growth helps you plan safe and effective ear hair removal methods.
How Trapped Debris Increases Irritation
Hormones explain the growth, but debris explains the itch.
When dirt, dead skin, and oils collect around ear hairs, friction amplification kicks in — constant rubbing irritates skin fast.
Sweat blockage and follicle obstruction trap irritants longer, creating prolonged contact that worsens redness. That micro-environment also encourages microbial growth.
Skin irritation prevention during ear hair removal starts with cleaning grooming tools and maintaining ear canal protection before you ever pick up a trimmer.
Signs You Should Not Ignore
Some reactions are mild. Others aren’t. Here’s what tells you to stop trimming and call a doctor:
- Persistent ear pain that keeps returning or sharpens over time
- Redness and heat spreading beyond the trimmed area
- Worsening itch that comes back every session
- Pus discharge or crusting with an odor
- Hearing changes — muffled sound or new ringing
These signal real risk to your ear canal safety.
Choose The Right Method

Not every method works the same way, and choosing wrong can mean irritation, regret, or wasted money. Your skin type, pain tolerance, and how long you want results to last all play a role.
Here’s a straightforward look at three main options to help you decide.
Trimming Vs Waxing Vs Laser
Each method carries a different risk profile, so know what you’re signing up for.
Trimming is quick, low-cost, and easy — but results don’t last long. Trimming also provides low skin irritation compared with other methods.
Waxing pulls from the root, giving you weeks of clean results, though it demands more user comfort with heat and tension.
Laser hair removal safety is solid when done professionally, but the financial investment and procedure time are real commitments.
Best Option for Sensitive Skin
If your skin reacts to almost everything, a Ceramic Blade Trimmer with a Silicone Guard Tip is your safest starting point. These electric trimmers use hypoallergenic blades and rounded tips to minimize friction.
Look for Dermatologist Recommended, Battery-Powered Devices with built-in safety features for skin irritation prevention. Low-Heat Wax works too, but only if your skin tolerates mild warmth.
Temporary Vs Long-lasting Results
Not all removal methods are created equal — and your regrowth timeline tells the whole story.
- Trimming offers quick results but needs frequent upkeep; regrowth appears within days
- Waxing pulls from the root, slowing regrowth up to six weeks
- Laser causes follicle damage gradually across multiple sessions
- Electrolysis targets each follicle individually for long-lasting results
- Session frequency and cost durability increase alongside permanence
Prepare Your Ears Safely

Before you even pick up a trimmer, your ears need a little prep work. Skipping this step is where most irritation starts. Here’s exactly what to do first.
Remove Visible Wax and Debris
Before you touch a trimmer, clear the runway first. Visible wax and debris create uneven surfaces that snag blades and cause nicks.
Try the Oil Softening Technique: a few drops of mineral or baby oil — classic Wax Dissolving Oils — loosen buildup without pushing it deeper. Then use the Gentle Wipe Method with balm wipes along the outer rim.
| Debris Detection Tips | Non-invasive Removal Tools |
|---|---|
| Look for flaking near the ear opening | Baby oil drops |
| Check for dried wax clusters at the rim | Mineral oil applicator |
| Spot discoloration on the outer folds | Soft balm wipes |
| Notice uneven texture before trimming | Wax kits with outer-ear tips |
| Identify residue blocking hair visibility | Clean cotton swab (outer only) |
Stop immediately if you feel burning — skin irritation prevention during ear hair removal starts here, not after. Cleaning of grooming tools, maintenance, and cleaning of grooming devices matter too; dirty blades drag debris right back.
Clean The Outer Ear Gently
Once wax is cleared, a clean surface makes all the difference. Use the Soft Washcloth Wipe method — dampen a cloth, not dripping wet, and wipe gently around the outer ear.
No Cotton Swabs inside the canal; they push debris deeper.
A Light Touch Technique with a Gentle Saline Rinse along the outer rim keeps precision grooming safe and painless.
Dry The Area Completely Before Trimming
Damp skin is a setup for trouble. After cleaning, moisture detection matters — if the outer ear still feels slick or tacky, it isn’t ready.
Use the pat dry technique with an absorbent material like a clean towel. Brief air dry timing helps too.
Humidity control in your space also counts. Dry skin means your trimmer glides cleanly, not drag.
Work in Bright, Clean Lighting
Good lighting isn’t optional — it’s your first safety guideline.
Use a dust-free lamp with cool white light (around 4000K–5000K) and position it at a consistent light angle to get shadow-free visibility across your outer ear.
A glare-free mirror keeps skin tone accurate so you won’t misjudge where hair ends. Clear sight lines mean cleaner, step-by-step passes and far less skin irritation.
Set Up Your Trimming Area

Before you start trimming, your setup matters more than most people realize. A few simple checks can mean the difference between a clean, irritation-free result and a frustrating mess.
Here’s what to have in place before you switch anything on.
Use a Magnifying Mirror
Seeing clearly is half the battle.
A magnifying mirror with the right magnification range — usually 3x to 5x — gives you control without zooming in so far you lose perspective. Look for models with LED illumination and strong contrast enhancement so you can easily separate hair from skin.
Mirror mounting on an adjustable arm keeps your neck comfortable.
Optical clarity makes every pass safer.
Keep Tools and Hands Clean
Clean tools protect your skin as much as your technique does. Wash your trimmer with soap and water first, then disinfect it — and let any disinfectant residue dry fully before it touches your ear.
Hand hygiene matters too: scrub between fingers, not just a quick rinse.
Store your trimmer in a dry pouch so dust and bathroom spray don’t undo your cleaning trimmer blades routine.
Avoid Water, Steam, and Damp Surfaces
Even dry hands can transfer moisture. That’s why Surface Moisture Management starts before your electric trimmer ever touches your ear.
Wait at least 30 minutes after a shower — Post‑Shower Cooling and Steam Delay Timing are real factors. Steam raises ambient humidity, softening skin and smearing debris.
Keep your space Humidity-Free:
- Step away from running taps
- Avoid steamy bathrooms
- Wipe surfaces dry before starting
- Use your ear hair trimmer only on dry skin
Check Your Trimmer Before Use
Your trimmer deserves a quick inspection before it touches your skin. Run a Blade Sharpness Test — dull blades tug instead of cut. Do a Battery Level Check so it doesn’t stall mid-session. Confirm your Guard Attachment Verification is secure. Then perform a Noise Consistency Check; grinding means trouble.
Trim Outer Ear Hair Carefully
Now comes the part where most people either do it right or accidentally cause irritation.
The actual trimming is simpler than you think — but only if you follow few key steps. Here’s what to keep in mind as you work through your outer ear hair.
Start With Visible Outer Hairs Only

Your outer ear is the only safe zone. Start with Visual Hair Identification — if you can’t clearly see the hair’s base on the outer ear’s surface, leave it alone.
Surface Only Trimming means ignoring anything near the canal entrance. Think of it as Borderline Debris Removal: visible hair only, nothing hidden.
That boundary is your first rule of painfree hair removal.
Use Light Pressure and Slow Passes

Think of your trimmer like a paintbrush — control comes from touch, not force. Blade Angle Control and Guard Use do the heavy lifting, so your job is Rhythmic Motion and a Steady Hand.
- Let Rounded tips glide; never push.
- Use Skin Feedback — tingling means stop.
- Slow passes = painless trimming and real Electric trimmer safety.
Pause Often to Avoid Over-trimming

Stop every minute or two — this is your built-in Progress Monitoring checkpoint. Use Mirror Repositioning to check from different angles, then run a clean fingertip along the outer rim for Skin Sensation Checks.
Incremental Snipping keeps painless trimming realistic; rounded tips do the work, so you don’t need to. Safety considerations for ear hair grooming demand patience over speed — less is always more.
Keep The Blade at Skin Level

Blade Angle Control is everything here — keep your electric trimmer’s blade parallel to the skin, not tilted inward. Parallel Skin Contact means you’re skimming hair, not digging.
- Consistent Stroke Alignment across each section
- Pressure Light Touch only — let rounded tips do the work
- Guard Comb Adjustment before starting
- Favor compact and lightweight, user-friendly ergonomics in ear trimmers
- Never angle toward the canal
Safety considerations for ear hair grooming demand this discipline every pass.
Avoid These Trimming Mistakes

Even with the right trimmer in hand, a few easy-to-miss mistakes can turn a simple grooming session into a painful one. Most irritation doesn’t come from the hair itself — it comes from how the trimming gets done.
Watch out for these common errors before your next session.
Do Not Insert Tools Into The Canal
Your ear canal isn’t a grooming zone — it’s a danger zone. Pushing ear hair trimmers or any tool past the canal opening violates basic canal safety guidelines and risks real harm. Insertion hazard awareness matters here: you can scratch the lining, pack wax deeper, or even puncture your eardrum.
Your ear canal is a danger zone, not a grooming zone — inserting any tool past the opening risks scratching the lining, packing wax deeper, or puncturing your eardrum
Stick to safe grooming alternatives targeting only visible outer hairs.
When in doubt, professional ear cleaning is the smarter move.
Avoid Trimming on Wet Skin
Wet skin is a trimmer’s worst enemy. Moisture kills dry skin grip, turning clean cuts into a blade slip risk.
Your outer ear becomes slippery, raising the chances of microabrasion prevention failures and skin irritation.
Wet/dry shavers exist, but even those perform better on dry skin. visibility reduction from dampness also makes over-trimming easy.
Always trim dry for safer electric trimmer safety.
Don’t Rush or Press Too Hard
Speed is the enemy of clean results. A controlled trim pace means short pass intervals — one to two gentle strokes, then stop and check. Frequent spot checks prevent over-trimming before it starts.
Minimal pressure technique matters too; gentle blade contact lets the rotating blades cut without compressing skin.
Rushing triggers irritation fast. Slow down, and your ears will thank you.
Skip Dull or Unsafe Devices
Dull tools are just as risky as rushing. A blade that snags instead of cuts pulls hair and irritates sensitive skin fast. That’s why Sharp Blade Assurance matters — your trimmer should glide, not tug.
- Check for Replaceable Blade System options so you’re never stuck with worn dual edge blades
- Confirm IP Water Resistance for safe, thorough cleaning
- Look for Guard Safety Design to protect delicate tissue
- Choose electric trimmers with Battery Longevity for consistent, reliable power
Keep Skin Calm After Trimming

Trimming is done, but your skin still needs a little attention. The next few minutes matter more than most people realize. Here’s how to keep things calm and irritation-free.
Wash The Outer Ear Gently
After trimming, clean your outer ear with lukewarm water and a soft washcloth. Use circular gentle motions across the outer folds — no cotton swabs, ever. push debris deeper. Wipe only visible surface areas, then let the skin air dry naturally.
Good ear hair trimmers with IPX7 waterproof ratings make rinsing the trimmer head easier, without safety considerations becoming complicated.
Pat Dry With a Clean Towel
Once you’ve washed, pat the outer ear dry with a lint-free towel. Use short, gentle taps — never rub. Towel material choice matters: microfiber or soft cotton won’t snag sensitive skin.
Keep drying duration brief but thorough.
Good hygiene practices mean using a clean, separate towel for wet/dry use only near your ears. Dry skin cuts infection risk considerably.
Apply Fragrance-free Moisturizer if Needed
Once your skin feels calm and dry, reach for a fragrance-free moisturizer — it’s one of the best ear hair removal tips you can use post-removal. Fragrance-free choices lower allergy risk and support barrier repair. Look for glycerin or ceramide ingredients for hydration.
Patch test behind your ear first. Apply a small amount to damp skin, focusing on post-removal ear hygiene and irritation prevention.
Avoid Earphones and Swimming Briefly
Your ears need breathing room right after trimming. Moisture trapping risks are real — earphones seal warmth against freshly trimmed skin, and earbud friction irritation can extend redness for hours.
Skip swimming too; post‑trim drying is essential for healing.
Keep these off your list for 24 hours:
- Standard earbuds or headphones
- Hot showers or saunas
- Swimming without swim earplug alternatives
- Touching ears with unwashed hands
- Wet/dry use of grooming tools near water
Compare Trimmers and Wax Kits

Not all ear hair removers work the same way, and the right pick depends on your skin, schedule, and how long you want results to last. Trimmers and wax kits each have real trade-offs worth knowing before you buy.
Here’s how they stack up across the things that matter most.
Safety for Sensitive Ear Skin
Sensitive ear skin deserves real respect. Always do a patch test before trying new products — your skin will tell you fast if something’s wrong. Stick to allergy-free products and skip anything fragranced after trimming.
A blade sharpness check before each session protects your skin barrier. Hygiene protocols matter too: clean tools, dry skin, and temperature control keep your ear canal safe.
Comfort, Precision, and Ease of Use
A trimmer that fights you mid-session is a trimmer that causes cuts. The best tools combine an Ergonomic Grip with One-Hand Operation, so your dominant hand stays in control while the other steadies your ear.
- Quiet Motor and Adjustable Speed reduce vibration for steadier passes
- An Illuminated Blade helps you spot fine hairs instantly
- Compact and lightweight builds make it a reliable travel trimmer
Cleaning and Maintenance Needs
A dirty blade is a dull blade — and a dull blade means more passes, more irritation.
Your Post-Use Blade Cleaning routine matters: brush off clippings after every session, wipe the exterior dry, and follow a consistent Blade Sanitization Routine using manufacturer-approved alcohol.
Dry Storage Practices prevent corrosion, while Battery Maintenance Tips keep power steady.
Stick to a Replacement Blade Schedule — dull edges tug instead of cut.
IPX7 waterproof models add user convenience by simplifying rinse-and-go cleaning.
How Long Results Usually Last
Results don’t last the same for every method — and that gap matters when you’re planning your routine.
- Trimming Regrowth Cycle: Stubble returns in 1–3 days; most people follow a weekly Maintenance Frequency Recommendation.
- Waxing Duration Timeline: Hair Follicle Recovery takes longer after root removal — expect 2 to 4 weeks of smooth skin, sometimes up to 6 weeks.
- Laser Reduction Timeline: Gradual reduction across sessions; long‑lasting results of wax versus trimming pale next to laser’s cumulative effect.
Top 5 Ear Hair Removers
Not all ear hair removers are built the same, and picking the wrong one can leave your skin red and irritated.
Five options cover different styles and budgets, so you can find what actually works for you.
Here’s what made the cut.
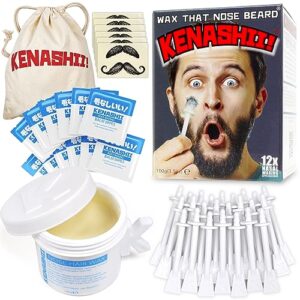
1. Nose Wax Kit with Ear Applicators
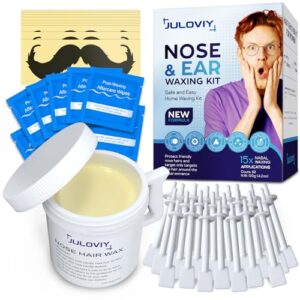
If you want longer‑lasting results without batteries or blades, a nose wax kit with ear applicators is worth a look. This kit uses hypoallergenic hard wax — gentle enough for sensitive skin — and comes with 30 disposable applicators that work for both nose and ear hair.
Results stay clean for five or more weeks, and regrowth comes back finer and softer. At $18.99, it’s an affordable, travel‑friendly option that keeps things simple without sacrificing effectiveness.
| Best For | Anyone who wants a low-maintenance, non-electric grooming option for nose and ear hair — especially travelers or people tired of daily trimming. |
|---|---|
| Hair Removal Method | Waxing |
| Target Area | Nose & Ear |
| Unisex Use | Yes |
| Travel Friendly | Yes |
| Pain Level | Low |
| Included Accessories | 30 applicators, 15 balm wipes, mustache guards |
| Additional Features |
|
- Results last 5 weeks, way longer than trimming or plucking
- Works for both nose and ear hair, so it’s two tools in one
- Hypoallergenic formula is gentle on sensitive skin, and the balm wipes help soothe afterward
- Heating the wax takes a few minutes, so it’s not a quick grab-and-go
- The first nostril can sting — it takes a little getting used to
- You’ll need a microwave-safe container to heat it, which adds a small extra step
2. ZORAMI Ear Nose Hair Trimmer
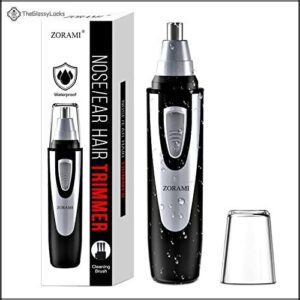
If wax isn’t your thing, the ZORAMI Ear Nose Hair Trimmer keeps it clean and simple. One AA battery powers dual 360° rotating stainless-steel blades — quiet enough at under 50 dB to use without waking anyone.
The IPX7-rated head pops off and rinses under water in seconds.
At just 2.8 oz, it slips into any travel bag.
For quick touch-ups before a meeting or weekend trip, it’s a genuinely practical tool to keep on hand.
| Best For | Anyone who wants a fast, no-fuss way to keep nose and ear hair in check — especially travelers or people who like a low-maintenance grooming routine. |
|---|---|
| Hair Removal Method | Electric Trimming |
| Target Area | Nose & Ear |
| Unisex Use | Yes |
| Travel Friendly | Yes |
| Pain Level | Painless |
| Included Accessories | Dust-proof cover |
| Additional Features |
|
- Quiet enough (under 50 dB) to use anywhere without bothering anyone
- IPX7-rated head pops off and rinses clean in seconds
- Tiny and light at 2.8 oz — fits in any bag or drawer
- Battery not included, and you’ll need to keep replacing AAs over time
- No length settings or attachments — it’s trimming only, not full grooming
- Some reports of quality inconsistencies, so you may get a dud
3. EQUADOSE Tweezy Nose Ear Hair Remover
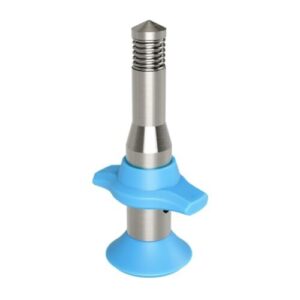
Sometimes the simplest tool wins. The EQUADOSE Tweezy skips batteries and blades entirely — it’s a compact stainless-steel plunger that pulls hairs from the root with a quick push.
No charging, no noise, no wax mess. At under 2 oz, it fits anywhere.
The root removal means hair grows back more slowly, so you’re not touching up every week. Fair warning: thicker hairs may cause mild tugging.
But for clean, no-fuss grooming on the go, it’s hard to beat.
| Best For | Anyone who wants a quiet, low-maintenance way to handle nose and ear hair grooming at home or on the go. |
|---|---|
| Hair Removal Method | Manual Plucking |
| Target Area | Nose & Ear |
| Unisex Use | Yes |
| Travel Friendly | Yes |
| Pain Level | Mild Discomfort |
| Included Accessories | Plastic storage sleeve |
| Additional Features |
|
- Pulls hair from the root, so regrowth is slower and touch-ups are less frequent
- No batteries, blades, or wax — nothing to charge, replace, or clean up
- Tiny and light enough to toss in a travel bag without a second thought
- Thicker hairs can cause a noticeable tug, so it’s not totally painless
- The short spring reach can make it fiddly to use and may miss fine or deep-set hairs
- Takes a little practice to nail the right angle and pressure
4. Wokaar Unisex Nose and Ear Wax Kit

If you’d rather go hands-free with wax, the Wokaar Unisex Nose and Ear Wax Kit is worth a look. It pulls hair from the root, so regrowth takes about four to six weeks — far longer than any trimmer.
The kit comes with 100g of hard wax beads, 30 applicator sticks, and mustache guards to protect surrounding skin. It’s hypoallergenic and safe for sensitive tissue.
Heat, apply, pull. That’s really it.
| Best For | Anyone who wants a low-maintenance, salon-free way to stay hair-free longer — especially people tired of trimming every few days. |
|---|---|
| Hair Removal Method | Waxing |
| Target Area | Nose & Ear |
| Unisex Use | Yes |
| Travel Friendly | Yes |
| Pain Level | Low |
| Included Accessories | 30 sticks, paper cup, measuring cup, mustache guard |
| Additional Features |
|
- Results last 4–6 weeks, so you’re not dealing with it constantly
- Works for both nose and ear hair, and the formula is gentle enough for sensitive tissue
- Saves real money over time compared to salon waxing sessions
- Takes a bit of practice to get the wax amount and heating just right
- Overheating is a real risk — you have to let it cool before it goes anywhere near your nose
- Not ideal if you have skin conditions like eczema or any open irritation in the area
5. Kenashii Nose Wax Hair Removal Kit
The Kenashii Nose Wax Hair Removal Kit keeps things simple without cutting corners. You get 100g of hypoallergenic wax split across two 50g bags, 24 applicator sticks, 12 post-waxing balm wipes, and mustache guards to protect surrounding skin.
No microwave needed — it melts in about five minutes. Apply, wait, pull.
Results can last up to five weeks, and regrowth comes back thinner over time. It’s a solid pick if you want longer breaks between grooming sessions.
| Best For | Anyone who wants a low-maintenance, at-home alternative to plucking or trimming and doesn’t mind a little wax work every few weeks. |
|---|---|
| Hair Removal Method | Waxing |
| Target Area | Nose & Ear |
| Unisex Use | Yes |
| Travel Friendly | Yes |
| Pain Level | Low |
| Included Accessories | 24 applicators, balm wipes, mustache guards, storage bag |
| Additional Features |
|
- Results last up to five weeks, so you’re not dealing with this every week
- Hypoallergenic formula stays pliable — no brittle, snapping wax mid-removal
- Comes with balm wipes and mustache guards to make the whole process a bit more comfortable
- Heating the wax takes some trial and error — too hot and it’s a burn risk, too cool and it won’t work
- One pass might not catch everything, so you may need to go back in a second time
- Instructions are English-only, which isn’t great if that’s not your first language
When to See a Professional

Most ear hair issues are easy to handle at home, but some signs mean it’s time to call in the pros. If something feels off — pain, strange discharge, or sudden hearing changes — don’t try to fix it yourself.
Here’s when professional help is the right move.
Pain, Discharge, or Hearing Loss
Pain, discharge, or hearing loss after trimming aren’t normal — they’re your body’s warning system. Discharge color indicators matter: yellow or green fluid signals infection, not irritation.
Pain trigger identification helps pinpoint whether it’s the ear canal or middle ear involved.
Unexplained tinnitus correlation with sudden hearing loss types — conductive or sensorineural — means see a doctor immediately.
Signs of Infection or Skin Damage
Red streaks radiating from your ear, yellow crust forming around trimmed skin, or increasing swelling are signs you shouldn’t brush off. Warmth and redness that spread outward — not shrink — point toward infection, not normal healing.
systemic fever makes it more urgent.
These are clear signals that dermatological safety has been compromised and a doctor needs to take a look.
Outer-ear Waxing Limits and Safety
Waxing works well for outer ear hair — but only if you respect its limits. Keep wax temperature limits in check; too hot, and you’re looking at burns on thin, sensitive skin.
Always do a patch test procedure before committing. Use fragrance-free formulations to avoid flare-ups.
The limited application zone is critical: never go inside the ear opening. After removal, follow strict post-removal ear hygiene and irritation prevention — skip moisture entirely.
Laser and Electrolysis Options for Lasting Results
Want results that last months — or forever? Two clinical options deliver that.
- Laser hair removal offers long-term hair reduction — ideal if your hair is dark, since Skin Tone Matching and Hair Color Suitability affect results.
- Electrolysis targets each follicle individually — permanent reduction regardless of hair color.
- Session Frequency and Cost Comparison matter: laser runs 4–6 sessions; electrolysis takes longer but is FDA-approved permanent.
Frequently Asked Questions (FAQs)
Is it a good idea to trim ear hair?
Yes, trimming ear hair is a good idea. It boosts personal confidence and meets cultural norms around grooming.
Just focus on safe, effective methods and smart cost-benefit choices to avoid irritation.
How do Turkish barbers remove ear hair?
Turkish barbers practice a time-honored ritual: rapid heat removal using a singeing stick.
This flame singeing technique targets outer hair only, burning fine strands in seconds — a professional safety method never meant for home use.
Does ear hair mean low testosterone?
Ear hair doesn’t reliably signal low testosterone. Hormone levels, genetics, and age all play a role.
Clinical testing — not appearance — is how doctors identify endocrine indicators.
Don’t let misleading assumptions drive health decisions.
What is the best thing to trim ear hair with?
rotary guarded trimmer is your best bet.
Look for electric trimmers with dual edge blades, IPX7 waterproof rating, and a rounded guard trimmer head.
compact and lightweight battery-operated trimmer models work well.
Can ear hair grow back thicker after trimming?
doesn’t thicken your follicle anatomy — that’s a trimming illusion. The perceived coarseness comes from blunt regrowth texture, not actual change.
Your hair’s growth cycle length stays the same regardless of how often you trim.
How often should you trim ear hair?
Most people do well trimming every one to two weeks.
Your regrowth speed factors in here — if tufts reappear sooner, adjust your trim schedule accordingly and follow simple frequency adjustment guidelines.
Is ear hair removal safe for older adults?
Yes, but with care. Age-related skin thinning and bleeding tendency mean gentler passes matter more. Chronic health conditions and skin sensitivity call for slower, lighter technique every time.
Does ear hair serve any protective purpose?
Ear hair is basically nature’s first line of defense.
It assists Dust Filtration, Microbe Defense, Insect Prevention, and Wax Distribution — quietly protecting your ear canal and preserving Hearing Comfort every single day.
Can trimming ear hair affect your hearing?
Short answer: not directly.
But when excess hair traps wax and causes acoustic blockage, you can experience muffled hearing or sound transmission loss.
Aggressive grooming near the inner ear canal risks ear canal narrowing — which is worse.
Conclusion
Patience, precision, and proper preparation—that’s what separates a clean result from a red, irritated ear. Learning how to trim ear hair without irritation isn’t complicated, but it does demand respect for the process.
Use the right tool. Keep the skin clean and dry. Never force the blade where it doesn’t belong.
Your ears handle sound, balance, and protection every single day. Treat them carefully, and they’ll never give you reason to regret it.
- https://popado.net/fragrance-free-moisturizers-benefits-and-properties-you-need-to-know/
- https://www.semanticscholar.org/paper/dbbe862d6e293cec493aaa07fb4f46f5b428cbfc
- https://catapult.global/blogs/blogs/7-reasons-to-go-for-a-fragrance-free-moisturizer
- https://acclaym.com/blogs/news/the-benefits-of-fragrance-free-skincare-products
- https://patchology.org/vetted/best-fragrance-free-moisturizers-for-sensitive-skin/