This site is supported by our readers. We may earn a commission, at no cost to you, if you purchase through links.

You’re basically creating a conditioner-water mixture that hydrates while encouraging your natural curl pattern.
This method works particularly well for wavy, curly, or coily hair types that crave moisture.
Unlike traditional conditioning, the squishing motion helps distribute product evenly while forming curl clumps for better definition.
Think of it as giving your thirsty curls a much-needed drink that lasts.
The technique transforms how your conditioner works—it’s not just what you use, but how you use it.
Table Of Contents
- Key Takeaways
- Squish to Condish Method
- Preparing for Squish to Condish
- Applying Conditioner Correctly
- Rinsing and Defining Curls
- Customizing Squish to Condish
- Frequently Asked Questions (FAQs)
- Does squish to condish really work?
- Do you rinse after squish to condish?
- What is the squish 2 Condish method?
- What does condish mean?
- How does hard water impact the Squish to Condish method?
- Can Squish to Condish accelerate hair color fading?
- Is Squish to Condish effective for high porosity hair?
- How often should Squish to Condish be performed weekly?
- Can Squish to Condish replace deep conditioning treatments?
- How often should I squish to condish?
- Conclusion
Key Takeaways
- You’ll transform your curls by applying conditioner to wet hair and squishing it upward with cupped hands, helping water and product penetrate your hair cuticle while encouraging curl clumping.
- Your hair will experience increased hydration and moisture retention, resulting in defined, frizz-free curls with better bounce and elasticity.
- You can customize the technique based on your hair’s porosity level – low porosity hair needs extra squishing to open cuticles, while high porosity hair benefits from partial rinsing.
- You’ll achieve best results by using sulfate-free cleansers, generous amounts of silicone-free conditioner, and following up with appropriate styling products while avoiding touching your curls until completely dry.
Squish to Condish Method
You’ll transform your limp curls into defined, bouncy coils with the Squish to Condish method, a hydration technique where you literally squish water and conditioner into your hair with cupped hands.
This simple yet effective approach opens the hair cuticle, allowing moisture to penetrate deeply while encouraging natural curl clumping, resulting in frizz-free definition that lasts longer than traditional conditioning methods, providing a lasting hydration technique.
What is Squish to Condish
Squish to Condish (STC) is a game-changing hydration technique for thirsty curls.
A revolutionary hydration boost for curls, Squish to Condish transforms thirsty strands into defined, frizz-free coils full of bounce and shine.
You’ll apply conditioner to wet hair, then repeatedly squish water and conditioner upward into your strands.
This method helps your hair’s cuticles open and absorb moisture deeply, which is a moisture retention strategy.
It’s not just another hair conditioning step—it’s a strategy that works for all curl types, reducing frizz and enhancing curl definition.
For overnight hydration, consider a similar approach to the baggy method, which traps moisture.
Benefits for Curly Hair
Now that you understand the concept, let’s explore why Squish to Condish works wonders for your curls.
This technique offers impressive benefits: it provides a serious hydration boost while promoting natural curl clumping.
You’ll notice immediate frizz reduction and enhanced curl definition after just one treatment.
The STC method improves overall manageability and hair health, making your curly hair more elastic and bouncy without causing product buildup or dehydration, leading to improved curl definition.
Suitable Hair Types
While those moisture-boosting benefits are impressive, you’re probably wondering if your hair type qualifies for Squish to Condish.
Good news, this technique works for virtually all curl patterns – from loose Wavy Hair to tight coils.
Whether you have Fine Hair that needs volume or Thick Hair craving definition, you’ll see results.
It’s especially transformative for Low Porosity curls, though those with severely Damaged Hair might experience some tangling.
Customize frequency based on your curly hair’s specific hydration needs.
Preparing for Squish to Condish
You’ll need a few key items ready before transforming your curls, including sulfate-free shampoo, a wide-tooth comb, and a quality silicone-free conditioner with slip.
Proper preparation guarantees your curls receive maximum hydration during the squish to condish technique, setting the foundation for those bouncy, defined coils you’ve been dreaming about, with maximum hydration being crucial.
Washing With Sulfate-Free Cleanser
Every successful Squish to Condish routine begins with proper cleansing.
You’ll want to use a sulfate-free shampoo or cleanser that removes product buildup without stripping your hair’s natural oils.
Sulfate alternatives like cocamidopropyl betaine are gentler on your curls, maintaining scalp health while preparing your strands for ideal conditioner absorption.
For best results, clarify thoroughly but gently, as residue can interfere with hair hydration during the squishing process.
Detangling and Sectioning
Now that your hair is clean, it’s time to prep for that magical Squish to Condish moment!
Gently work through tangles with a wide-tooth comb or your fingers while your hair’s still wet.
Divide your curls into 4-6 manageable sections using sectioning clips. This approach guarantees even conditioner distribution and lets you focus on one area at a time, maximizing those curl-defining benefits you’re after, which will help you achieve the perfect conditioner distribution.
Choosing The Right Conditioner
Now that your hair is properly detangled and sectioned, let’s pick the perfect conditioner for your squish to condish (STC) journey.
The right hair conditioner makes all the difference! Look for silicone-free formulas rich in moisturizing ingredients—they’ll penetrate the cuticle without coating your strands.
Many people now seek conditioners without silicones for healthier hair. Skip drugstore options and consider plant-based products that improve hair density.
Your conditioner choice should balance protein and moisture based on your hair porosity.
Applying Conditioner Correctly
You’ll transform your curls by applying conditioner with purpose, not just slapping it on like you’re buttering toast.
With the right amount distributed evenly through your mid-lengths and ends, you’re setting the foundation for those bouncy, defined coils you’ve been dreaming about.
Amount and Distribution of Conditioner
When applying conditioner for the Squish to Condish (STC) method, generous product saturation is absolutely vital for success.
Your conditioner quantity should be:
- Enough to make your hair feel slippery like seaweed
- Double what you’d normally use (yes, really!)
- Distributed evenly through each section using your fingers as combs
- Applied until every strand feels coated but not weighed down
Use sectioning techniques to guarantee complete coverage throughout.
Many find that a specialized STC conditioner enhances the process.
Avoiding Roots and Scalp
While applying generous amounts of conditioner, keep it away from your roots and scalp. This prevents scalp buildup and root grease that can weigh down your curls.
A good conditioner can also restore essential moisture to the hair.
| Concern | Why Avoid Roots | Solution |
|---|---|---|
| Scalp Sensitivity | Irritation from product buildup | Apply from mid-shaft down |
| Oiliness | Natural oils already present | Focus on dry ends |
| Volume | Heavy roots flatten curls | Targeted hydration on lengths |
During STC, concentrate conditioner application where your hair needs moisture most—the ends! This involves applying conditioner where it’s needed, which is highlighted in the table above as focusing on dry ends with targeted hydration on lengths, and avoiding roots due to natural oils already present.
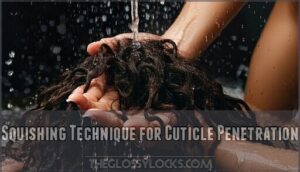
Squishing Technique for Cuticle Penetration
Now that you’ve kept the product away from your roots, it’s time for the magic to happen.
The squishing technique is where the real transformation begins! You’ll want to cup your hands, gathering water and curls together, then apply gentle squishing pressure upward.
This action helps open hair cuticles, allowing better conditioner absorption. For ideal results, use cool water temperature which seals in moisture.
Your hair’s porosity impacts how quickly this saturation occurs, so be patient while working through each section until proper hair saturation is achieved, ensuring the best possible outcome with gentle squishing pressure.
Rinsing and Defining Curls
You’ll now transform your conditioner-coated curls into defined, bouncy coils by gently squishing water upward into your hair, encouraging curl clumping and proper hydration.
Once you’ve completed this essential rinsing technique, your curls will be perfectly prepped for styling products that lock in moisture and enhance your natural pattern.
Water Squishing for Hydration
Now that you’ve applied your conditioner, it’s time for the real magic—water squishing! This technique boosts hydration levels dramatically through proper Water Absorption.
Here’s how to master squishing water into your conditioned hair:
- Cup lukewarm water in your palms
- Gather sections of hair gently
- Press upward with medium Squishing Pressure
- Listen for a "squish" sound indicating Cuticle Opening
- Repeat until hair feels slippery but not overly diluted
Achieving ideal results may require specialized squishing products. You’ll feel the difference immediately—hair that drinks up moisture like a sponge!
Curl Clumping and Definition
Three distinct curl families will form as you continue squishing water into your conditioner-coated strands.
Watch how these curl clumps naturally gather, creating what we call "curl families."
Curl families form as your strands clump together naturally, bringing unmatched definition, bounce, and charm to your curls!
For maximum frizz reduction, don’t break these clumps apart! The squish to condish technique enhances these natural groupings, providing long-term definition.
Try pairing with a gel for even better clump size and definition—you’ll be amazed at how your curls transform with maximum frizz reduction.
Post-Conditioning Care and Styling
After completing your Squish to Condish ritual, your styling journey begins.
Apply styling products to soaking wet hair, starting with lighter products like leave-ins before heavier gels.
Plop with a microfiber towel for 10-20 minutes to remove excess moisture without disturbing curl definition.
To maintain hydration on non-wash days, consider using lightweight hair oils.
For maximum frizz control, air dry or use a diffuser on low heat, and remember not to touch your curls until they’re completely dry, to ensure the best curl definition and hair care results with proper styling.
Customizing Squish to Condish
You’ll get the most from squish to condish when you tailor it to your hair’s unique needs, whether you have low porosity strands that need extra time or high porosity curls that require specific products.
You can further customize your results by combining this technique with other curly hair methods, adjusting the amount of water used, or experimenting with different conditioner formulations for your specific curl pattern.
This approach allows you to customize your results by making adjustments that cater to the unique characteristics of your hair.
Adjusting for Hair Porosity
Your hair porosity determines how your squish to condish routine should work.
For low porosity hair with tightly closed cuticles, use silicone-free moisturizing conditioners and focus on the squishing motion to force those stubborn cuticles open.
If you’ve got high porosity hair that’s naturally thirsty, try partial rinsing to retain extra moisture—it’ll act like a built-in leave-in conditioner.
Understanding your hair’s ability to absorb product is key to hydration success.
Combining With Other Techniques
Several powerful techniques can supercharge your Squish to Condish routine for maximum hydration and definition.
Try combining S2C with the LOC method by applying leave-in, oil, and cream afterward.
Follow your squishing with plopping in a microfiber towel to maintain curl definition, or enhance results with diffuser use.
For extra hold, apply gel during the squishing process. The Curly Girl Method‘s principles work perfectly with this technique, creating a thorough approach to moisture-rich, bouncy curls.
Tips for Long-Term Benefits and Hair Health
To maximize your Squish to Condish success long-term, prioritize these five essential hair health practices:
- Prevent Product Buildup with clarifying washes every 2-3 weeks
- Invest in Night Protection using satin pillowcases or bonnets
- Maintain Scalp Health with gentle massages during cleansing
- Balance moisture with regular Protein Treatments for strength
- Follow consistent Trimming Frequency (every 8-12 weeks)
These habits guarantee your moisture retention efforts aren’t wasted, keeping your hydration levels at their best between conditioning techniques.
Regular massages can stimulate dormant follicles.
Frequently Asked Questions (FAQs)
Does squish to condish really work?
Yes, it really works! You’ll notice more hydrated, defined curls with less frizz when you properly implement this technique. Many curly-haired folks swear by it for transforming their natural texture.
Do you rinse after squish to condish?
Like rinsing the final notes of a symphony, you’ll partially rinse out your conditioner after squishing.
You’ll want to leave some in for moisture, but rinse enough to avoid product buildup and heaviness.
What is the squish 2 Condish method?
The squish to condish method involves applying conditioner to wet hair.
Then cupping water in your hands and squishing upward into your curls to enhance hydration, definition, and reduce frizz in curly hair.
What does condish mean?
Just when you’re getting into hair care, you’ll find "condish" is simply shorthand for conditioner.
It’s your hair’s best friend, locking in moisture and creating those beautiful, defined curls you’re looking for.
How does hard water impact the Squish to Condish method?
Hard water leaves mineral deposits on your hair, preventing moisture absorption during the S2C technique.
You’ll notice less curl definition, increased frizz, and product buildup.
Consider using a chelating shampoo or filtered water instead.
Can Squish to Condish accelerate hair color fading?
Yes, frequent wet styling methods like Squish to Condish can fade your hair color faster, especially with water-soluble dyes.
You’ll want to use color-safe conditioners and cooler water to minimize potential fading.
Is Squish to Condish effective for high porosity hair?
While most techniques favor low porosity hair, your high porosity strands will drink up moisture through squish to condish.
The technique’s intensive hydration seals your cuticles effectively, preventing the rapid moisture loss you typically experience, which is a key benefit of using intensive hydration.
How often should Squish to Condish be performed weekly?
For best results, you’ll typically want to perform this hydrating technique once or twice weekly, depending on your hair’s unique needs.
Those with drier hair might benefit from more frequent application.
Can Squish to Condish replace deep conditioning treatments?
While enhancing hydration and defining curls, squish to condish can’t fully replace deep conditioning treatments.
You’ll still need those intensive treatments to provide protein balance, repair damage, and deliver long-term nourishment that daily techniques can’t.
How often should I squish to condish?
For most curly hair types, you’ll benefit from squishing to condish 1-2 times weekly during regular wash days.
If you have particularly dry hair, you might increase to 3 times weekly for ideal hydration.
Conclusion
As droplets cascade through your curls, remember that the squish to condish technique isn’t just a method—it’s a transformation ritual for your hair.
By embracing this approach, you’ll discover moisture retention, enhanced definition, and bounce that lasts.
Whether you’re a curl novice or veteran, squish to condish delivers consistent results when practiced regularly.
Your curls will thank you with volume, shine, and that coveted definition that turns heads.
Ready to revolutionize your curl routine? Start squishing today!


