This site is supported by our readers. We may earn a commission, at no cost to you, if you purchase through links.

Most guys drop $40 every three weeks just to keep their beard looking sharp. That’s over $600 a year walking straight into your barber’s pocket.
Learning to fade your own beard changes that equation completely. You’ll need clippers with adjustable guards, a steady hand, and about 20 minutes of focus. The technique itself isn’t complicated—start at your neckline with a short guard, move up through longer lengths, and blend each shift with upward scooping motions.
Once you nail the guard-by-guard method, you control exactly how your beard frames your face. No appointments, no waiting, no settling for someone else’s interpretation of what looks good.
Table Of Contents
- Key Takeaways
- What is a Beard Fade?
- Essential Tools for Fading Your Beard
- Preparing Your Beard for a Fade
- Step-by-Step Guide to Fading Your Beard
- Techniques for a Smooth, Even Fade
- Maintaining and Styling Your Faded Beard
- Top 8 Products for DIY Beard Fades
- Frequently Asked Questions (FAQs)
- How can I fade my beard at home?
- Should I fade my beard wet or dry?
- How do you fade a beard?
- Should a beard be faded?
- How do you maintain a faded beard?
- Can a barber fade a beard?
- How can I fade my beard easily?
- How can I fade my beard color?
- How long does your beard need to be to fade it?
- How can I temporarily darken my beard?
- Conclusion
Key Takeaways
- You’ll save over $600 annually by learning to fade your own beard at home using clippers with adjustable guards and mastering the guard-by-guard blending technique that builds smooth transitions from neckline to cheeks.
- The fade technique graduates hair length from short at the neck to full at the cheeks using incremental guard drops (typically 0.5-1mm steps), combined with upward scooping motions to eliminate harsh lines and create seamless blends.
- Essential prep work—washing to soften hair, trimming to an even baseline length, and defining sharp neck and cheek lines—determines whether your fade succeeds or fails before you even start blending.
- Professional results require the right tools (clippers with guards 1-6, precision trimmers for edges, quality combs) and consistent maintenance every 1-2 weeks to keep the fade sharp and preserve the graduated progression.
What is a Beard Fade?

A beard fade isn’t just another grooming trend—it’s a technique that transforms rough, patchy growth into a sharp, polished look.
The key lies in mastering beard trimming fundamentals—gradual length transitions and careful clipper work create that seamless gradient between your facial hair and skin.
You trim your beard to different lengths, creating a gradual shift from skin to full hair without visible lines or choppy sections. Here’s what you need to know to master this game-changing style.
Definition and Purpose of Beard Fading
A beard fade gradually reduces hair length from your lower cheeks and neck upward, creating a smooth progression into sideburns. You use clipper guards to build a stepped progression that emphasizes your jawline, cheekbones, and facial structure.
This fade technique blends patchy growth patterns into a cohesive gradient, giving you control over beard shaping while drawing attention exactly where you want it.
The fade technique transforms patchy growth into a controlled gradient that sculpts attention exactly where you want it
Benefits of Faded Beard Styles
You gain facial harmony through graduated blending that softens harsh lines and spotlights your cheekbones.
A faded beard suits any hair texture while offering style versatility—low, mid, or high gradients give you three looks with one length.
This beard trimming guide unlocks grooming tips that hide patchiness, maintain beard symmetry, and keep your beard styling sharp without constant reshaping.
Beard Fade Vs. Traditional Beard Trim
Unlike a traditional trim that holds one guard across your entire beard, a fade graduates from short at the neckline to full length at your cheeks—tailoring every angle to your facial structure and aesthetic preferences.
Master these trim techniques to reshape any beard style:
- Guard ranges from 1 to 6 blend hair texture seamlessly
- Taper blades carve precise cheek anchors
- Incremental fading sculpts your jawline
- Beard shaping and trimming erases visible steps
Essential Tools for Fading Your Beard

You can’t fade your beard with just any tool. Professional-grade clippers with guard attachments give you control over length transitions, while precision combs and scissors handle the details that make or break the blend.
Here’s what you need in your kit to execute a clean fade from start to finish.
Clippers and Trimmers With Guards
You can’t fade a beard without the right weapons. Grab a professional clipper with stainless steel blades—they cut through dense growth without tugging or overheating.
Your trimmer settings matter: guards ranging from 1 to 6 give you control over beard blending and fade techniques. Start with your longest guard and work down in one-millimeter increments. That’s how you build smooth transitions without guesswork.
Proper care for your tools, including clipper maintenance advice, ensures every fade is sharp and your equipment lasts longer.
Combs and Brushes for Precision
Precision trimming demands the right accessories. Use a fine-tooth comb with narrow spacing to lift hairs away from your skin, exposing uneven lengths your beard trimmer might miss.
A quality bristle brush directs growth patterns and smooths transitions during hair blending. Choose tools with anti-static nylon—they glide through coarse growth without snagging. Clean both weekly with warm water to maintain bristle quality and guarantee sharp beard styling tips every session.
Beard Scissors and Shaping Tools
Stainless steel scissors with convex edge sharpening cut coarse hair cleanly without tugging. Look for micro-serrated blades—they grip fine strands during trimming.
Ergonomic grips reduce fatigue on longer beard care sessions. Pair your beard trimmer with multi-function shaping tools that include built-in combs for symmetry.
Regular blade sharpening and oiling hinges improve hair texturing control. Clean trimmer accessories weekly to prevent buildup and maintain precision.
For achieving impeccable lines and symmetry, consider using a tool with an all-in-one beard shaping design.
Preparing Your Beard for a Fade

Your fade won’t work if your beard isn’t ready. You need clean, even hair and crisp lines before you touch a guard.
Here’s how to prep your beard the right way.
Washing and Softening The Beard
Start with warm water to open those beard cuticles and prepare your canvas. Choose a sulfate-free gentle shampoo to protect natural oils during beard cleansing. Massage it in for 30 to 60 seconds using effective softening techniques.
Rinse completely until no residue remains. Pat dry with a towel, then apply beard oil or moisturizer while the hair’s still slightly damp for ideal beard care.
Trimming to an Even Starting Length
You can’t build a fade on an uneven foundation. Select a guard that matches your desired beard length—usually a 4 or 5 for density. Keep the hair trimmer flat against your skin and use slow, controlled passes across each section. This beard preparation step sets your baseline for everything that follows.
Master these trimming techniques for perfect guard placement:
- Divide your beard into zones—upper cheek, lower cheek, and chin—to guarantee uniform starting length across all areas
- Maintain constant blade angle throughout each pass to prevent accidental tapering before you’re ready to fade
- Recheck symmetry after each section, accounting for different hair texture and growth patterns on each side
Defining Neck and Cheek Lines
Your neckline and cheek line anchor the entire fade—skip this step and you’ll chase crooked edges all day. Mark your neckline 2 to 3 finger widths above the Adam’s apple, curving naturally with your jaw. Position the cheek line along the cheekbone crease, aligning with the outer iris edge for facial symmetry.
| Line Type | Placement Guide | Shaping Goal |
|---|---|---|
| Neckline | 2-3 fingers above Adam’s apple | Natural curve, clean contrast |
| Cheek Line | Outer iris alignment | Sharp edge, balanced density |
| Sideburn Zone | Follow natural growth | Smooth beard fade progression |
Use a detailing trimmer at 0.5 mm for precision. Check both sides in angled lighting to catch asymmetries before you start blending.
Step-by-Step Guide to Fading Your Beard
Now that your beard is prepped and ready, it’s time to execute the fade. This process breaks down into four key stages that build on each other for a clean, professional result.
Follow each step in order to create a smooth progression from your neckline all the way up to your hairline.
Choosing The Starting Guard Length

Your fade lives or dies by your first guard choice. Lock in the right starting length by considering these four factors:
- Guard length basics — Start with guard 3 or 4 at your longest beard section to create contrast without shock.
- Facial anatomy — Match your jawline shape to avoid harsh lines.
- Hair texture — Coarse beards need longer guards; fine hair takes shorter.
- Fade styles — High fades start longer; low fades begin tighter.
Fading The Neckline and Jawline

Now that you’ve picked your guard position, attack the neckline first. Position two fingers above your Adam’s apple to mark the baseline.
Use guard 1 at the throat, then step up through guards 2, 3, and 4 as you climb toward the jawline. Feather each pass with light, upward strokes to blend the gradation layers smoothly without hard lines.
Blending The Sideburns Into The Beard

Your sideburns connect hair to beard, so lock in that fade symmetry with precision. Start at the ear with a longer guard, then scoop downward with a flicking motion to blend seamlessly. Match the edge transition angle to your jawline contour—usually 45 degrees—to avoid choppy breaks. Adjust for hair texture: coarser beards need softer passes, while denser growth demands lighter strokes for even beard blending.
- Use guard 3 at the sideburn base, stepping down to 1 as you approach the jawline
- Flick the trimmer away from your ear to feather the blend naturally
- Check both sides in the mirror constantly to maintain mirror-image precision
- Finish with a light pass over stray hairs to tighten the entire transition zone
Using Multiple Guard Lengths for a Seamless Transition

Guard length strategy is your blueprint for flawless shading. Start with a 3 or 4 at the fullest section, then drop half a millimeter per inch as you move toward the neck.
Smaller guard jumps—about 0.5 to 1 millimeter—eliminate harsh lines and create smooth beard layering. Use your clippers with deliberate, overlapping passes to blend each zone into the next.
Techniques for a Smooth, Even Fade

Getting the fade right comes down to control and consistency. You need to master a few core techniques that turn rough transitions into smooth blends.
Here’s how to work your clippers like a pro and avoid the amateur mistakes that ruin a good fade.
The Guard-by-Guard Blending Method
Think of this approach as building a staircase from your jawline to your cheek. You’ll master smooth beard fade transitions by working through successive guards:
- Start with your longest guard at the baseline and trim a horizontal section
- Drop one guard size and overlap the previous pass by half an inch
- Repeat until you reach your shortest length near the neckline
Each pass with your beard trimmer refines the blend. Use consistent tension and straight movements with your clippers to prevent visible lines between guards.
Using a Flicking or Scooping Motion
Sweep the guard away from your skin in short passes to nail your fade blending. This flicking technique removes length gradually without harsh edges.
Keep your wrist light and angle the trimmer 10 to 15 degrees upward. Move from chin to cheek with consistent strokes. Drop guard control when pressure creeps up—soft contact preserves your beard’s natural texture and prevents skip marks.
Mirror Checks and Symmetry Tips
Perfect beard balancing lives and dies in your mirror setup. Proper lighting tips and symmetry checks transform guesswork into precision grooming techniques that guarantee a flawless faded beard every session.
Perfect beard balancing lives and dies in your mirror setup. Proper lighting tips and symmetry checks transform guesswork into precision grooming techniques that guarantee a blemish-free faded beard every session.
Fixing Lines or Uneven Spots
Precision beats panic when harsh lines appear on your faded beard. Switch back to the next longer guard and use light, overlapping strokes to soften the edge—slow passes with the blade angled 10 degrees let you blend without overcutting.
For stubborn spots, dampen the area and comb flat to expose uneven texture, then apply controlled scooping motions until the boundary disappears.
Maintaining and Styling Your Faded Beard

Your fade isn’t a one-and-done job. Keep it sharp with consistent upkeep, the right products, and clean edges. Here’s how to maintain control and keep your beard looking deliberate.
Regular Trimming and Shaping
Your fade maintenance won’t hold forever—beard maintenance demands consistent attention. Trim every one to two weeks to preserve the smooth progression from jaw to neck.
Use your clippers to fine-tune the fade control zones, adjusting guard lengths incrementally. Edge refining along cheek and necklines keeps the shape tight.
Master these grooming techniques and shaping techniques, and you’ll command your beard’s evolution instead of chasing it.
Beard Oils and Balms for Health and Hold
Your beard care means nothing if dry skin and brittle hair sabotage the look. Lock in beard hydration with daily oil blends—jojoba and argan mimic natural sebum to fuel beard health and beard growth.
For hair conditioning and skin nourishment, reach for balm textures that layer wax over moisture. Choose your beard oil or beard balm based on these priorities:
- Lightweight absorption without greasy residue
- Fatty acids that seal cuticles and reduce frizz
- Light to medium hold for style retention
- Nutrient delivery to jawline skin post-trim
- Natural ingredients over synthetic fragrances
Master beard care, and your fade stays sharp.
Cleaning Up Edges and Stray Hairs
Even the sharpest fade collapses without crisp boundaries. Define your beard lines by removing stray hair along cheek and neck edges—guardless passes lock in facial symmetry.
Edge trimming anchors the entire blend, separating intentional design from accident. Run your trimmer or razor against the grain where beard meets skin, then check both sides under direct light.
Precise hair blending at the borders elevates your faded beard from amateur to master-level beard trimming techniques.
Top 8 Products for DIY Beard Fades
Your tools determine the quality of your fade. You need clippers that hold a tight guard, trimmers that create sharp lines, and combs that glide through dense growth without snagging.
Here are eight products that deliver professional results at home.
1. Braun Multi Grooming Kit Trimmer
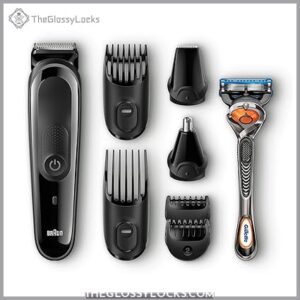
Start with the Braun Multi Grooming Kit MGK3060 if you want guard flexibility. You’ll get 13 precision settings from 0.5mm to 21mm across four combs—enough range to control every fade progression.
The detail trimmer tackles sharp cheek and neck lines without switching tools. It’s fully washable, so cleanup takes seconds under the tap. Automatic voltage means you can groom anywhere.
At 0.78 pounds, it won’t fatigue your hand mid-fade. Attach guards firmly before each pass to maintain consistent height changes.
| Best For | Home users who want a versatile grooming kit with multiple length settings for beard, hair, and body trimming without needing separate devices. |
|---|---|
| Brand | Procter & Gamble |
| Weight | 0.78 Pounds |
| Color | Gray |
| Primary Material | Plastic |
| Waterproof | Yes |
| Power Source | Rechargeable |
| Additional Features |
|
- 13 precision length settings (0.5-21mm) give you control over fades and different hair lengths
- Fully washable design makes cleanup quick and easy under running water
- Includes detail trimmer and ear/nose attachments so you can handle multiple grooming tasks with one kit
- Battery life can decline after a few months of regular use
- Charging takes over 12 hours to reach full power, which is inconvenient
- Replacement parts can get expensive if attachments wear out
2. Gillette Beard Trimmer And Shaver
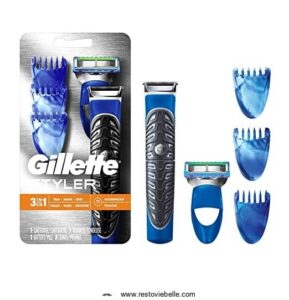
Switch to the King C Gillette Beard Trimmer when you need runtime and waterproof durability. You’ll command 40 length settings for precise fade control across stubble, short, and long styles.
The Braun-engineered blades cut smoothly without pulling, and the centered cutting system delivers even results across your entire beard surface. Battery power gives you 50 minutes of cordless freedom per charge—enough for multiple sessions before you need to plug in.
Rinse the detachable head under the tap after each fade.
| Best For | Men who want a versatile grooming tool that handles trimming, shaving, and edging in the shower or at the sink. |
|---|---|
| Brand | Gillette |
| Weight | 3.52 Ounces |
| Color | Stainless Steel |
| Primary Material | Stainless Steel |
| Waterproof | Yes |
| Power Source | 1 AA Battery |
| Additional Features |
|
- Waterproof design lets you groom in the shower and makes cleanup a breeze
- Three comb attachments give you flexibility for different hair lengths and styles
- Works with all Gillette 5-blade razor refills so you get a close shave when you need it
- Runs on a single AA battery instead of being rechargeable, which can get expensive
- Battery life may run short if you’re doing longer grooming sessions
- May struggle with very thick or coarse hair compared to heavier-duty trimmers
3. co2CREA Trimmer Hard Case Replacement
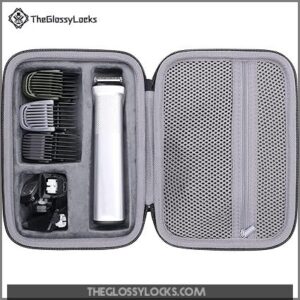
Protect your trimmer investment with the co2CREA Hard EVA Case. You’re securing a shockproof shell that guards against drops, dust, and moisture when you travel or store your multigroom kit between sessions.
The anti-static lining prevents scratches on metal components, while molded compartments lock your MG3750, MG5750, or MG7750 trimmer in place. Toss in guards, brushes, and your charging cable—the organizer accommodates multiple accessories without crushing your blades. The reinforced zipper withstands daily use, and the lightweight carry handle makes grab-and-go simple.
| Best For | Frequent travelers and grooming enthusiasts who need portable, organized protection for their Philips Multigroom trimmer and accessories. |
|---|---|
| Brand | co2CREA |
| Weight | 0.57 Pounds |
| Color | Black |
| Primary Material | Nylon |
| Waterproof | Water-resistant |
| Power Source | N/A |
| Additional Features |
|
- Hard EVA shell provides shockproof, dustproof, and water-resistant protection during travel or storage
- Anti-static lining prevents scratches on blades and metal components while keeping everything secure
- Fits multiple Multigroom Series models (3000/5000/7000) with room for guards, brushes, and charging cables
- Case arrives empty—trimmer and accessories sold separately
- Limited internal organization may require creative packing for smaller attachments
- Won’t accommodate every trimmer model, so double-check compatibility before buying
4. Bevel Cordless Beard Trimmer
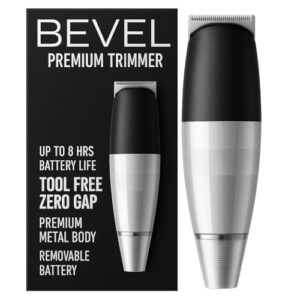
You’re stepping up to professional control with the Bevel Cordless Beard Trimmer. Zero-gap your blade without tools—dial in razor-sharp lines that anchor every fade from cheek to neckline.
The rechargeable battery delivers six hours of uninterrupted power, eliminating mid-session cable wrestling when you’re blending guards from jawline to sideburns. Stainless steel blades slice through coarse hair without tugging, and the ergonomic grip reduces hand fatigue during extended shaping sessions.
This trimmer executes precision edging and flawless blending with the consistency barbershops demand.
| Best For | Barbers and home users who need professional-level precision for detailed beard shaping, clean edge-ups, and maintaining sharp facial hair lines. |
|---|---|
| Brand | Bevel |
| Weight | 1.57 Pounds |
| Color | Silver |
| Primary Material | Plastic |
| Waterproof | No |
| Power Source | Rechargeable |
| Additional Features |
|
- Tool-free zero-gap blade adjustment lets you dial in precision without fumbling with screwdrivers mid-trim
- Six-hour rechargeable battery keeps you cordless through multiple sessions without losing power during heavy use
- Stainless steel blades cut cleanly through coarse hair without pulling or tugging
- Premium price puts it above most consumer-grade trimmers on the market
- Blade can pop off during cleaning if you’re not careful with handling
- Battery strength may drop noticeably when edging or doing extended detail work
5. Kent Fine Tooth Hair Comb
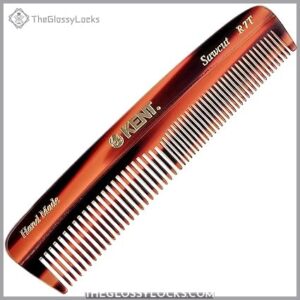
You need surgical control when detailing stubble and mustache edges—grab the Kent Fine Tooth Hair Comb. Hand-polished cellulose acetate teeth glide through short hairs without snagging, while saw-cut rounded tips protect your skin from micro-scratches during close work.
This pocket-sized tool measures 110 mm, making touch-ups easy between full sessions. The fine spacing distributes natural oils evenly and tames flyaways that ruin clean fade lines. Kent’s 200-year heritage delivers barbershop precision you can carry anywhere.
| Best For | Barbers and grooming enthusiasts who need precision control for detailing beards, mustaches, and tight fade work. |
|---|---|
| Brand | KENT |
| Weight | 0.04 Ounces |
| Color | Natural |
| Primary Material | Celluloid/Cellulose Acetate |
| Waterproof | No |
| Power Source | N/A |
| Additional Features |
|
- Hand-polished teeth with rounded edges prevent skin irritation during close detailing work
- Dual-sided design with both fine and wide teeth handles different grooming tasks
- Pocket-sized at 5.1 inches makes it perfect for touch-ups and travel
- Small size might feel awkward if you have larger hands
- Higher price point than standard combs due to handmade construction
- Fine tooth spacing may not work well for thick or curly hair types
6. ZilberHaar Beard Brush
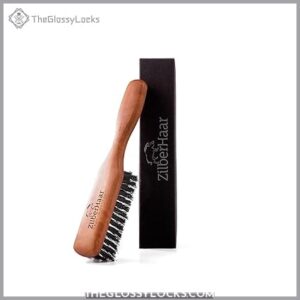
Pre-fade prep demands boar bristle power—lock onto the ZilberHaar Beard Brush. One hundred percent boar bristles distribute natural oils from root to tip, eliminating dry patches that wreck fade transitions. The oiled pearwood handle won’t slip when you’re working product through damp hair before trimming.
German engineering delivers tight bristle density across a six-inch oblong body, reaching deep growth without scratching skin. Stiff and soft variants let you match bristle firmness to your beard thickness. Use this before every fade session to align hairs and expose uneven lengths.
| Best For | Men with medium to long beards who want to distribute oils evenly and maintain healthy growth between fade sessions. |
|---|---|
| Brand | ZilberHaar |
| Weight | Not specified |
| Color | Stiff Brown |
| Primary Material | Boar/Wood |
| Waterproof | No |
| Power Source | N/A |
| Additional Features |
|
- 100% boar bristles effectively spread natural oils and beard products from root to tip
- Solid pearwood handle provides a comfortable, non-slip grip even when working with damp hair
- Available in different bristle stiffness options to match your specific beard thickness
- May be too small for very thick or extremely long beards
- Stiff bristles can cause discomfort on sensitive skin, especially with shorter beards
- Requires regular cleaning to maintain bristle effectiveness and hygiene
7. Andis Slimline Pro Hair Trimmer
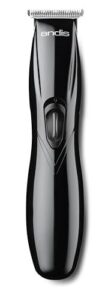
Zero-gap detailing separates amateurs from masters—grab the Andis Slimline Pro Li Trimmer. The T-blade cuts microscopically close to skin for razor-sharp cheek and neck lines that anchor every fade. Ninety minutes of lithium runtime lets you dial in transitions without cord drag interrupting your hand angle.
The pencil-grip body weighs 11.2 ounces, eliminating fatigue during multi-guard blending sessions. Rotary motor power stays consistent from first pass to final cleanup, preventing patchy spots. Four attachment guards and a charging stand keep your setup battle-ready.
| Best For | Barbers and home users who need professional-level precision for fades, edge-ups, and detailed beard work without dealing with cord limitations. |
|---|---|
| Brand | Wahl |
| Weight | 11.2 Ounces |
| Color | Black |
| Primary Material | Plastic/Metal |
| Waterproof | No |
| Power Source | Corded/Cordless |
| Additional Features |
|
- T-blade with zero-gap adjustment delivers extremely close cuts for sharp lines and clean fades
- Cordless design with 90-minute battery life provides unrestricted movement during detailed work
- Lightweight 11.2-ounce body reduces hand fatigue during longer grooming sessions
- Battery may lose charging capacity over extended use according to some user reports
- Only 4 guard sizes included (maxing out at 9mm) limits versatility for longer hair lengths
- Charging stand connection can be finicky for some users
8. Gillette Fusion Proglide Men’s Razor

Cleanup passes demand blade precision—five antifriction ProGlide blades deliver it. FlexBall technology pivots across jawline curves and chin angles, maintaining skin contact where clippers leave off. The enhanced lubrastrip reduces irritation during neck shaves that define your fade’s lower boundary.
Flip the cartridge to access the precision trimmer for sideburn detailing and mustache edges. Each refill manages a month of maintenance shaves, keeping cheek lines crisp between full fade sessions. Compatible with all Fusion handles, ProGlide refills lock into your existing setup without adapter hassle.
| Best For | Men who maintain fades or detailed facial hair and need a reliable razor for cleanup passes, neck shaves, and precision edging between barber visits. |
|---|---|
| Brand | Gillette |
| Weight | 1.76 Ounces |
| Color | Not specified |
| Primary Material | Metal/Plastic |
| Waterproof | Yes |
| Power Source | N/A |
| Additional Features |
|
- FlexBall technology follows facial contours for consistent contact on tricky areas like the jawline and neck
- Precision trimmer on the back handles sideburns, mustache lines, and fade boundaries without switching tools
- Five anti-friction blades with lubrastrip reduce irritation during frequent touch-ups on sensitive skin
- May arrive without original packaging or protective case
- Blade longevity varies by user, so heavy shavers might replace cartridges more often than the advertised monthly timeline
- Some users report performance decline over extended use
Frequently Asked Questions (FAQs)
How can I fade my beard at home?
Fading your beard at home isn’t rocket science—it just takes the right clippers, a steady hand, and a guard-by-guard approach. Start long, blend down gradually, and check symmetry obsessively.
Should I fade my beard wet or dry?
Dry cutting shows how your beard look will actually look after styling, letting you catch uneven spots and blend transitions more accurately.
Wet hair clumps together, making precise fades harder to gauge.
How do you fade a beard?
Start with your longest guard at the neckline. Move upward in one-inch sections, dropping to a shorter guard each time. Blend the sideburns last, creating smooth transitions between every length.
Should a beard be faded?
Not always. A beard fade works best when you shave your head or wear a short hairstyle. It creates a clean blend from scalp to jawline, making your entire look flow together seamlessly.
How do you maintain a faded beard?
Keeping your fade sharp takes consistency. Trim every one to two weeks, apply beard oil daily, and use balm for shape. Clean up edges as needed and exfoliate underneath regularly.
Can a barber fade a beard?
Yes. Barbers fade beards using clippers, guards, and blending techniques to create smooth transitions from sideburns to jawline.
They control length precisely through vertical motions and feathering methods that eliminate harsh lines.
How can I fade my beard easily?
The secret lies in guard discipline. Begin with your longest guard, then step down gradually—each pass shortens by one setting.
Use upward flicking motions to soften transitions and erase harsh lines.
How can I fade my beard color?
Dye your beard gradually using semi-permanent color one shade lighter than your goal. Apply it in sections, leaving roots darker and tips lighter.
Rinse after ten minutes for a natural gradient effect.
How long does your beard need to be to fade it?
Think of your beard canvas like a canvas—you need enough to work with.
A fade usually starts around 0 to 5 centimeters, giving you the length needed for smooth blending between guard levels.
How can I temporarily darken my beard?
Temporary beard dyes wash out in 24 to 48 hours without long-term staining.
Color sprays deliver quick coverage for one-day use.
Tint glazes add subtle shade while conditioning hairs for up to two weeks.
Conclusion
Your barber’s medieval guild monopoly on sharp fades ends today. Once you’ve mastered how to fade your own beard, you’re not just saving money—you’re taking ownership of your look.
Lock down your guard progression, trust the upward scooping motion, and stop second-guessing yourself mid-blend. Your bathroom mirror becomes your barbershop. Your schedule dictates the appointment. And your standards define the result.
That’s the difference between asking permission and taking control.